動畫 CSS3 照片堆棧
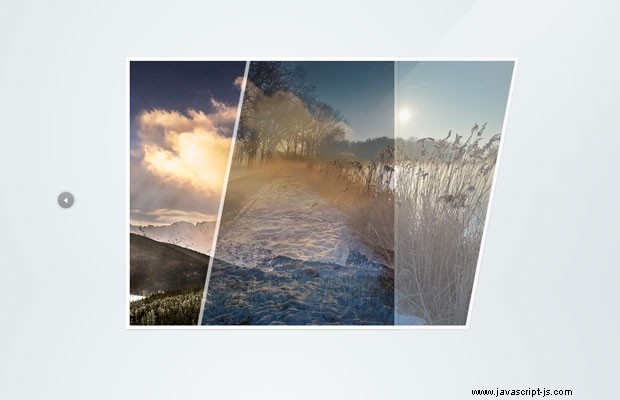
在本教程中,我們將構建一個動畫照片堆棧,它將使用各種花哨的效果在一組圖像之間進行過渡。效果完全使用 CSS3 實現,這意味著它們可以在現代瀏覽器和移動設備上流暢運行。我們還將使照片堆棧自動前進,因此您可以將其用作幻燈片。
HTML
與往常一樣,第一步是展示示例的標記。我們從一個常規的 HTML5 文檔開始,其中包含許多 CSS/JS 文件:
index.html
<!DOCTYPE html>
<html>
<head>
    <meta charset="utf-8" />

    <title>Animated CSS3 Photo Stack | Tutorialzine Demo</title>

    <!-- CSS Includes -->
    <link href="assets/css/style.css" rel="stylesheet" />
    <link href="assets/css/animate.css" rel="stylesheet" />

</head>
<body>

    <ul id="photos">
        <li><a href="http://www.flickr.com/photos/brockwhittaker/8500935165/"
        style="background-image:url(...)">Landscape 5</a></li>
        <!-- More photos here -->
    </ul>

    <a href="#" class="arrow previous"></a>
    <a href="#" class="arrow next"></a>

    <!-- Libraries -->
    <script src="https://ajax.googleapis.com/ajax/libs/jquery/1.9.1/jquery.min.js"></script>
    <script src="assets/js/script.js"></script>

</body>
</html>
#照片 UL 持有我們將製作動畫的照片。對於每張照片,我定義了一個 LI 項目,其中包含一個錨元素。圖像被設置為鏈接的背景圖像屬性。正如您將在 CSS 部分中看到的,我使用 background-size 屬性來強製圖像覆蓋鏈接的整個寬度和高度。添加更多照片時,請記住,由於它們是絕對定位的,它們會以相反的順序顯示 (最後一張照片將在頂部)。
在文檔的開頭部分,我包含了我們的主要樣式表和 animate.css——這個庫為我們提供了那些美妙的 CSS3 動畫。在結束 body 標記之前,我們有 jQuery 庫和 script.js,我們將在下面討論。
JavaScript
要觸發動畫庫提供給我們的效果,我們必須為具有動畫名稱的元素分配一個類名。動畫結束後,我們還必須將動畫照片移動到堆棧底部,以便我們可以顯示下一張圖像。為了使這個例子有效,我們需要做以下事情:
- 首先,我們將監聽箭頭上的點擊;
- 然後,當點擊下一個箭頭時,我們將觸發一個隨機選擇的 CSS 動畫,通過為堆棧的最頂部元素分配一個類名(由於定位,這實際上是最後一個 LI 項);
- 一秒鐘後,當動畫完成時,我們將使用 prependTo jQuery 方法將動畫元素移動到其他 LI 之前(這會將其推到堆棧的底部)並刪除我們在上面分配的類。
- 對於上一個箭頭,我們將執行幾乎相同的操作,唯一的區別是我們會在觸發動畫之前將最後一張圖片放在堆棧頂部。
此外,我還將像我們在本文中所做的那樣添加自動前進功能。這會將示例變成一個很酷的幻燈片,當您單擊其中一個箭頭時會停止自動轉換。
下面是代碼的樣子:
assets/js/script.js
$(function() {

    var exits = ['fadeOut', 'fadeOutDown', 'fadeOutUpBig', 'bounceOut', 'bounceOutDown',
        'hinge', 'bounceOutUp', 'bounceOutLeft', 'rotateOut', 'rotateOutUpLeft',
        'lightSpeedOut', 'rollOut'];

    var entrances = ['fadeIn', 'fadeInDown', 'fadeInRight', 'bounceIn', 'bounceInRight',
            'rotateIn', 'rotateInDownLeft', 'lightSpeedIn', 'rollIn', 'bounceInDown'];

    var photos = $('#photos'),
        ignoreClicks = false;

    $('.arrow').click(function(e, simulated){
        if(ignoreClicks){

            // If clicks on the arrows should be ignored,
            // stop the event from triggering the rest
            // of the handlers

            e.stopImmediatePropagation();
            return false;
        }

        // Otherwise allow this click to proceed,
        // but raise the ignoreClicks flag

        ignoreClicks = true;

        if(!simulated){
            // Once the user clicks on the arrows,
            // stop the automatic slideshow
            clearInterval(slideshow);
        }
    });

    // Listen for clicks on the next arrow
    $('.arrow.next').click(function(e){

        e.preventDefault();

        // The topmost element
        var elem = $('#photos li:last');

        // Apply a random exit animation
        elem.addClass('animated')
            .addClass( exits[Math.floor(exits.length*Math.random())] );

        setTimeout(function(){

            // Reset the classes
            elem.attr('class','').prependTo(photos);

            // The animation is complate!
            // Allow clicks again:
            ignoreClicks = false;

        },1000);
    });

    // Listen for clicks on the previous arrow
    $('.arrow.previous').click(function(e){

        e.preventDefault();

        // The bottom-most element
        var elem = $('#photos li:first');

        // Move the photo to the top, and
        // apply a random entrance animation

        elem.appendTo(photos)
            .addClass('animated')
            .addClass( entrances[Math.floor(entrances.length*Math.random())] );

        setTimeout(function(){

            // Remove the classess
            elem.attr('class','');

            // The animation is complate!
            // Allow clicks again:
            ignoreClicks = false;

        },1000);
    });

    // Start an automatic slideshow
    var slideshow = setInterval(function(){

        // Simulate a click every 1.5 seconds
        $('.arrow.next').trigger('click',[true]);

    }, 1500);

});
animate.css 提供的所有效果我都沒有用過,但是你可以在它的 github 頁面上找到完整的列表。
我們剩下要做的就是寫一些 CSS 樣式。
CSS
我不會在這裡展示所有樣式,只展示那些直接負責照片堆棧的樣式:
assets/css/styles.css
#photos{
    margin:0 auto;
    padding-top:120px;
    width:450px;
    position:relative;
}

#photos li{
    position:absolute;
    width:450px;
    height:450px;
    overflow:hidden;
    background-color:#fff;
    box-shadow: 1px 1px 1px #ccc;
    z-index:10;

    -webkit-animation-duration: 1s;
    -moz-animation-duration: 1s;
    animation-duration: 1s;
}

#photos li a{
    position:absolute;
    top:6px;
    left:6px;
    right:6px;
    bottom:6px;
    background-size: cover;
    text-indent:-9999px;
    overflow:hidden;
}
要更改動畫的持續時間,您必須提供 animation-duration 屬性。在上面的片段中,我將其設置為 1 秒。更多可以設置的屬性有animation-delay表示動畫觸發前的延遲,animation-iteration-count表示重複次數。
完成!
有了這個,我們的動畫照片堆棧效果就完成了!您可以將此示例用作即使在移動設備上也能流暢運行的輕量級幻燈片。