帶有 CSS3 過渡的平滑對角淡入淡出畫廊
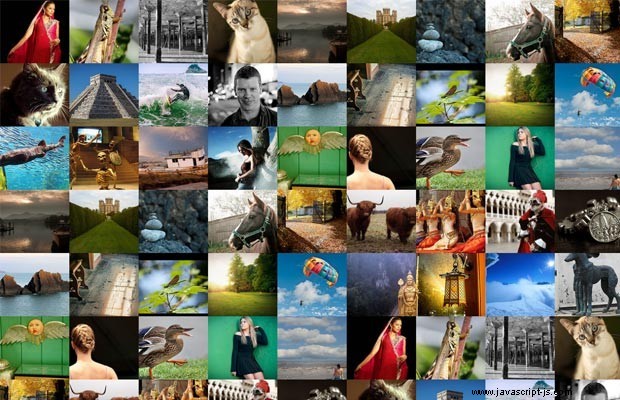
在本教程中,我們將創建一個具有平滑對角漸變效果的畫廊,由 css3 過渡提供支持。它將掃描服務器上包含照片的文件夾,並將它們顯示在跨越整個瀏覽器窗口的網格中。添加新照片就像將兩個文件(常規圖像和縮略圖,最好是 150x150 像素)複製到圖庫文件夾一樣簡單。
支持 CSS3 的瀏覽器將顯示平滑的動畫對角淡入淡出效果,而舊版瀏覽器將退回到更簡單但仍可完美使用的畫廊的非動畫版本。
HTML
像往常一樣,我們在開始新項目時要做的第一件事就是編寫 HTML。
index.html
<!DOCTYPE html>
<html>

    <head>
        <meta charset="utf-8"/>
        <title>Smooth Diagonal Fade Gallery with CSS3 Transitions</title>

        <!-- The Swipebox plugin -->
        <link href="assets/swipebox/swipebox.css" rel="stylesheet" />

        <!-- The main CSS file -->
        <link href="assets/css/style.css" rel="stylesheet" />

        <!--[if lt IE 9]>
            <script src="http://html5shiv.googlecode.com/svn/trunk/html5.js"></script>
        <![endif]-->
    </head>

    <body>

        <div id="loading"></div>

        <div id="gallery"></div>

        <!-- JavaScript Includes -->
        <script src="https://ajax.googleapis.com/ajax/libs/jquery/1.10.0/jquery.min.js"></script>
        <script src="assets/swipebox/jquery.swipebox.min.js"></script>
        <script src="assets/js/jquery.loadImage.js"></script>
        <script src="assets/js/script.js"></script>

    </body>
</html>
圖庫依賴於 jQuery 庫,我在結束 body 標記之前包含了它。我還添加了一個很棒的小燈箱插件,稱為 Swipebox,但您可以輕鬆地將其替換為您選擇的燈箱。兩個主要的 div 是 #loading 和 #gallery .第一個包含加載 gif,第二個包含畫廊照片。 #畫廊 div 設置為 position:fixed 所以它佔據了頁面的整個寬度和高度。照片本身的標記同樣簡單:
<a href="assets/photos/large/34.jpg" class="swipebox static"
    style="width:148px;height:129px;background-image:url(assets/photos/thumbs/34.jpg)">
</a>
圖庫中的照片都是 150x150 像素,這意味著我們幾乎永遠不會完全適合整個頁面,除非我們稍微調整它們的大小。這正是上面照片所發生的情況,這就是為什麼它的樣式屬性中有一個寬度和高度值。您將在 JS 部分看到我們如何計算它。
用 PHP 掃描照片
照片包含在服務器上的兩個文件夾中 - assets/photos/thumbs/ 縮略圖和 assets/photos/large/ 一個用於全尺寸。使用 PHP,我們將掃描文件夾並輸出帶有文件名的 JSON。您也可以從數據庫中返回圖像,但您必須保持相同的結構。這是腳本:
加載.php
// Scan all the photos in the folder
$files = glob('assets/photos/large/*.jpg');

$data = array();
foreach($files as $f){
    $data[] = array(
        'thumb' => str_replace('large', 'thumbs', $f),
        'large' => $f
    );
}

// Duplicate the photos a few times, so that we have what to paginate in the demo.
// You most certainly wouldn't want to do this with your real photos.
// $data = array_merge($data, $data);
// $data = array_merge($data, $data);
// $data = array_merge($data, $data);

header('Content-type: application/json');

echo json_encode(array(
    'data' => $data,
));
將新照片添加到圖庫就像將圖像及其縮略圖複製到正確的文件夾一樣簡單(兩個文件應該具有相同的名稱!)。我已經復制了幾次照片,所以我們有一個更大的池可以在畫廊中展示,但你可能不想用你的真實照片這樣做。
現在我們已經有了 JSON,讓我們編寫一些 JavaScript!
JavaScript
這是我們需要做的:
- 首先,我們將發出一個 AJAX GET 請求,以從 PHP 腳本中獲取磁盤上的所有照片。
- 然後我們將根據窗口的尺寸計算在頁面上顯示的照片數量及其大小,以使它們完美契合。
- 我們將使用一個使用 jQuery deferreds 的預加載器腳本來預加載將在當前頁面上顯示的所有圖像。同時,我們將顯示#loading div。
- 加載完所有內容後,我們將為照片生成標記並將它們添加到#gallery 元素中。然後我們將觸發對角漸變動畫並初始化 Swipebox 庫。
- 當用戶點擊箭頭時,我們將重複第 3 步和第 4 步(帶有左上角或右下角的動畫)。
代碼太長,我無法一口氣展示,所以我將分部分展示給您。首先,這是我們將遵循的總體結構:
assets/js/script.js
$(function(){

    // Global variables that hold state

    var page = 0,
        per_page = 100,
        photo_default_size = 150,
        picture_width = photo_default_size,
        picture_height = photo_default_size,
        max_w_photos, max_h_photos
        data = [];

    // Global variables that cache selectors

    var win = $(window),
        loading = $('#loading'),
        gallery = $('#gallery');

    gallery.on('data-ready window-resized page-turned', function(event, direction){

        // Here we will have the JavaScript that preloads the images
        // and adds them to the gallery

    });

    // Fetch all the available images with
    // a GET AJAX request on load

    $.get('load.php', function(response){

        // response.data holds the photos

        data = response.data;

        // Trigger our custom data-ready event
        gallery.trigger('data-ready');

    });

    gallery.on('loading',function(){
        // show the preloader
        loading.show();
    });

    gallery.on('loading-finished',function(){
        // hide the preloader
        loading.hide();
    });

    gallery.on('click', '.next', function(){
        page++;
        gallery.trigger('page-turned',['br']);
    });

    gallery.on('click', '.prev', function(){
        page--;
        gallery.trigger('page-turned',['tl']);
    });

    win.on('resize', function(e){

        // Here we will monitor the resizing of the window
        // and will recalculate how many pictures we can show
        // at once and what their sizes should be so they fit perfectly

    }).resize();

    /* Animation functions */

    function show_photos_static(){

        // This function will show the images without any animations
    }

    function show_photos_with_animation_tl(){

        // This one will animate the images from the top-left

    }

    function show_photos_with_animation_br(){

        // This one will animate the images from the bottom-right

    }

    /* Helper functions */

    function get_per_page(){

        // Here we will calculate how many pictures
        // should be shown on current page

    }

    function get_page_start(p){

        // This function will tell us which is the first
        // photo that we will have to show on the given page

    }

    function is_next_page(){

        // Should we show the next arrow?

    }

    function is_prev_page(){

        // Should we show the previous arrow?

    }

});
一些函數定義留空,但您可以在頁面下方看到它們。第一組變量定義將保存畫廊的狀態 - 尺寸、圖片數組、當前頁面等,這允許邏輯和數據之間更清晰的分離。我們將使用自定義事件來更好地組織代碼(通過監聽和触發任意命名事件)。您可以將這些事件偵聽器視為對象的方法,將靠近開頭的變量視為其屬性。
閱讀完上面片段中的所有註釋後,繼續第一個事件監聽器,它會根據當前頁面輸出圖像數組的相關切片:
gallery.on('data-ready window-resized page-turned', function(event, direction){

    var cache = [],
        deferreds = [];

    gallery.trigger('loading');

    // The photos that we should be showing on the new screen
    var set = data.slice(get_page_start(), get_page_start() + get_per_page());

    $.each(set, function(){

        // Create a deferred for each image, so
        // we know when they are all loaded
        deferreds.push($.loadImage(this.thumb));

        // build the cache
        cache.push('<a href="' + this.large + '" class="swipebox"' +
                    'style="width:' + picture_width + 'px;height:' + picture_height + 'px;background-image:url(' + this.thumb + ')">'+
                    '</a>');
    });

    if(is_prev_page()){
        cache.unshift('<a class="prev" style="width:' + picture_width + 'px;height:' + picture_height + 'px;"></a>');
    }

    if(is_next_page()){
        cache.push('<a class="next" style="width:' + picture_width + 'px;height:' + picture_height + 'px;"></a>');
    }

    if(!cache.length){
        // There aren't any images
        return false;
    }

    // Call the $.when() function using apply, so that
    // the deferreds array is passed as individual arguments.
    // $.when(arg1, arg2) is the same as $.when.apply($, [arg1, arg2])

    $.when.apply($, deferreds).always(function(){

        // All images have been loaded!

        if(event.type == 'window-resized'){

            // No need to animate the photos
            // if this is a resize event

            gallery.html(cache.join(''));
            show_photos_static();

            // Re-initialize the swipebox
            $('#gallery .swipebox').swipebox();

        }
        else{

            // Create a fade out effect
            gallery.fadeOut(function(){

                // Add the photos to the gallery
                gallery.html(cache.join(''));

                if(event.type == 'page-turned' && direction == 'br'){
                    show_photos_with_animation_br();
                }
                else{
                    show_photos_with_animation_tl();
                }

                // Re-initialize the swipebox
                $('#gallery .swipebox').swipebox();

                gallery.show();

            });
        }

        gallery.trigger('loading-finished');
    });

});
雖然圖片已添加到 #gallery div 在單個操作中,它們被設置為 opacity:0 與CSS。這為動畫功能奠定了基礎。其中第一個顯示沒有動畫的照片,後兩個從左上角或右下角以波浪的形式對它們進行動畫處理。動畫完全基於 CSS,當我們使用 jQuery 為圖像分配類名時觸發。
function show_photos_static(){

    // Show the images without any animations
    gallery.find('a').addClass('static');

}

function show_photos_with_animation_tl(){

    // Animate the images from the top-left

    var photos = gallery.find('a');

    for(var i=0; i<max_w_photos + max_h_photos; i++){

        var j = i;

        // Loop through all the lines
        for(var l = 0; l < max_h_photos; l++){

            // If the photo is not of the current line, stop.
            if(j < l*max_w_photos) break;

            // Schedule a timeout. It is wrapped in an anonymous
            // function to preserve the value of the j variable

            (function(j){
                setTimeout(function(){
                    photos.eq(j).addClass('show');
                }, i*50);
            })(j);

            // Increment the counter so it points to the photo
            // to the left on the line below

            j += max_w_photos - 1;
        }
    }
}

function show_photos_with_animation_br(){

    // Animate the images from the bottom-right

    var photos = gallery.find('a');

    for(var i=0; i<max_w_photos + max_h_photos; i++){

        var j = per_page - i;

        // Loop through all the lines
        for(var l = max_h_photos-1; l >= 0; l--){

            // If the photo is not of the current line, stop.
            if(j > (l+1)*max_w_photos-1) break;

            // Schedule a timeout. It is wrapped in an anonymous
            // function to preserve the value of the j variable

            (function(j){
                setTimeout(function(){
                    photos.eq(j).addClass('show');
                }, i*50);
            })(j);

            // Decrement the counter so it points to the photo
            // to the right on the line above

            j -= max_w_photos - 1;
        }
    }
}
接下來是偵聽窗口調整大小事件的函數。每當調整瀏覽器窗口大小或更改設備方向時,都會出現這種情況。在這個函數中,我們將計算我們可以在屏幕上放多少張照片,以及它們的確切尺寸應該是多少才能完美貼合。
win.on('resize', function(e){

    var width = win.width(),
        height = win.height(),
        gallery_width, gallery_height,
        difference;

    // How many photos can we fit on one line?
    max_w_photos = Math.ceil(width/photo_default_size);

    // Difference holds how much we should shrink each of the photos
    difference = (max_w_photos * photo_default_size - width) / max_w_photos;

    // Set the global width variable of the pictures.
    picture_width = Math.ceil(photo_default_size - difference);

    // Set the gallery width
    gallery_width = max_w_photos * picture_width;

    // Let's do the same with the height:

    max_h_photos = Math.ceil(height/photo_default_size);
    difference = (max_h_photos * photo_default_size - height) / max_h_photos;
    picture_height = Math.ceil(photo_default_size - difference);
    gallery_height = max_h_photos * picture_height;

    // How many photos to show per page?
    per_page = max_w_photos*max_h_photos;

    // Resize the gallery holder
    gallery.width(gallery_width).height(gallery_height);

    gallery.trigger('window-resized');

}).resize();
最後一行導致函數在定義後立即被觸發,這意味著我們從一開始就有正確的值。
以下輔助函數抽像出一些最常用的計算:
function get_per_page(){

    // How many pictures should be shown on current page

    // The first page has only one arrow,
    // so we decrease the per_page argument with 1
    if(page == 0){
        return per_page - 1;
    }

    // Is this the last page?
    if(get_page_start() + per_page - 1 > data.length - 1){
        // It also has 1 arrow.
        return per_page - 1;
    }

    // The other pages have two arrows.
    return per_page - 2;
}

function get_page_start(p){

    // Which position holds the first photo
    // that is to be shown on the give page

    if(p === undefined){
        p = page;
    }

    if(p == 0){
        return 0;
    }

    // (per_page - 2) because the arrows take up two places for photos
    // + 1 at the end because the first page has only a next arrow.

    return (per_page - 2)*p + 1;
}

function is_next_page(){

    // Should we show the next arrow?

    return data.length > get_page_start(page + 1);
}

function is_prev_page(){

    // Should we show the previous arrow?

    return page > 0;
}
它們可能只有幾行長並且只使用一兩次,但它們對使我們的代碼更具可讀性有很大幫助。

CSS
最後,這是 CSS 代碼。默認情況下,照片的不透明度為零,並對其應用了 0.8 的比例變換。它們還具有轉換屬性集,這將導致屬性的每次更改都被動畫化。 .show 由動畫函數添加的類,提高了元素的不透明度和比例,由瀏覽器自動動畫化。
assets/css/styles.css
#gallery{
    position:fixed;
    top:0;
    left:0;
    width:100%;
    height:100%;
}

#gallery a{
    opacity:0;
    float:left;
    background-size:cover;
    background-position: center center;

    -webkit-transform:scale(0.8);
    -moz-transform:scale(0.8);
    transform:scale(0.8);

    -webkit-transition:0.4s;
    -moz-transition:0.4s;
    transition:0.4s;
}

#gallery a.static:hover,
#gallery a.show:hover{
    opacity:0.9 !important;
}

#gallery a.static{
    opacity:1;

    -webkit-transform:none;
    -moz-transform:none;
    transform:none;

    -webkit-transition:opacity 0.4s;
    -moz-transition:opacity 0.4s;
    transition:opacity 0.4s;
}

#gallery a.next,
#gallery a.prev{
    background-color:#333;
    cursor:pointer;
}

#gallery a.next{
    background-image:url('../img/arrow_next.jpg');
}

#gallery a.prev{
    background-image:url('../img/arrow_prev.jpg');
}

#gallery a.show{
    opacity:1;

    -webkit-transform:scale(1);
    -moz-transform:scale(1);
    transform:scale(1);
}
.static 類由 show_photos_static() 設置 功能,它會禁用所有動畫(不透明度除外,因為我們希望懸停效果仍然是平滑的)並立即顯示照片(否則在每次調整大小時,您都會看到對角線褪色)。您可以在教程文件中看到此文件的其餘部分,您可以從頁面頂部附近的按鈕下載。
我們完成了!
我希望你喜歡這個小實驗,並為這個流暢的動畫畫廊找到很多用途。