創建一個 PHP 和 CSS3 支持的 About 頁面
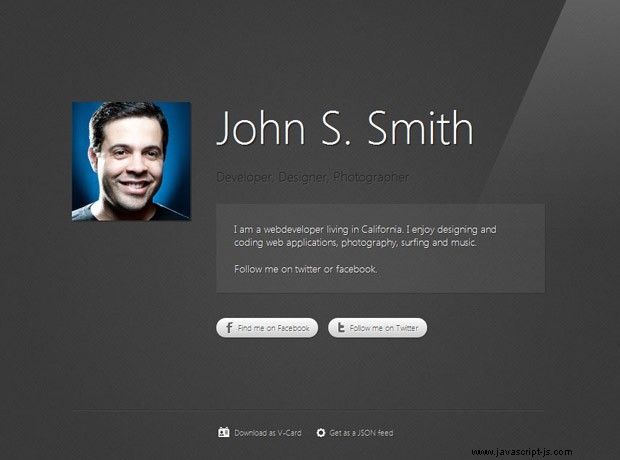
在本教程中,我們將創建一個由 PHP、HTML5 和 CSS3 提供支持的簡單 about 頁面。它將向您的訪問者顯示您的聯繫信息,並可選擇將其下載為 vCard(用於將其導入第三方應用程序)。
您可以將今天的示例用作即將到來的個人網站的佔位符,或用作實際的關於頁面。
HTML
與往常一樣,第一步是編寫為我們的示例提供支持的 HTML 標記。這是一個簡單的頁面,其主要目的是在語義上呈現我們的聯繫方式。這將需要添加適當的元標記並使用 hCard 微格式在頁面中嵌入數據。
index.php
<!DOCTYPE html>
<html>
    <head>
        <meta charset="utf-8" />
        <meta name="description" content="Online info page of <?php echo $profile->fullName()?>. Learn more about me and download a vCard." />

        <title>Creating a PHP and CSS Powered About Page  | Tutorialzine Demo</title>

        <!-- Our CSS stylesheet file -->
        <link rel="stylesheet" href="assets/css/styles.css" />

        <!--[if lt IE 9]>
          <script src="http://html5shiv.googlecode.com/svn/trunk/html5.js"></script>
        <![endif]-->
    </head>

    <body>

        <section id="infoPage">

            <img src="<?php echo $profile->photoURL()?>" alt="<?php echo $profile->fullName()?>" width="164" height="164" />

            <header>
                <h1><?php echo $profile->fullName()?></h1>
                <h2><?php echo $profile->tags()?></h2>
            </header>

            <p class="description"><?php echo nl2br($profile->description())?></p>

            <a href="<?php echo $profile->facebook()?>" class="grayButton facebook">Find me on Facebook</a>
            <a href="<?php echo $profile->twitter()?>" class="grayButton twitter">Follow me on Twitter</a>

            <ul class="vcard">
                <li class="fn"><?php echo $profile->fullName()?></li>
                <li class="org"><?php echo $profile->company()?></li>
                <li class="tel"><?php echo $profile->cellphone()?></li>
                <li><a class="url" href="<?php echo $profile->website()?>"><?php echo $profile->website()?></a></li>
            </ul>

        </section>

        <section id="links">
            <a href="?vcard" class="vcard">Download as V-Card</a>
            <a href="?json" class="json">Get as a JSON feed</a>
            <p>In this tutorial: <a href="http://www.flickr.com/photos/levycarneiro/4144428707/">Self Portrait</a> by <a href="http://www.flickr.com/photos/levycarneiro/">Levy Carneiro Jr</a></p>
        </section>

    </body>
</html>
$profile 您在上面看到的變量,包含我們稍後將編寫的 AboutPage PHP 類的對象。它保存了我們的聯繫方式,並提供了許多有用的方法來生成 JSON 和 vCard 文件。
如上所述,我們使用 hCard 微格式在頁面中嵌入聯繫方式。這是一個簡單的標準,我們使用常規 HTML 元素的類名來指定數據,搜索引擎很容易識別。 hCard 包含有關我們的全名、組織、電話和主頁的信息:
<ul class="vcard">
    <li class="fn"><?php echo $profile->fullName()?></li>
    <li class="org"><?php echo $profile->company()?></li>
    <li class="tel"><?php echo $profile->cellphone()?></li>
    <li><a class="url" href="<?php echo $profile->website()?>"><?php echo $profile->website()?></a></li>
</ul>
您還可以選擇指定家庭/工作地址和其他類型的有用信息。

PHP
使用服務器端語言的要點之一是我們可以讓頁面的某些方面動態生成。這讓我們不必手動更新頁面的各個部分。
對於我們的 about 頁面,我們有一個簡單的配置文件,其中包含頁面使用的數據。相同的資源用於生成 vCard 文件和 JSON 提要。
config.php
$info = array(
    'firstName'     => 'John',
    'middleName'    => 'S.',
    'lastName'      => 'Smith',
    'photoURL'      => 'assets/img/photo.jpg',
    'birthDay'      => strtotime('22-03-1983'),
    'city'          => 'MyCity',
    'country'       => 'United States',
    'street'        => 'My Street 21',
    'zip'           => '12345',
    'company'       => 'Google Inc',
    'website'       => 'https://tutorialzine.com/',
    'email'         => '[email protected]',
    'cellphone'     => '12345678910',
    'description'   => "I am a webdeveloper living in ...",
    'tags'          => 'Developer, Designer, Photographer',
    'facebook'      => 'http://www.facebook.com/',
    'twitter'       => 'http://twitter.com/Tutorialzine'
); 並非所有這些屬性都顯示在關於頁面上。其中一些(如地址字段 , 公司 , 電子郵件 和生日 ) 僅在用戶將配置文件下載為 vCard 時才可用 或作為 JSON 文件 .您還可以向該數組添加更多屬性(完整列表在 config.php 中作為註釋給出 文件)。
所以現在我們已經提供了我們想要的所有信息,我們需要構建一個類來處理呈現完整關於頁面的任務。
aboutPage.class.php
class AboutPage{
    private $info = array();

    // The constructor:

    public function __construct(array $info){
        $this->info = $info;
    }

    // A helper method that assembles the person's full name:

    public function fullName(){
        return $this->firstName().' '.$this->middleName().' '.$this->lastName();
    }

    // Using PHP's Magick __call method to make the
    // properties of $this->info available as method calls:

    public function __call($method,$args = array()){

        if(!array_key_exists($method,$this->info)){
            throw new Exception('Such a method does not exist!');
        }

        if(!empty($args)){
            $this->info[$method] = $args[0];
        }
        else{
            return $this->info[$method];
        }
    }

    // This method generates a vcard from the $info
    // array, using the third party vCard class:

    public function downloadVcard(){

        $vcard = new vCard;

        $methodCalls = array();

        // Translating the properties of $info to method calls
        // understandable by the third party vCard class:

        $propertyMap = array(
            'firstName'     => 'setFirstName',
            'middleName'    => 'setMiddleName',
            'lastName'      => 'setLastName',
            'birthDay'      => 'setBirthday',
            'city'          => 'setHomeCity',
            'zip'           => 'setHomeZIP',
            'country'       => 'setHomeCountry',
            'website'       => 'setURLWork',
            'email'         => 'setEMail',
            'description'   => 'setNote',
            'cellphone'     => 'setCellphone');

        // Looping though the properties in $info:

        foreach($this->info as $k=>$v){

            // Mapping a property of the array to a recognized method:

            if($propertyMap[$k]){
                $methodCalls[$propertyMap[$k]] = $v;
            }
            else {

                // If it does not exist, transform it to setPropertyName,
                // which might be recognized by the vCard class:

                $methodCalls['set'.ucfirst($k)] = $v;
            }
        }

        // Attempt to call these methods:

        foreach($methodCalls as $k=>$v){
            if(method_exists($vcard,$k)){
                $vcard->$k($v);
            }
            else error_log('Invalid property in your $info array: '.$k);
        }

        // Serving the vcard with a x-vcard Mime type:

        header('Content-Type: text/x-vcard; charset=utf-8');
        header('Content-Disposition: attachment; filename="'.$this->fullName().'.vcf"');
        echo $vcard->generateCardOutput();
    }

    // This method generates and serves a JSON object from the data:

    public function generateJSON(){
        header('Content-Type: application/json');
        header('Content-Disposition: attachment; filename="'.$this->fullName().'.json"');

        // If you wish to allow cross-domain AJAX requests, uncomment the following line:
        // header('Access-Control-Allow-Origin: *');

        echo json_encode($this->info);
    }
}
從下面的代碼可以看出,我們使用第三方開源類來實際生成 vCard 文件 (vcf)。由於這個類使用它自己的一組方法調用,我們需要將我們的配置文件轉換成它可以理解的東西。我們正在使用 $propertyMap 將 $info 數組中的屬性映射到需要在 vCard 對像上執行的方法調用的名稱的數組。我們配置完$vcard 對象,我們設置內容頭並調用對象的generateCardOutput() 方法。這會導致瀏覽器顯示文件下載對話框。
我們在 generateJSON 方法中做的基本上是一樣的,除了我們沒有使用第三方 PHP 類,而是 json_encode() 內置。我們使用 application/json 內容類型提供 JSON 文件。如果您希望能夠通過 AJAX 從其他域訪問您的數據,也可以取消註釋訪問控制標頭。
現在讓我們看看我們如何在 index.php 中使用這個類:
index.php
require 'includes/config.php';
require 'includes/aboutPage.class.php';
require 'includes/vcard.class.php';

$profile = new AboutPage($info);

if(array_key_exists('json',$_GET)){
    $profile->generateJSON();
    exit;
}
else if(array_key_exists('vcard',$_GET)){
    $profile->downloadVcard();
    exit;
}
您在上面看到的片段位於 index.php 的頂部 ,在任何 HTML 之前,因為我們必須能夠設置標題。包含適當的 PHP 源文件後,我們創建一個新的 AboutPage 以配置數組作為參數的對象。在此之後我們檢查請求的 URL 是否是 ?json 或 ?vcard ,並提供適當的數據。否則顯示常規的about頁面。
CSS
關於頁面的大部分設計都非常簡單。然而,相當一部分 CSS3 用於將圖像數量保持在最低限度。兩個按鈕 - 在 facebook 上找到我 ,以及在推特上關注我 ,位於文本下方,是帶有 .grayButton 的普通超鏈接 班級名稱。你可以在下面看到這個類的定義:
assets/css/styles.css
a.grayButton{
    padding:6px 12px 6px 30px;
    position:relative;

    background-color:#fcfcfc;
    background:-moz-linear-gradient(left top -90deg, #fff, #ccc);
    background:-webkit-linear-gradient(left top -90deg, #fff, #ccc);
    background:linear-gradient(left top -90deg, #fff, #ccc);

    -moz-box-shadow: 1px 1px 1px #333;
    -webkit-box-shadow: 1px 1px 1px #333;
    box-shadow: 1px 1px 1px #333;

    -moz-border-radius:18px;
    -webkit-border-radius:18px;
    border-radius:18px;

    font-size:11px;
    color:#444;
    text-shadow:1px 1px 0 #fff;
    display:inline-block;
    margin-right:10px;

    -moz-transition:0.25s;
    -webkit-transition:0.25s;
    transition:0.25s;
}

a.grayButton:hover{
    text-decoration:none !important;
    box-shadow:0 0 5px #2b99ff;
}

a.grayButton:before{
    background:url('../img/icons.png') no-repeat;
    height: 18px;
    left: 4px;
    position: absolute;
    top: 6px;
    width: 20px;
    content: '';
}

a.grayButton.twitter:before{
    background-position:0 -20px;
}
上面的代碼將 CSS3 線性漸變應用於按鈕、文本陰影和圓角。它還定義了一個 0.25 秒的過渡,為懸停時應用的發光設置動畫。我們也在使用 :before 偽元素來創建與按鈕一起使用的圖標。由於我們使用的是精靈,兩個按鈕之間唯一不同的是背景圖像的偏移量。
在此之後,我們有“下載為 vCard " 和 "獲取 JSON 文件 " 鏈接:
assets/css/styles.css
#links{
    text-align:center;
    padding-top: 20px;
    border-top:1px solid #4a4a4a;
    text-shadow: 1px 1px 0 #333333;
    width:655px;
    margin:0 auto;
}

#links a{
    color: #ccc;
    position:relative;
}

#links > a{
    display: inline-block;
    font-size: 11px;
    margin: 0 10px;
    padding-left:15px;
}

#links > a:before{
    background: url("../img/icons.png") no-repeat -10px -60px;
    position:absolute;
    content:'';
    width:16px;
    height:16px;
    top:2px;
    left:-4px;
}

#links > a.vcard:before{
    background-position: -10px -40px;
    top: 0;
    left: -8px;
}

#links p{
    color: #888888;
    font-size: 10px;
    font-style: normal;
    padding: 30px;
}
作為 #links section 元素包含的不僅僅是這些鏈接(它包含一個段落,其中包含一個指向 Levy Carneiro Jr. 的偉大肖像圖像的鏈接),我們必須將樣式限制為該部分的直接子元素的錨元素。
到此,我們的 PHP 和 CSS3 支持頁面就完成了!
總結
您可以將此關於頁面用作個人網站的簡單佔位符。您還可以使用現有的用戶數據庫並為您的用戶創建漂亮的配置文件。結合我們之前的一些教程,您可以將您在 facebook、flickr 圖片或推文上的最新帖子顯示為個性化主頁。


