帶有 jQuery 的氣泡幻燈片效果
今天我們將構建一個基於 jQuery 的氣泡動畫效果。這將是在您的網站上以有趣的幻燈片形式呈現一組圖像的好方法。由於代碼將完全模塊化,您將能夠輕鬆地使用和修改它。
HTML
我們今天要創建的幻燈片效果將採用易於使用的 jQuery 插件的形式。由於大部分工作都是由插件完成的,所以本節沒有太多可做的。但是,要使用該插件,您需要在頁面上添加一個無序列表。幻燈片的各個幻燈片將添加為 LI 元素。
index.html
<!DOCTYPE html>
<html>
    <head>
        <meta charset="utf-8" />
        <title>Bubble Slideshow Effect with jQuery | Tutorialzine Demo</title>

        <!-- Our CSS stylesheet file -->
        <link rel="stylesheet" href="assets/css/styles.css" />

        <!-- The plugin stylehseet -->
        <link rel="stylesheet" href="assets/jquery.bubbleSlideshow/jquery.bubbleSlideshow.css" />

        <!--[if lt IE 9]>
          <script src="http://html5shiv.googlecode.com/svn/trunk/html5.js"></script>
        <![endif]-->
    </head>

    <body>

        <!-- The bubble slideshow holder -->
        <ul id="slideShow"></ul>

        <!-- JavaScript includes -->
        <script src="http://ajax.googleapis.com/ajax/libs/jquery/1.6.2/jquery.min.js"></script>
        <script src="assets/jquery.bubbleSlideshow/bgpos.js"></script>
        <script src="assets/jquery.bubbleSlideshow/jquery.bubbleSlideshow.js"></script>
        <script src="assets/js/script.js"></script>

    </body>
</html>
為了能夠使用該插件,您需要包含 jquery.bubbleSlideshow.css 在頁面的頭部,bgpos.js 和 jquery.bubbleSlideshow.js 在結束正文標記之前。 bgpos.js 是一個 jQuery CSS hooks 插件,可以讓我們為 background-position 設置動畫 屬性(氣泡動畫中需要)和 jquery.bubbleSlideshow.js 保存我們今天要寫的代碼。還要記得包含 jQuery 庫。
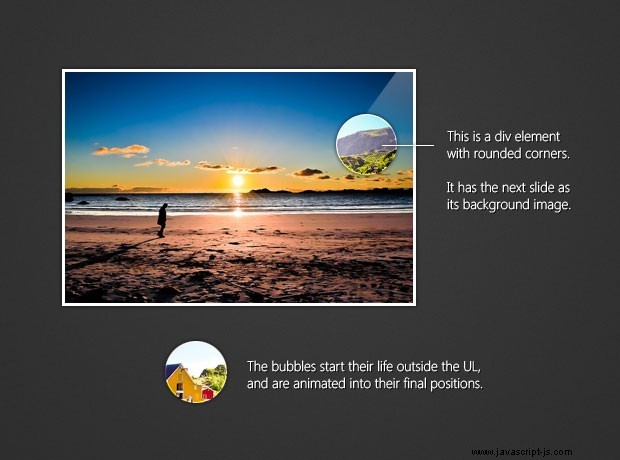
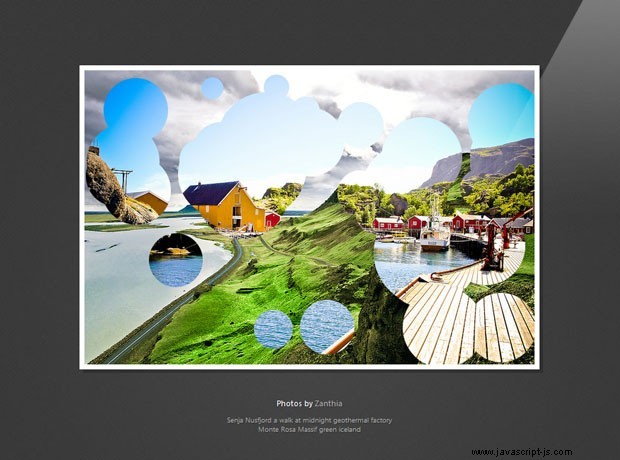
你可以在下面看到氣泡效果的簡單解釋。
JavaScript 和 jQuery
首先,我們將編寫一個名為 Bubble 的 JavaScript 類 .幻燈片中的每個氣泡都將成為此類的對象。它將具有 top 等屬性 和左 (位置偏移),大小 (圓的直徑)和一個 elem 屬性,它是一個包含實際 div 的 jQuery 對象。稍後我們將在 flyFrom() 中為氣泡設置動畫時使用此屬性 方法。
jquery.bubbleSlideshow.js
  // This is the Bubble class. It takes left and top
    // coordinates, size (diameter) and a image URL

    function Bubble( left, top, size, imgURL ){

        this.top    = top;
        this.left   = left;
        this.size   = size;

        // This places the center of the
        // circles on the specified position:

        top -= size/2;
        left-= size/2;

        this.elem = $('<div>',{
            'class':'bubble',
            'css'   : {
                'width'     : size,
                'height'    : size,
                'top'       : top,
                'left'      : left,
                'background-position': (-left)+'px '+(-top)+'px',
                'background-image': 'url('+imgURL+')'
            }
        });

    }

    // The fly from method takes a starting position, time,
    // and a callback function, executed when the animation finishes.

    Bubble.prototype.flyFrom = function( startX, startY, time, callBack ){

        time = time || 250;
        callBack = callBack || function(){};

        startX -= this.size/2;
        startY -= this.size/2;

        // Offsetting the element

        this.elem.css({
            'display'               : 'block',
            'backgroundPositionX'   : -startX,
            'backgroundPositionY'   : -startY,
            'left'                  : startX,
            'top'                   : startY
        });

        // Animating it to where it should be

        this.elem.animate({
            'backgroundPositionX'   : -this.left,
            'backgroundPositionY'   : -this.top,
            'left'                  : this.left,
            'top'                   : this.top
        }, time, 'easeOutCirc', callBack );

    };

    // Helper function for generating random
    // values in the [min,max] range

    function rand( min, max ){
        return Math.floor( Math.random()*((max+1)-min) + min);
    }
flyFrom() 方法採用一組坐標,確定氣泡飛入的位置 .它仍然會在您創建它時指定的位置結束。此方法在 Bubble 函數的原型上定義,它自動使其可用於所有實例。這是一種更有效的方法,因為一次只存在此方法的一個副本,而不是每個對像都存在此方法的副本。另外,請注意 rand() 在片段底部定義的函數。它模仿了同名的 PHP 函數,並在整個插件代碼中使用。
現在我們已經有了類,讓我們編寫一個函數來創建一個包含氣泡對象的數組,將它們附加到一個新的 LI 元素,並為它們設置動畫。該函數接受三個參數:
- 舞台 ,它是一個包含 UL 元素的 jQuery 對象。這將保存幻燈片,每張幻燈片都是一個單獨的 LI;
- imgURL 是將在氣泡中顯示的圖片的 URL;
- 功能 是一個回調函數,將在所有氣泡動畫完成後調用。這用於切換幻燈片並破壞氣泡,因為在過渡到新幻燈片後將不再需要它們;
正如您所猜測的,對於每個幻燈片過渡,都會創建一組新的隨機氣泡,並在下一張幻燈片可見後銷毀。
jquery.bubbleSlideshow.js
  function showBubbles( stage, imgURL, func ){

        // This function appends a new LI element to the UL
        // and uses it to hold and animate the bubbles.

        var i = 0,
            bubbles = [],
            totalBubbles = 75,
            stageWidth = stage.outerWidth(),
            stageHeight = stage.outerHeight(),
            emptyFunc = function(){};

        // This li holds the bubbles
        var li = $('<li class="bubbleStage">').appendTo(stage);

        // This function is passed to the flyFrom method call:

        var callBack = function(){

            // Waiting for the func function to
            // finish and removing the li.

            $.when(func()).then(function(){
                li.remove();
            });
        };

        for( i=0; i<totalBubbles; i++ ){

            var x    = rand(0, stageWidth),
                y    = rand(0,stageHeight),
                size = rand(30,150);

            var bubble = new Bubble( x, y, size, imgURL );
            li.append(bubble.elem);

            bubbles.push(bubble);
        }

        // Sorting the bubbles so that the
        // bubbles closest to the top border of
        // the image come first:

        bubbles = bubbles.sort(function( b1, b2 ){
            return b1.top+b1.size/2 > b2.top+b2.size/2;
        });

        // Looping through all the bubbles,
        // and triggering their flyFrom methods

        for( i=0; i<bubbles.length; i++){

            (function( bubble, i ){
                setTimeout(function(){

                    bubble.flyFrom(
                        stageWidth/2,
                        stageHeight+200,
                        250,
                        (i == bubbles.length-1) ? callBack : emptyFunc
                    );

                // This Math.floor schedules five bubbles
                // to be animated simultaneously

                }, Math.floor(i/5)*100);

            })( bubbles[i], i );
        }
    }
偉大的!所以現在我們有一個函數可以在一個新的 LI 元素中創建一組氣泡並為它們設置動畫。但這些只是功能,它們還不是插件,所以我們將不得不努力。此外,我們仍然缺少幻燈片本身。讓我們寫下缺失的部分:
jquery.bubbleSlideshow.js
$.fn.bubbleSlideshow = function(photos){

        if(!$.isArray(photos)){
            throw new Error("You need to pass an array of photo URLs as a parameter!");
        }

        photos = photos.reverse();

        var ul = this.addClass('bubbleSlideshow');

        $.each(photos,function(){
            ul.append('<li><img src="'+this+'" /></li>');
        });

        // These methods are available externally and
        // can be used to control the bubble slideshow

        ul.showNext = function(){
            showNext(ul);
        };

        ul.showPrev = function(){
            showPrev(ul);
        };

        ul.autoAdvance = function(timeout){
            timeout = timeout || 6000;
            autoAdvance(ul,timeout);
        };

        ul.stopAutoAdvance = function(){
            stopAutoAdvance(ul);
        };

        return ul;
    };
上面的代碼定義了一個名為 bubbleSlideshow() 的新插件 .它應該在 UL 元素上調用,並將照片 URL 數組作為其參數。這些被添加到 UL 中。
在其主體內,插件為數組中的每張照片創建一個新的 LI 元素,並添加 showNext , showPrev , 自動前進 和 stopAutoAdvance UL 方法。它們圍繞著同名的本地函數,您可以在下面看到:
jquery.bubbleSlideshow.js
  function autoAdvance(stage,timeout){
        stage.data('timeout',setTimeout(function(){
            showNext(stage);
            autoAdvance(stage,timeout);
        },timeout));
    }

    function stopAutoAdvance(stage){
        clearTimeout(stage.data('timeout'));
    }

    function showNext(stage){
        showFrame(stage, stage.find('li.bubbleImageFrame').first());
    }

    function showPrev(stage){
        showFrame(stage, stage.find('li.bubbleImageFrame').last().prev());
    }

    function showFrame(stage, frame ){

        // This function shows a frame,
        // passed as a jQuery object

        if(stage.data('working')){
            // Prevents starting more than
            // one animation at a time:
            return false;
        }
        stage.data('working',true);

        var frame = frame.hide().detach();

        // Using the showBubbles function, defined below.
        // The frame is showed after the bubble animation is over.

        showBubbles( stage, frame.find('img').attr('src'), function(){
            stage.append(frame);
            stage.data('working',false);

            // This returns a jQuery Promise object.
            return frame.fadeIn('slow');
        });

} 我用“本地” 來描述這些功能,因為它們不能從插件外部獲得。 showNext 和 showPrev 上面的函數都調用 showFrame ,將要顯示的 UL 和 LI 幻燈片傳遞給它。 顯示框架 確保一次只運行一個動畫,並調用 showBubbles 函數我們已經寫好了。
與方法調用一起傳遞的回調函數,通過在 UL 中最後附加它來顯示要顯示在所有其他幻燈片之上的幻燈片(幻燈片是絕對定位的,這意味著 UL 中的最後一個元素顯示在頂部)。氣泡動畫完成後調用此函數。
以下是初始化氣泡幻燈片的方法:
script.js
$(function(){
    var photos = [
        'http://farm6.static.flickr.com/5230/5822520546_dd2b6d7e24_z.jpg',
        'http://farm5.static.flickr.com/4014/4341260799_b466a1dfe4_z.jpg',
        'http://farm6.static.flickr.com/5138/5542165153_86e782382e_z.jpg',
        'http://farm5.static.flickr.com/4040/4305139726_829be74e29_z.jpg',
        'http://farm4.static.flickr.com/3071/5713923079_60f53b383f_z.jpg',
        'http://farm5.static.flickr.com/4108/5047301420_621d8a7912_z.jpg'
    ];

    var slideshow = $('#slideShow').bubbleSlideshow(photos);

    $(window).load(function(){
        slideshow.autoAdvance(5000);
    });

    // Other valid method calls:

    // slideshow.showNext();
    // slideshow.showPrev();
    // slideshow.stopAutoAdvance();
});
剩下的就是定義一些 CSS 規則來添加定位、溢出和背景位置等屬性:
jquery.bubbleSlideshow.css
ul.bubbleSlideshow{
    position:relative;
    list-style:none;
    overflow:hidden;
}

.bubbleSlideshow li{
    position:absolute;
    top:0;
    left:0;
}

.bubbleSlideshow li img{
    display:block;
}

.bubbleSlideshow li div.bubble{
    -moz-border-radius:50%;
    -webkit-border-raidus:50%;
    border-radius:50%;

    background-repeat:no-repeat;
    display:none;
    position:absolute;
}
到此氣泡效果幻燈片就完成了!
最後的話
我們今天所做的效果可能不僅限於幻燈片。它可用於構建獨特的網站背景、標題和演示文稿。該插件可自動調整大小以適應 UL,因此您可以通過調整一些 CSS 屬性輕鬆更改其大小。