如何創建 jQuery 確認對話框替換
繼續我們為瀏覽器控件構建可定制替代方案的探索,本週我們將以易於使用的 jQuery 插件的形式構建一個跨瀏覽器的自定義確認對話框。您可以選擇文本、按鈕和單擊時將執行的操作。
HTML
雖然我們主要集中在確認對話框上,但讓我們先說一下我們將要使用它的頁面。如果你很想看插件的源代碼,可以跳過這一步,向下滾動到教程的 jQuery 部分。
index.php
<!DOCTYPE html>

<html>
<head>
<meta http-equiv="Content-Type" content="text/html; charset=utf-8" />
<title>A jQuery Confirm Dialog Replacement with CSS3 | Tutorialzine Demo</title>

<!-- Including the Cuprum font with @font-face from Google's webfont API  -->

<link href='http://fonts.googleapis.com/css?family=Cuprum&subset=latin' rel='stylesheet' type='text/css'>
<link rel="stylesheet" type="text/css" href="css/styles.css" />
<link rel="stylesheet" type="text/css" href="jquery.confirm/jquery.confirm.css" />

</head>
<body>

<div id="page">

        <div class="item">
            <a href="https://tutorialzine.com/?p=1274">
                <img src="https://tutorialzine.com/img/featured/1274.jpg" title="Coding a Rotating Image Slideshow w/ CSS3 and jQuery" alt="Coding a Rotating Image Slideshow w/ CSS3 and jQuery" width="620" height="340" />
            </a>
            <div class="delete"></div>
        </div>

        <!-- Other "item" divs -->

</div>

<!-- Including jQuery and our jQuery Confirm plugin -->

<script src="http://ajax.googleapis.com/ajax/libs/jquery/1.4.4/jquery.min.js"></script>
<script src="jquery.confirm/jquery.confirm.js"></script>
<script src="js/script.js"></script>

</body>
</html>
在文檔的開頭部分,我包括 Cuprum 來自 Google 字體目錄的字體 jquery.confirm.css ,這是確認對話框的樣式表,以及 styles.css ,用於設置示例頁面的樣式。
在正文部分的底部,我包含了 jQuery 庫 , jquery.confirm.js ,這是主要的插件文件,和 script.js ,它偵聽示例頁面上的點擊事件,使用啟動插件。最後兩個文件將在本教程的最後一步中討論。
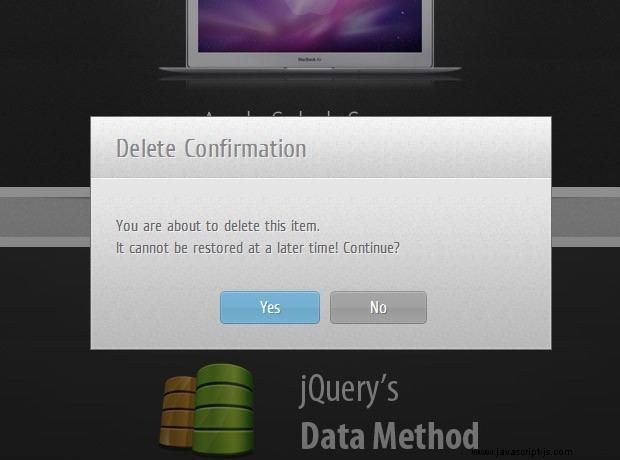
對話框本身不過是幾行 HTML。下面你可以看到插件插入的代碼來顯示確認窗口。
對話框示例代碼
<div id="confirmOverlay">
    <div id="confirmBox">

        <h1>Title of the confirm dialog</h1>
        <p>Description of what is about to happen</p>

        <div id="confirmButtons">
            <a class="button blue" href="#">Yes<span></span></a>
            <a class="button gray" href="#">No<span></span></a>
        </div>
    </div>
</div>
此代碼附加到文檔的正文中。 確認覆蓋 顯示在頁面的其餘部分,防止在對話框可見時與其進行任何交互(模態行為)。 h1 , p 和確認按鈕 div 根據您傳遞給插件的參數填充。您將在本文後面閱讀更多內容。
CSS
確認對話框的樣式包含在 jquery.confirm.css 中 .這樣可以更輕鬆地包含到現有項目中,並且它的構建方式可以確保它不會與您的其他頁面樣式發生衝突。
jquery.confirm.css
#confirmOverlay{
    width:100%;
    height:100%;
    position:fixed;
    top:0;
    left:0;
    background:url('ie.png');
    background: -moz-linear-gradient(rgba(11,11,11,0.1), rgba(11,11,11,0.6)) repeat-x rgba(11,11,11,0.2);
    background:-webkit-gradient(linear, 0% 0%, 0% 100%, from(rgba(11,11,11,0.1)), to(rgba(11,11,11,0.6))) repeat-x rgba(11,11,11,0.2);
    z-index:100000;
}

#confirmBox{
    background:url('body_bg.jpg') repeat-x left bottom #e5e5e5;
    width:460px;
    position:fixed;
    left:50%;
    top:50%;
    margin:-130px 0 0 -230px;
    border: 1px solid rgba(33, 33, 33, 0.6);

    -moz-box-shadow: 0 0 2px rgba(255, 255, 255, 0.6) inset;
    -webkit-box-shadow: 0 0 2px rgba(255, 255, 255, 0.6) inset;
    box-shadow: 0 0 2px rgba(255, 255, 255, 0.6) inset;
}

#confirmBox h1,
#confirmBox p{
    font:26px/1 'Cuprum','Lucida Sans Unicode', 'Lucida Grande', sans-serif;
    background:url('header_bg.jpg') repeat-x left bottom #f5f5f5;
    padding: 18px 25px;
    text-shadow: 1px 1px 0 rgba(255, 255, 255, 0.6);
    color:#666;
}

#confirmBox h1{
    letter-spacing:0.3px;
    color:#888;
}

#confirmBox p{
    background:none;
    font-size:16px;
    line-height:1.4;
    padding-top: 35px;
}

#confirmButtons{
    padding:15px 0 25px;
    text-align:center;
}

#confirmBox .button{
    display:inline-block;
    background:url('buttons.png') no-repeat;
    color:white;
    position:relative;
    height: 33px;

    font:17px/33px 'Cuprum','Lucida Sans Unicode', 'Lucida Grande', sans-serif;

    margin-right: 15px;
    padding: 0 35px 0 40px;
    text-decoration:none;
    border:none;
}

#confirmBox .button:last-child{ margin-right:0;}

#confirmBox .button span{
    position:absolute;
    top:0;
    right:-5px;
    background:url('buttons.png') no-repeat;
    width:5px;
    height:33px
}

#confirmBox .blue{              background-position:left top;text-shadow:1px 1px 0 #5889a2;}
#confirmBox .blue span{         background-position:-195px 0;}
#confirmBox .blue:hover{        background-position:left bottom;}
#confirmBox .blue:hover span{   background-position:-195px bottom;}

#confirmBox .gray{              background-position:-200px top;text-shadow:1px 1px 0 #707070;}
#confirmBox .gray span{         background-position:-395px 0;}
#confirmBox .gray:hover{        background-position:-200px bottom;}
#confirmBox .gray:hover span{   background-position:-395px bottom;}
使用了少數 CSS3 聲明。在 #confirmOverlay 定義,我們使用 CSS3 漸變(目前僅在 Firefox、Safari 和 Chrome 中可用),其餘部分使用透明 PNG 後備。
稍後,在 #confirmBox ,它位於屏幕中間,我添加了一個嵌入框陰影,它實際上是一個高光(想想 Photoshop 的內發光)。我也用過 Cuprum 字體,包含在 Google 的字體目錄中。
除了一些文本陰影外,您還可以看到按鈕的樣式。它們是使用滑動門技術建造的。目前有兩種設計可供選擇 - 藍色和灰色。您可以通過指定附加聲明來添加新的按鈕顏色。
jQuery
在轉到插件的源代碼之前,讓我們先看看我們在追求什麼。在 script.js 中 你可以看到插件是如何調用的。
script.js
$(document).ready(function(){

    $('.item .delete').click(function(){

        var elem = $(this).closest('.item');

        $.confirm({
            'title'     : 'Delete Confirmation',
            'message'   : 'You are about to delete this item. <br />It cannot be restored at a later time! Continue?',
            'buttons'   : {
                'Yes'   : {
                    'class' : 'blue',
                    'action': function(){
                        elem.slideUp();
                    }
                },
                'No'    : {
                    'class' : 'gray',
                    'action': function(){}  // Nothing to do in this case. You can as well omit the action property.
                }
            }
        });

    });

});
當 .delete 在我們的示例頁面中單擊 div,腳本執行 $.confirm 函數,由我們的插件定義。然後它傳遞對話框的標題、描述和帶有按鈕的對象。每個按鈕都有一個 CSS 類的名稱和一個 action 財產。這個action就是當按鈕被點擊時要執行的函數。
現在讓我們轉到有趣的部分。在 jquery.confirm.js 您可以查看我們的確認對話框替代方案的源代碼。
jquery.confirm.js
(function($){

    $.confirm = function(params){

        if($('#confirmOverlay').length){
            // A confirm is already shown on the page:
            return false;
        }

        var buttonHTML = '';
        $.each(params.buttons,function(name,obj){

            // Generating the markup for the buttons:

            buttonHTML += '<a href="#" class="button '+obj['class']+'">'+name+'<span></span></a>';

            if(!obj.action){
                obj.action = function(){};
            }
        });

        var markup = [
            '<div id="confirmOverlay">',
            '<div id="confirmBox">',
            '<h1>',params.title,'</h1>',
            '<p>',params.message,'</p>',
            '<div id="confirmButtons">',
            buttonHTML,
            '</div></div></div>'
        ].join('');

        $(markup).hide().appendTo('body').fadeIn();

        var buttons = $('#confirmBox .button'),
            i = 0;

        $.each(params.buttons,function(name,obj){
            buttons.eq(i++).click(function(){

                // Calling the action attribute when a
                // click occurs, and hiding the confirm.

                obj.action();
                $.confirm.hide();
                return false;
            });
        });
    }

    $.confirm.hide = function(){
        $('#confirmOverlay').fadeOut(function(){
            $(this).remove();
        });
    }

})(jQuery);
我們的插件定義了 $.confirm() 方法。它的作用是讀取您傳遞的參數,構建標記,然後將其添加到頁面中。作為 #confirmOverlay div 在它的 CSS 聲明中被分配了一個固定的位置,我們可以讓瀏覽器讓它在屏幕上居中,並在訪問者滾動頁面時移動它。
添加標記後,腳本為單擊事件分配事件處理程序,執行相應按鈕的操作參數。
這樣,我們的 jQuery 驅動的確認對話框就完成了!
總結
您可以通過修改 jquery.confirm.css 來自定義對話框的外觀 .由於對話框的 message 屬性採用 HTML 文本,您可以通過在確認窗口中顯示圖像和圖標來進一步自定義它。
您甚至可以將此插件用作警報對話框 - 您只需要傳遞一個沒有操作屬性的按鈕。