使用 jQuery 製作贈品隨機數生成器應用程序
第一個 Tutorialzine 贈品已經結束!現在是抽出獲勝者的時候了。但是,由於這是一個 Web 開發博客,我們不能只運行 ORDER BY RAND() phpMyAdmin 中的 MySQL 查詢。更重要的是,必須頒發三組不同的獎品。這需要一種更時尚的方法 - 一個專用的隨機化 jQuery 應用程序,專門用於在比賽和贈品中選擇獲勝者。
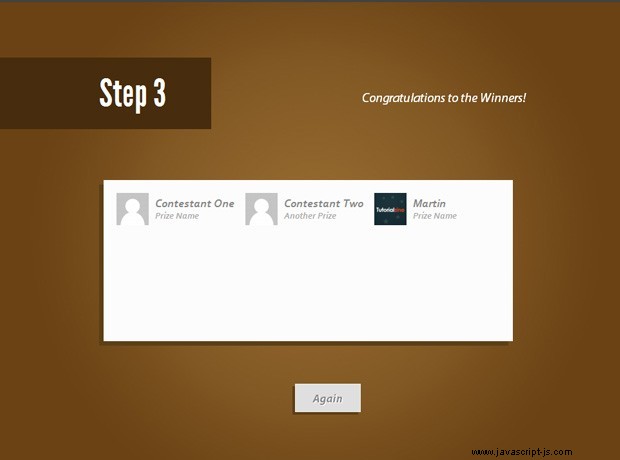
該應用程序分為三個步驟 - 在第一步中,您提供參賽者姓名和電子郵件的列表,用逗號分隔(每個參賽者在單獨的一行中)。在第二步中,您提供獎品名稱和編號,表示已提供的副本數量。在最後一步中,您將獲得隨機選擇的參賽者名單及其獎品。
HTML
像往常一樣,我們從 HTML 標記和新的文檔類型開始。在此之後,我們繼續使用樣式表。第一個樣式表是由 fontsquirrel 的字體生成器生成的。它將允許我們在每個瀏覽器中使用非網絡安全的 LeagueGothic 字體。字體文件本身位於演示中的 LeagueGothic 文件夾中。
randomizer.html
<!DOCTYPE html>
<html>
<head>
<meta http-equiv="Content-Type" content="text/html; charset=utf-8" />
<title>Making a Giveaway Randomizer App w/ jQuery | Tutorialzine Demo</title>
<link rel="stylesheet" type="text/css" href="LeagueGothic/fontface.css" />
<link rel="stylesheet" type="text/css" href="styles.css" />
</head>
<body>
<div class="step" id="step1">
<div class="section">
<h1>Step 1</h1>
<h2>Paste a CSV Formatted List of All The Contestants</h2>
<textarea></textarea>
<a href="#" class="button">Next</a>
</div>
</div>
<div class="step" id="step2">
<div class="section">
<h1>Step 2</h1>
<h2>Paste a CSV Formatted List of All The Prizes</h2>
<textarea></textarea>
<a href="#" class="button back">Back</a>
<a href="#" class="button finish">Finish!</a>
</div>
</div>
<div class="step" id="step3">
<div class="section">
<h1>Step 3</h1>
<h2>Congratulations to the Winners!</h2>
<div class="results"></div>
<a href="#" class="button again">Again</a>
</div>
</div>
<script src="http://ajax.googleapis.com/ajax/libs/jquery/1.4.2/jquery.min.js"></script>
<script src="md5.js"></script>
<script src="script.js"></script>
</body>
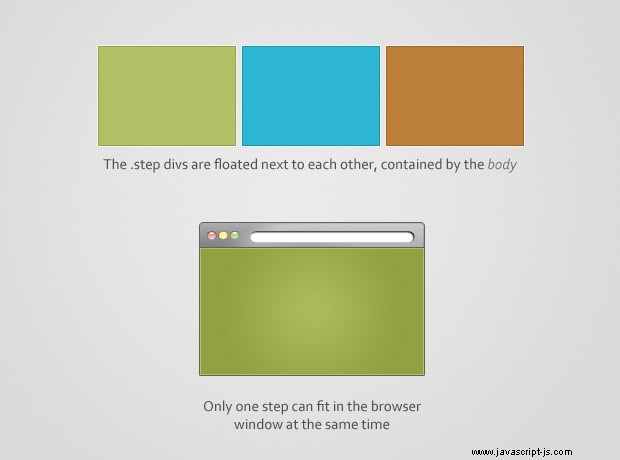
</html> 正如您稍後將看到的,我們將許多樣式應用於 body 元素並將其用作常規塊容器。在裡面我們有三個 .step div,其中包含自己的一組標題、文本區域和按鈕。
正如您將在本教程的下一部分中看到的那樣,我們使 body 比瀏覽器窗口寬三倍,每個部分 div 正好是其寬度的 33.333%。這使得這些部分與瀏覽器一樣寬(即使您調整窗口大小也會如此)。
最後我們包含了 jQuery 庫,我們的 script.js 文件和另一個 - md5.js . JavaScript 不提供計算 md5 哈希的方法,因此我們包含了 md5() 的純 JavaScript 實現 PHP 函數,由 php.js 項目創建。我們將在最後一步中需要這個,我們將從 Gravatar 中提取評論者的頭像,使用他們的電子郵件地址。

CSS
構建應用程序的下一步是編寫 CSS。這裡只介紹更有趣的樣式。您可以在下載存檔的 styles.css 中查看其餘部分。
styles.css - 第 1 部分
html{

   /**
    *   The background of the HTML element is
    *   visible as the top and bottom dark strips.
    */

    background-color:#424242;
}

body{
    font-size:13px;
    color:#fff;
    font-family:Arial, Helvetica, sans-serif;

   /**
    *   Using the body element as a
    *   container for the animation
    */

    left:0;
    position:fixed;
    top:5px;
    bottom:5px;
    width:300%;
}

.step{
    /* Each step takes one third of the width */

    float:left;
    height:100%;
    width:33.3333%;
    overflow:hidden;
    position:relative;
}

/* Step 1 */

#step1{ background:url('img/bg_1.jpg') no-repeat center center #6f7c18;}

#step1 textarea{
    -moz-box-shadow:-7px 7px 0 #637018;
    -webkit-box-shadow:-7px 7px 0 #637018;
    box-shadow:-7px 7px 0 #637018;
}

#step1 a.button{
    -moz-box-shadow:-4px 4px 0 #637018;
    -webkit-box-shadow:-4px 4px 0 #637018;
    box-shadow:-4px 4px 0 #637018;
}

#step1 a.button:active{

    /* The pressed state of the button */

    -moz-box-shadow:-2px 2px 0 #637018;
    -webkit-box-shadow:-2px 2px 0 #637018;
    box-shadow:-2px 2px 0 #637018;
}

#step1 h1{ background-color:#4a5310;}
這裡發生的情況是,我們將 body 元素用作常規容器並在其上應用固定定位。這將頁面的標記保持在最低限度,並證明正文與頁面上的其他元素沒有什麼不同。我們將主體製作為瀏覽器窗口寬度的三倍。由於所有尺寸均以百分比形式給出,因此即使您調整瀏覽器大小,所有內容都會按比例縮放。
請注意,我們已經為 html 元素應用了背景顏色。這在應用的頂部和底部顯示為兩條較暗的條帶。
這三個階梯向左浮動,是body元素寬度的33.333%,這使得它們完美地填滿了屏幕的寬度。每個步驟都應用了一組單獨的規則(由於步驟類的 ID),例如背景圖像、框陰影的不同顏色和 h1 標題。這裡只給出第一步的類,step2和step3思路相同。
styles.css - 第 2 部分
/* Each step contains a section, centered in the page */

.section{
    height:550px;
    left:50%;
    margin:-275px 0 0 -328px;
    position:absolute;
    top:50%;
    width:655px;
}

h1{
    /* The step text */

    font-family:'LeagueGothicRegular',Arial,Helvetica,sans-serif;
    font-size:60px;
    position:absolute;
    right:488px;
    text-align:right;
    top:0;
    width:5000px;
    padding:20px 70px 20px 20px;
    font-weight:normal;
}

h2{
    /* The instruction text */
    position:absolute;
    right:0;
    top:50px;
    font-weight:normal;
    font-style:italic;
}

h2,a.button{
    font-family:'Myriad Pro', Corbel, Arial, Helvetica, sans-serif;
}

.section textarea,
.section .results{
    background-color:#fcfcfc;
    border:0;
    bottom:100px;
    color:#888888;
    font-family:Arial,Helvetica,sans-serif;
    font-size:12px;
    height:230px;
    padding:20px;
    position:absolute;
    width:615px;

    outline:none;
    resize:none;
    overflow:auto;
}
在每個步驟 div 中都有一個帶有 .section 的元素 班級。它使用 CSS 在頁面上水平和垂直居中。所有標題、文本框和按鈕都相對於該部分進行定位,並且也完全居中。
最有趣的部分可能是 h1 標題,它始終顯示在屏幕的左側(無論窗口有多大),並且恰好停在距該部分右邊框 488px 處。它還使用 LeagueGothicRegular , fontface 嵌入字體,你可以在 中找到它的定義 LeagueGothic/fontface.css
jQuery
現在是時候讓這個小應用真正發揮作用了。啟動你的引擎,現在是 jQuery 時間!
script.js - 第 1 部分
$(document).ready(function(){

    /* An object with element selectors and margin values */

    var buttonMargins = {
        '#step1 a.button'   : '-100%',
        '#step2 a.finish'   : '-200%',
        '#step2 a.back'     : 0,
        '#step3 a.again'    : 0
    }

    var b = $('body');

    // Adding a click event listener to
    // every element in the object:

    $.each(buttonMargins,function(key,val){
        $(key).click(function(){
            b.animate({marginLeft:val});
            return false;
        });
    });

    // An additional click handler for the finish button:

    $('#step2 a.finish').click(function(){

        var resultsDiv = $('#step3 .results');

        // Catching the errors with a try / catch statement:

        try{

            resultsDiv.empty();

            var contestants = parseCSV($('#step1 textarea').val(),'contestants'),
                prizes      = parseCSV($('#step2 textarea').val(),'prizes'),
                allPrizes   = [];

            // The second element of the prizes CSV is
            // the number of copies of the prize

            $.each(prizes, function(){
                for(var i=0;i<this.col2;i++){

                    // The allPrizes array contains
                    // one entry for each prize.

                    allPrizes.push(this.col1);
                }
            });

            if(allPrizes.length > contestants.length){
                throw 'There are more prizes than contestants!';
            }

            // Randomizing both the contestants and the prizes:

            contestants = contestants.shuffle();
            allPrizes   = allPrizes.shuffle();

            // Using Gravatar
            var gravatarURL =   'http://www.gravatar.com/avatar/-REPLACE-?size=50&default='+
                                encodeURIComponent('http://www.gravatar.com/avatar/ad516503a11cd5ca435acc9bb6523536?size=50');

            // Generating the markup:
            for(var i=0;i<allPrizes.length;i++){
                var result = $('<div>',{className:'result'});

                // Using a pure JavaScript md5 implementation to generate the hash
                // of the email so we can fetch the avatar from Gravatar:

                result.append($('<img>',{
                    src: gravatarURL.replace('-REPLACE-',md5(contestants[i].col2.toLowerCase()))
                }));

                result.append($('<p>',{
                    className   : 'info',
                    title       : contestants[i].col1 + ', ' +contestants[i].col2,
                    html        : contestants[i].col1 + '<i>'+allPrizes[i]+'</i>'
                }));

                resultsDiv.append(result);
            }

        }
        catch (e){
            // Dispaly the error message:
            resultsDiv.append($('<p>',{className:'error',html:e}));
        }
    });
該腳本包含在 document.ready 事件監聽函數中。腳本所做的第一件事是將一組事件附加到按鈕上。這些通過負邊距值創建身體的動畫運動,並顯示不同的步驟。為了避免我們不得不單獨編寫事件監聽器,腳本循環通過 buttonMargins 對象並為我們附加監聽器。
完成 按鈕得到特殊處理,當它被點擊時,文本區域中的 CSV 格式數據必須被解析並隨機組合以產生獲勝者。請注意我們如何使用我們之前包含的 md5 函數來計算第 74 行的電子郵件哈希,用於從 Gravatar 獲取參賽者的頭像。
script.js - 第 2 部分
  function parseCSV(str, name){

        // A simple function for parsing CSV formatted text

        var arr = str.split('\n');

        if(!arr.length){
            throw 'The '+name+' list cannot be empty!';
        }

        var tmp = [];
        var retArr = [];

        for(var i=0;i<arr.length;i++){

            if(!arr[i]) continue;

            tmp = arr[i].split(',');

            if(tmp.length!=2){
                throw 'The '+name+' list is malformed!';
            }

            retArr.push({
                col1 : $.trim(tmp[0]),
                col2 : $.trim(tmp[1])
            })
        }

        return retArr;
    }

    // A method for returning a randomized array:
    Array.prototype.shuffle = function(deep){
        var i = this.length, j, t;
        while(i) {
            j = Math.floor((i--) * Math.random());
            t = deep && typeof this[i].shuffle!=='undefined' ? this[i].shuffle() : this[i];
            this[i] = this[j];
            this[j] = t;
        }
        return this;
    };

});
在 script.js 的第二部分 ,可以看到簡單的parseCSV() 功能。它旨在解析兩個文本區域的內容並返回一個對像數組。每個對象包含一個 col1 和 col2 屬性,對應於 textareas 中的數據。這稍後用於生成名稱/獎品組合。
另外,請注意 shuffle 方法,在 Array 原型上定義 .以這種方式定義它使其可用於腳本中的任何數組。我們用它來洗牌選手和獎品,讓每個人都有公平的獲勝機會。
有了這個,我們簡單的隨機化器應用就準備好了!
使用應用程序
對於較小的比賽,您可以手動填充參賽者和獎品列表,但對於較大的比賽,這是不可能的(例如,在 Tzine 的贈品中,有超過 200 名參賽者!)。這是以下查詢派上用場的地方:
SELECT DISTINCT comment_author,comment_author_email FROM wp_comments WHERE comment_post_ID = 1132 AND comment_approved = 1
它選擇所有在贈品上發表評論的人的姓名和電子郵件(請記住替換 comment_post_ID 值)。在 phpMyAdmin 中運行此查詢後,只需單擊導出並選擇 CSV(請記住將分隔符字段留空)。然後只需將創建的 CSV 列表複製並粘貼到應用程序中即可。
在下面的評論部分分享您對該應用的建議和想法!