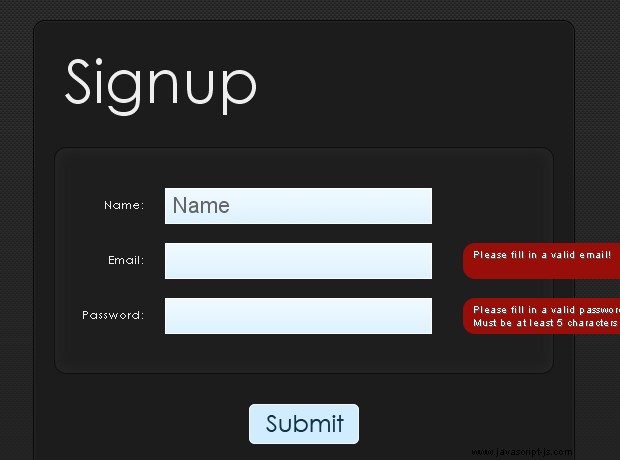
使用 PHP、jQuery 和 CSS3 的碳纖維註冊表單
今天我們正在製作碳纖維風格的表格,使用漸進增強構建。這意味著我們首先要確保表單在沒有 JavaScript 和花哨的 CSS 支持的情況下也能正常工作(在這裡想想 IE6),然後通過在酷炫的樣式、AJAX 和 jQuery 魔法上分層來繼續前進。
該表單具有自己的自定義工具提示驗證功能,甚至可以在禁用 JavaScript 的情況下完美使用。
第 1 步 - XHTML
第一步包括創建表單的 XHTML 主幹。它必須簡單,並且根據漸進增強定義的原則,必須完全可以單獨使用。
demo.html
<div id="carbonForm">
    <h1>Signup</h1>

    <form action="submit.php" method="post" id="signupForm">

        <div class="fieldContainer">
            <div class="formRow"></div>
            <!-- Two more formRow divs -->
        </div>

        <div class="signupButton">
            <input type="submit" name="submit" id="submit" value="Signup" />
        </div>

    </form>
</div>
碳形式 div 是表單的主要容器。它位於頁面中間,帶有 CSS margin 屬性,然後使用 jQuery 垂直居中(有關居中的更多信息,請查看我們的 MicroTut)。
在其中我們有標題和帶有 fieldContainer 的表單 分區。裡面有三個 formRow divs,共享下面給出的標記:
demo.html
<div class="formRow">
    <div class="label">
        <label for="name">Name:</label>
    </div>

    <div class="field">
        <input type="text" name="name" id="name" />
    </div>
</div> 每對標籤 和輸入 元素位於其自己的包裝 div 內,這些 div 浮動到左側。這允許您在演示頁面中看到的表單佈局。讓文本框名稱相同很重要 作為他們的id s,因為這用於顯示錯誤工具提示,您將在接下來的步驟中看到。
第 2 步 - CSS
表單嚴重依賴 CSS 來實現碳纖維效果。還使用了許多 CSS3 規則,它們成功地模仿了以前只能在 Photoshop 等圖形套件中實現的效果。這裡只給出最有趣的樣式,其餘的可以在 styles.css 中查看 在下載存檔中。
styles.css
#carbonForm{
/* The main form container */
background-color:#1C1C1C;
border:1px solid #080808;
margin:20px auto;
padding:20px;
width:500px;
-moz-box-shadow:0 0 1px #444 inset;
-webkit-box-shadow:0 0 1px #444 inset;
box-shadow:0 0 1px #444 inset;
}
.fieldContainer{
/* The light rounded section, which contans the fields */
background-color:#1E1E1E;
border:1px solid #0E0E0E;
padding:30px 10px;
/* CSS3 box shadow, used as an inner glow */
-moz-box-shadow:0 0 20px #292929 inset;
-webkit-box-shadow:0 0 20px #292929 inset;
box-shadow:0 0 20px #292929 inset;
}
#carbonForm,.fieldContainer,.errorTip{
/* Rounding the divs at once */
-moz-border-radius:12px;
-webkit-border-radius:12px;
border-radius:12px;
}
.formRow{
height:35px;
padding:10px;
position:relative;
}
.label{
float:left;
padding:0 20px 0 0;
text-align:right;
width:70px;
}
label{
font-family:Century Gothic,Myriad Pro,Arial,Helvetica,sans-serif;
font-size:11px;
letter-spacing:1px;
line-height:35px; /* Neat line height trick */
}
.field{
float:left;
}
.field input{
/* The text boxes */
border:1px solid white;
color:#666666;
font-family:Arial,Helvetica,sans-serif;
font-size:22px;
padding:4px 5px;
background:url("img/box_bg.png") repeat-x scroll left top #FFFFFF;
outline:none;
}
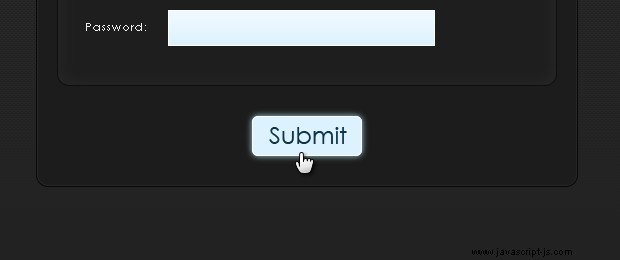
#submit{
/* The submit button */
border:1px solid #f4f4f4;
cursor:pointer;
height:40px;
text-indent:-9999px;
text-transform:uppercase;
width:110px;
background:url("img/submit.png") no-repeat center center #d0ecfd;
-moz-border-radius:6px;
-webkit-border-radius:6px;
border-radius:6px;
}
#submit.active{
/* Marking the submit button as active adds the preloader gif as background */
background-image:url("img/preloader.gif");
}
input:hover,
input:focus{
/* CSS3 glow effect */
-moz-box-shadow:0 0 8px lightblue;
-webkit-box-shadow:0 0 8px lightblue;
box-shadow:0 0 8px lightblue;
} 這些規則中的大多數都非常簡單。您可能會發現我們處理提交按鈕的方式很有趣,因為此元素的樣式很難跨瀏覽器保持一致。
隱藏按鈕的文本(在我們的例子中是“註冊 "),我們可以使用否定文本縮進 技巧,但在 IE 中,它只有在我們還指定 text-transform:uppercase 時才有效 規則。我們還添加了一個由文本“提交”組成的透明背景圖片 " in 世紀哥特式 ,如果按鈕被分配了一個“active " 類。
我們還使用了許多 CSS3 效果及其特定於供應商的版本,以實現更好的兼容性。 邊框半徑 用於圓角,並帶有 box-shadow 我們可以模仿不同的發光和陰影效果。
第 3 步 - jQuery
在包含 jQuery 庫和我們自己的 script.js 之後 文件,我們可以繼續編寫 JavaScript 代碼,為表單註入活力。
script.js
$(document).ready(function(){
    // $(document).ready() is executed after the page DOM id loaded

    // Binding an listener to the submit event on the form:
    $('#signupForm').submit(function(e){

        // If a previous submit is in progress:
        if($('#submit').hasClass('active')) return false;

        // Adding the active class to the button. Will show the preloader gif:
        $('#submit').addClass('active');

        // Removing the current error tooltips
        $('.errorTip').remove();

        // Issuing a POST ajax request to submit.php (the action attribute of the form):
        $.post($('#signupForm').attr('action'),
            $('#signupForm').serialize()+'&fromAjax=1',function(response){

            if(!response.status)
            {
                // Some kind of input error occured

                // Looping through all the input text boxes,
                // and checking whether they produced an error
                $('input[type!=submit]').each(function(){
                    var elem = $(this);
                    var id = elem.attr('id');

                    if(response[id])
                        showTooltip(elem,response[id]);
                });
            }
            else location.replace(response.redirectURL);

            $('#submit').removeClass('active');
        },'json');

        e.preventDefault();
    });

    $(window).resize();
});

// Centering the form vertically on every window resize:
$(window).resize(function(){
    var cf = $('#carbonForm');

    $('#carbonForm').css('margin-top',($(window).height()-cf.outerHeight())/2)
});

// Helper function that creates an error tooltip:
function showTooltip(elem,txt)
{
    // elem is the text box, txt is the error text
    $('<div class="errorTip">').html(txt).appendTo(elem.closest('.formRow'));
}
單擊提交按鈕(或按 enter 鍵,同時在其中一個字段中輸入文本)提交表單。綁定到提交事件的函數通過 e.preventDefault() 防止這種情況發生 並向 submit.php 發出 AJAX 請求 而是。
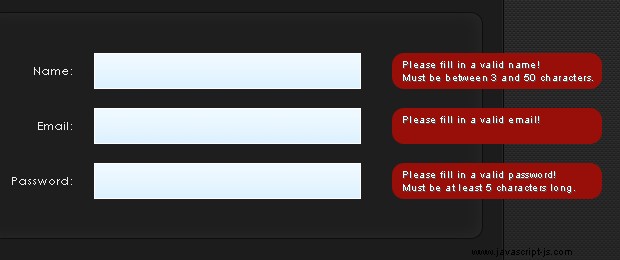
返回的響應被評估為 JSON 代碼(一個 JavaScript 對象),其中包含一個特殊的 status 財產。根據其值,腳本要么在字段上顯示錯誤工具提示,要么將瀏覽器重定向到響應中的指定 URL。
示例錯誤響應
{
    "status"    : 0,    // Indicates that the response is an error
    "email"     : "Please fill in a valid email!",      // Error message
    "pass"      : "Please fill in a valid password!"    // Error message
}
錯誤工具提示是由腳本在遍歷表單中的所有字段並檢查它們的 id 是否作為屬性存在於響應對像中時生成的。如果這樣做,則會使用 showTooltip() 創建一個工具提示 功能。
還要注意我們如何使用 serialize() 第 18 行的方法一次發送所有表單字段。此外,在同一行,我們設置 fromAjax=1 ,這將告訴 PHP 以 JSON 格式返迴響應。
現在讓我們看看這個響應是如何生成的以及表單是如何驗證的。
第 4 步 - PHP
這種形式的好處是即使禁用 JavaScript 也可以使用。這是可行的,因為表單元素的 action 屬性也設置為 submit.php .這意味著無論表單如何發送,我們只需要執行一次驗證。
提交.php
// Error reporting:
error_reporting(E_ALL^E_NOTICE);

// This is the URL your users are redirected,
// when registered succesfully:

$redirectURL = 'https://demo.tutorialzine.com/2010/04/carbon-signup-form/demo.html';

$errors = array();

// Checking the input data and adding potential errors to the $errors array:

if(!$_POST['name'] || strlen($_POST['name'])<3 || strlen($_POST['name'])>50)
{
    $errors['name']='Please fill in a valid name!<br />Must be between 3 and 50 characters.';
}

if(!$_POST['email'] || !preg_match("/^[\.A-z0-9_\-\+]+[@][A-z0-9_\-]+([.][A-z0-9_\-]+)+[A-z]{1,4}$/", $_POST['email']))
{
    $errors['email']='Please fill in a valid email!';
}

if(!$_POST['pass'] || strlen($_POST['pass'])<5)
{
    $errors['pass']='Please fill in a valid password!<br />Must be at least 5 characters long.';
}

// Checking whether the request was sent via AJAX
// (we manually send the fromAjax var with the AJAX request):

if($_POST['fromAjax'])
{
    if(count($errors))
    {
        $errString = array();
        foreach($errors as $k=>$v)
        {
            // The name of the field that caused the error, and the
            // error text are grouped as key/value pair for the JSON response:
            $errString[]='"'.$k.'":"'.$v.'"';
        }

        // JSON error response:
        die ('{"status":0,'.join(',',$errString).'}');
    }

    // JSON success response. Returns the redirect URL:
    echo '{"status":1,"redirectURL":"'.$redirectURL.'"}';

    exit;
}

// If the request was not sent via AJAX (probably JavaScript
// has been disabled in the visitors' browser):

if(count($errors))
{
    echo '<h2>'.join('<br /><br />',$errors).'</h2>';
    exit;
}

// Directly redirecting the visitor if JS is disabled:

header("Location: ".$redirectURL);
所有遇到的錯誤都添加到 $errors 大批。這取決於是否 fromAjax 設置與否,稍後作為 JSON 對象返回,或直接打印到屏幕上。
這樣我們的碳纖維註冊表就完成了!
結論
您可以以任何您喜歡的方式修改和構建此表單。目前,表單實際上並沒有註冊用戶,但您可以添加必要的代碼來註冊用戶。它還可以作為您網站的聯繫表格。