帶有 PHP、jQuery 和 MySQL 的簡單橫幅旋轉器
在本教程中,我們將製作一個簡單的 PHP、jQuery 和 MySQL 橫幅旋轉器,您可以使用它在您的網站上創建和隨機顯示橫幅。每個橫幅都有一個簡潔的 jQuery 動畫效果,您可以根據自己的需要進行自定義。
數據庫架構
在我們開始編碼之前,讓我們看一下數據庫。所有橫幅都插入到 橫幅 MySQL 表。它的結構如下:
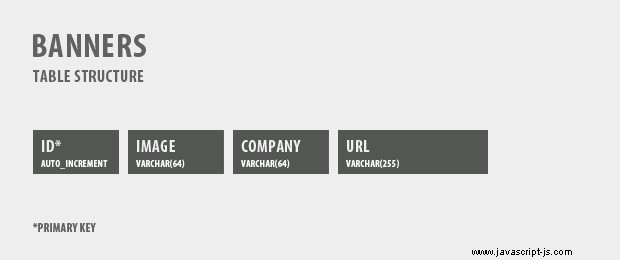
身份證 是一個主鍵,它是自動遞增的,這意味著如果您手動插入新橫幅,則無需在該字段中添加數字。接下來是圖片 公司名稱之後包含橫幅文件名的字段 最後是 URL 公司網站的,都是varchar字段(正則字符串)。
如果您想在自己的主機上運行演示,您需要從 table.sql 中的定義重新創建此表 在下載存檔中。只需將 SQL colde 粘貼到您的 MySQL 管理器中即可。另外不要忘記在 connect.php 中填寫您的 MySQL 登錄詳細信息 , 在將文件上傳到您的服務器之前。
第 1 步 - XHTML
橫幅的 XHTML 代碼由 PHP 在數據庫查詢後動態生成,並輸出到頁面。示例橫幅的標記如下所示:
demo.php
<div class="banner">
<a href="http://www.rapidxhtml.com/">
<img src="img/banners/rapidHTML.png" alt="Rapid HTML"
width="125" height="125" />
</a>
<p class="companyInfo">Visit Rapid HTML</p>
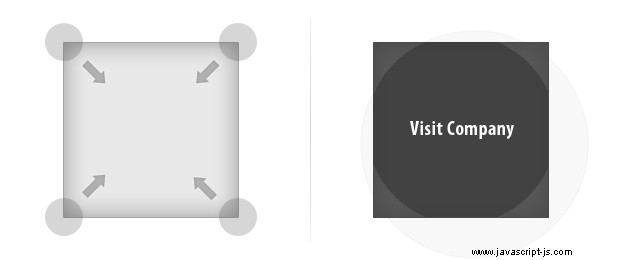
<div class="cornerTL"></div>
<div class="cornerTR"></div>
<div class="cornerBL"></div>
<div class="cornerBR"></div>
</div> 在每個橫幅 div 中,我們都有一個指向公司網站的超鏈接、一個標準的 125 x 125 像素橫幅、一個帶有公司名稱的段落和四個角落 div。
默認情況下,段落和角 div 是隱藏的,當用戶將鼠標移到主 .banner 上時會顯示 分區。這確保了橫幅即使在禁用 JavaScript 的情況下也能完美運行,儘管沒有花哨的過渡。
第 2 步 - CSS
讓我們開始設置頁面樣式。為了確保跨瀏覽器的兼容性,我們首先必須重置瀏覽器應用於頁面元素的默認樣式。使用通用頁面重置很簡單:
styles.css - 第 1 部分
*{
    /* A universal page reset */
    margin:0;
    padding:0;
}

body{
    /* Setting default text color, background and a font stack */
    font-size:0.825em;
    color:#666;
    background-color:#fff;
    font-family:Arial, Helvetica, sans-serif;
}

.bannerHolder{
    /* The main banner unordered list */

    height:270px;
    width:270px;

    float:left;
    margin:20px 15px;
    padding:10px;
    background:#f7f7f7;
    border:1px solid #eee;

    /* CSS3 rounded corners */

    -moz-border-radius:12px;
    -webkit-border-radius:12px;
    border-radius:12px;
}

.bannerHolder li{
    /* Hiding the bullets of the li elements: */
    list-style:none;
    display:inline;
}

.banner{
    /* The banner divs */
    position:relative;
    width:125px;
    height:125px;
    overflow:hidden;
    float:left;
    margin:5px;
}

.banner img{
    /* The banner divs */
    display:block;
    border:none;
}
由於橫幅被組織在一個無序列表中,我們首先設置列表本身的樣式(分配給 bannerHolder class),然後是其中的 li 元素,最後是橫幅 div。
由於頁面上有兩組橫幅,我們必須堅持使用類名來定位 CSS 中的元素,因為 ID 必須是唯一的,並且不允許多個元素具有相同的 ID。
styles.css - 第 2 部分
.banner div{
    /* The dark animated divs */

    position:absolute;
    z-index:100;
    background-color:#222;
    width:60px;
    height:60px;
    cursor:pointer;

    /*  Setting a really big value for border-radius
        will make the divs perfect circles */

    -moz-border-radius:100px;
    -webkit-border-radius:100px;
    border-radius:100px;
}

/*  Positioning the animated divs outside the
    corners of the visible banner area: */

.banner .cornerTL{ left:-63px;top:-63px; }
.banner .cornerTR{ right:-63px;top:-63px; }
.banner .cornerBL{ left:-63px;bottom:-63px; }
.banner .cornerBR{ right:-63px;bottom:-63px; }

.banner p{
    /* The "Visit Company" text */

    display:none;   /* hidden by default */

    left:0;
    top:57px;
    width:100%;
    z-index:200;
    position:absolute;

    font-family:Tahoma, Arial, Helvetica, sans-serif;
    color:white;
    font-size:11px;
    text-align:center;

    cursor:pointer;
}
在代碼的第二部分,我們設計了在 mouseenter 上滑動到視圖中的動畫圓形 div。我們正在使用 border-radius CSS3 屬性並給它一個 100px 值,我們將 div 變成完美的圓圈。我們還將四個 div 中的每一個都定位在其父 div 之外。

第 3 步 - PHP
轉到 PHP 部分,我們將首先看一下橫幅類。
banner.class.php
class Banner{

    private $data = array();

    public function __construct($row){
        $this->data = $row;
    }

    public function html(){

        /* This method returns the banner's HTML code */

        $d = &$this->data;
        $d['company'] = htmlspecialchars($d['company']);

        return '
            <div class="banner">
                <a href="'.$d['url'].'">
                    <img src="img/banners/'.$d['image'].'" alt="'.$d['company'].'"
                    width="125" height="125" />
                </a>
                <p class="companyInfo">Visit '.$d['company'].'</p>
                <div class="cornerTL"></div>
                <div class="cornerTR"></div>
                <div class="cornerBL"></div>
                <div class="cornerBR"></div>
            </div>';
    }

}
類的構造方法在我們創建橫幅對象時執行。它複製 $row 我們將變量作為參數傳遞給它的內部私有 $data 數組。
另一種方法 - html() - 返回橫幅的 HTML 代碼。
您可以在下面看到如何使用此類及其方法:
demo.php
$bannerResult = mysql_query("SELECT * FROM banners");

$banners = array();
while($row=mysql_fetch_assoc($bannerResult))
{
    $banners[] = new Banner($row);
}

// Randomizing the $banners array:
shuffle($banners);

// Splitting the banners array into smaller arrays with 4 banners each:
$bannerGroups = array_chunk($banners,4);
從數據庫中選擇所有橫幅後,PHP 將結果的每一行作為關聯數組獲取,並創建橫幅對象。在此之後產生的 $banners 數組在內置 array_chunk() 的幫助下被打亂和拆分 功能。
由於我們有 8 個橫幅,我們最終在 $bannerGroups 中有兩個元素 ,我們可以打印到頁面上:
demo.php
<ul class="bannerHolder">
    <?php

        // Looping through the first group:
        foreach($bannerGroups[0] as $ban)
        {
            echo '<li>'.$ban->html().'</li>';
        }

    ?>
</ul>
生成所有標記並設置樣式後,我們可以繼續學習本教程的 jQuery 部分。

第 4 步 - jQuery
將 jQuery 庫包含到頁面後,我們就可以開始在 script.js 中編寫自己的 JavaScript 代碼了。
script.js
$(document).ready(function(){

    // Lowering the opacity of all slide in divs
    $('.banner div').css('opacity',0.4);

    // Using the hover method
    $('.banner').hover(function(){

        // Executed on mouseenter

        var el = $(this);

        // Find all the divs inside the banner div,
        // and animate them with the new size

        el.find('div').stop().animate({width:200,height:200},'slow',function(){
            // Show the "Visit Company" text:
            el.find('p').fadeIn('fast');
        });

    },function(){

        // Executed on moseleave

        var el = $(this);

        // Hiding the text
        el.find('p').stop(true,true).hide();

        // Animating the divs
        el.find('div').stop().animate({width:60,height:60},'fast');

    }).click(function(){

        // When clicked, open a tab with the address of the hyperlink

        window.open($(this).find('a').attr('href'));

    });
});
使用 hover 方法,我們將兩個函數綁定到 mouseenter 和 mouseleave 事件。它們分別顯示和隱藏四個圓角 div 和段落標籤。
注意 stop() 的使用 函數,顧名思義,它會停止正在運行的動畫。請記住,如果您需要停止像 fadeOut() 這樣的內置效果 ,你應該傳遞兩個額外的 true 函數的參數。
停止動畫很重要,因為在舊動畫完成之前觸發新動畫會使它們堆積起來,這絕對是不希望的。
最後,由於超鏈接隱藏在 div 下方,因此無法點擊,因此我們在主橫幅 div 上監聽 click 事件,並在事件發生時打開一個新選項卡到相應的 URL。
這樣我們簡單的橫幅旋轉腳本就完成了!
結論
在本教程中,我們演示了 PHP 的一些 OOP 特性、jQuery 動畫和一些有趣的 CSS 效果。您可以隨意修改此代碼並以任何您喜歡的方式使用它。
你怎麼看?您將如何修改此腳本?