使用 PHP、MySQL 和 PayPal 的 API 創建捐贈中心
這一切都始於上個月我收到以下電子郵件時:
你是對的,Devon,聽到關於教程的新想法總是很高興。捐贈中心是一個很好的機會來試驗 PayPal 的 API 並構建可以讓很多人受益的東西。
理念
PayPal 為第三方開發人員提供了大量 API 和集成選項。其中之一是捐贈按鈕,您可以直接從 PayPal 網站生成並直接包含在您的頁面中。這些按鈕的轉化率通常很低,但正確的激勵措施會產生很大的不同。
這個想法是有一個專門的捐贈中心 .在這裡,您可以看到您的捐款會產生怎樣的影響,以及已經捐款的人的名單。
選擇您希望捐贈的金額並單擊按鈕後,您將被重定向到 paypal.com 完成交易。完成後,您將被重定向回捐贈中心,您可以在那裡填寫表格並被列入官方捐贈者名單 .

第 1 步 - 數據庫
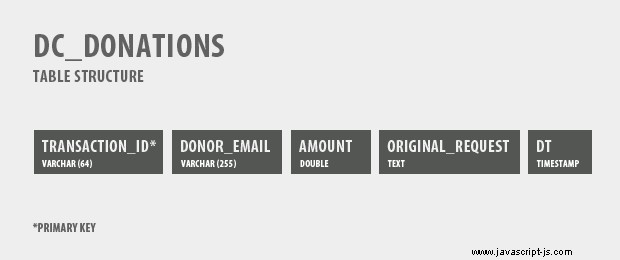
該腳本使用兩個表 - dc_donations 和 dc_comments .第一個存儲在 PayPal 請求中傳遞的捐贈數據(我們將在教程的 PHP 步驟中回到這一點)。
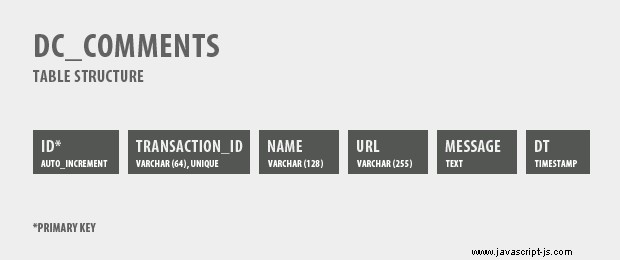
第二個表格包含有關捐贈者的信息,他們在感謝頁面上自己填寫。
您可以通過運行 tables.sql 中的 SQL 代碼在數據庫中創建這些表 (在下載存檔中找到)來自 phpMyAdmin 的 SQL 選項卡。您也可以通過“導入”功能上傳文件。
在此之後記得將您的 MySQL 登錄詳細信息添加到 connect.php .
第 2 步 - XHTML
移動到捐贈中心的標記本身。捐贈 PHP 是訪問者看到的唯一頁面。另一個頁面是 thankyou.php ,僅在捐贈者完成捐贈過程後才會顯示給他們。
donate.php
<div id="main">
    <h1>Donation Center</h1>
    <h2>Show Your Support for our Cause</h2>

    <div class="lightSection">
        <h3>Hello, dear visitor!</h3>
        <p>This is Tutorialzine's Donation Center...</p>

        <!-- The PayPal Donation Button -->

    </div>

    <div class="chart">
        Our Goal
    </div>

    <div class="donations">
        <?php echo $percent?>% done
    </div>

    <div class="clear"></div>

    <div class="donors">
        <h3>The Donor List</h3>
        <h4>Folks Who Showed Their Support</h4>

        <div class="comments">

        <!-- PHP Code that generates the comments -->

        </div> <!-- Closing the comments div -->

    </div> <!-- Closing the donors div -->

</div> <!-- Closing the main div -->
.lightSection div 包含我們向頁面訪問者顯示的消息和 PayPal 捐贈按鈕的標記,您可以在下面看到。在這之後是餅圖,它顯示了我們的初始目標達到了多少。該圖表是使用 Google 的 Charting API 生成的。最後是 .donors div,其中保存了已經捐贈的捐贈者列表。
donate.php
<form action="<?php echo $payPalURL?>" method="post" class="payPalForm">
    <div>
        <input type="hidden" name="cmd" value="_donations" />
        <input type="hidden" name="item_name" value="Donation" />

        <!-- Your PayPal email: -->
        <input type="hidden" name="business"
        value="<?php echo $myPayPalEmail?>"/>

        <!-- PayPal will send an IPN notification to this URL: -->
        <input type="hidden" name="notify_url"
        value="<?php echo $url.'/ipn.php'?>" />

        <!-- The return page to which the user is
        navigated after the donations is complete: -->

        <input type="hidden" name="return"
        value="<?php echo $url.'/thankyou.php'?>" />

        <!-- Signifies that the transaction data will be
        passed to the return page by POST: -->

        <input type="hidden" name="rm" value="2" />

        <!-- General configuration variables for the paypal landing page. -->

        <input type="hidden" name="no_note" value="1" />
        <input type="hidden" name="cbt" value="Go Back To The Site" />
        <input type="hidden" name="no_shipping" value="1" />
        <input type="hidden" name="lc" value="US" />
        <input type="hidden" name="currency_code" value="USD" />

        <!-- The amount of the transaction: -->

        <select name="amount">
        <option value="50">$50</option>
        <option value="20">$20</option>
        <option value="10" selected="selected">$10</option>
        <option value="5">$5</option>
        <option value="2">$2</option>
        <option value="1">$1</option>
        </select>

        <input type="hidden" name="bn" value="
        PP-DonationsBF:btn_donate_LG.gif:NonHostedGuest" />

        <!-- You can change the image of the button: -->
        <input type="image" src="https://www.paypal.com/en_US/i/btn/btn_donate_LG.gif" name="submit" alt="PayPal - The safer, easier way to pay online!" />

    <img alt="" src="https://www.paypal.com/en_US/i/scr/pixel.gif"
    width="1" height="1" />

    </div>
</form>
PayPal 捐贈按鈕的結構是一個常規的 html 表單。當您單擊捐贈圖形時,表單將提交給 PayPal。可以進行許多自定義,例如捐贈金額、捐贈收件人的電子郵件等等(完整的選項列表位於此處)。每個選項都作為隱藏字段添加到表單中。
注意 return 和 notify_url 變量。第一個獲取付款完成後用戶被重定向到的頁面的 URL(在我們的例子中是 thankyou.php ),另一個是一個特殊的頁面,它監聽 PayPal 的即時支付通知 (IPN )。
現在讓我們轉到教程的 PHP 部分。

第 3 步 - PHP
如上一步所述,當發生付款時,PayPal 會向您的腳本發送 IPN 通知,其中包含交易的各種數據。實現此 IPN 偵聽器頁面涉及大量編碼,因為腳本必須驗證通知是否由 PayPal 發出。
幸運的是,有很多好人已經實現了這些驗證並將它們打包到一個易於使用的 PHP5 PayPal 類中。現在讓我們看看它是如何使用的:
ipn.php
require "paypal_integration_class/paypal.class.php";
require "config.php";
require "connect.php";

$p = new paypal_class;
$p->paypal_url = $payPalURL; // $payPalURL is defined in config.php

if ($p->validate_ipn()) {
    if($p->ipn_data['payment_status']=='Completed')
    {
        $amount = $p->ipn_data['mc_gross'] - $p->ipn_data['mc_fee'];

        mysql_query("   INSERT INTO dc_donations (transaction_id,donor_email,amount,original_request)
                        VALUES (
                            '".esc($p->ipn_data['txn_id'])."',
                            '".esc($p->ipn_data['payer_email'])."',
                            ".(float)$amount.",
                            '".esc(http_build_query($_POST))."'
                        )");
    }
}

function esc($str)
{
    global $link;
    return mysql_real_escape_string($str,$link);
}
首先我們創建一個新的 paypal_class 並為其分配 PayPal 的 URL。剩下的就是調用 $p->validate_ipn() 方法,它將為我們完成所有艱苦的工作。如果一切順利,我們將交易金額、收款人的電子郵件和交易 ID 插入 dc_donations 桌子。這可能是一個值得注意的好地方,該頁面對最終用戶不可見,它僅用於偵聽後端發生的來自 paypal 的 IPN 通知。
thankyou.php
require "config.php";
require "connect.php";

if(isset($_POST['submitform']) && isset($_POST['txn_id']))
{
    $_POST['nameField'] = esc($_POST['nameField']);
    $_POST['websiteField'] =  esc($_POST['websiteField']);
    $_POST['messageField'] = esc($_POST['messageField']);

    $error = array();

    if(mb_strlen($_POST['nameField'],"utf-8")<2)
    {
        $error[] = 'Please fill in a valid name.';
    }

    if(mb_strlen($_POST['messageField'],"utf-8")<2)
    {
        $error[] = 'Please fill in a longer message.';
    }

    if(!validateURL($_POST['websiteField']))
    {
        $error[] = 'The URL you entered is invalid.';
    }

    $errorString = '';
    if(count($error))
    {
        $errorString = join('<br />',$error);
    }
    else
    {
        mysql_query("   INSERT INTO dc_comments (transaction_id, name, url, message)
                        VALUES (
                            '".esc($_POST['txn_id'])."',
                            '".$_POST['nameField']."',
                            '".$_POST['websiteField']."',
                            '".$_POST['messageField']."'
                        )");

        if(mysql_affected_rows($link)==1)
        {
            $messageString = '<a href="donate.php">You were added to our donor section!</a>';
        }
    }
}
用戶捐款後,他會被 PayPal 重定向到我們的感謝頁面。在這裡,他可以通過填寫表格將自己添加到捐贈者名單中。文重定向,PayPal 將交易數據放入 $_POST 數組,可用於 thankyou.php .我們可以使用這些數據來確認用戶實際上已經捐款,而不僅僅是手動導航到 thankyou.php ,繞過貝寶。提交表單後,用戶被添加到 dc_comments 表。
donate.php
require "config.php";
require "connect.php";

// Determining the URL of the page:
$url = 'http://'.$_SERVER['SERVER_NAME'].dirname($_SERVER["REQUEST_URI"]);

// Fetching the number and the sum of the donations:
list($number,$sum) = mysql_fetch_array(mysql_query("SELECT COUNT(*),SUM(amount) FROM dc_donations"));

// Calculating how many percent of the goal are met:
$percent = round(min(100*($sum/$goal),100));

// Building a URL with Google's Chart API:
$chartURL = 'http://chart.apis.google.com/chart?chf=bg,s,f9faf7&cht=p&chd=t:'.$percent.',-'.(100-$percent).'&chs=200x200&chco=639600&chp=1.57';
Google 的 Chart Api 是一種生成任何類型圖表的簡單方法。要使用它,您只需創建一個指向 http://chart.apis.google.com/ 的 URL,其中包含背景顏色、圖表類型(在我們的例子中為餅圖)和逗號分隔的值列表等設置作為數據。您可以像添加常規圖像一樣包含此 URL,系統將為您動態生成圖表。
donate.php
<?php
    $comments = mysql_query("SELECT * FROM dc_comments ORDER BY id DESC");

    // Building the Donor List:

    if(mysql_num_rows($comments))
    {
        while($row = mysql_fetch_assoc($comments))
        {
            ?>

                <div class="entry">
                    <p class="comment">
                    <?php
                        echo nl2br($row['message']); // Converting the newlines of the comment to <br /> tags
                    ?>
                    <span class="tip"></span>
                    </p>

                    <div class="name">
                        <?php echo $row['name']?> <a class="url" href="<?php echo $row['url']?>"><?php echo $row['url']?></a>
                    </div>
                </div>

            <?php
        }
    }
?>
稍後在 donate.php ,我們在對 dc_comments 運行查詢後構建捐贈者列表 表。
第 4 步 - CSS
生成所有標記並將其包含在頁面中後,就可以對其進行樣式設置了。您可能會感到驚訝,但整個設計完全基於 CSS,並且不使用單個圖像(除了 PayPal 的捐贈按鈕圖像)。
styles.css - 第 1 部分
*{
    /* Universal page reset */
    margin:0;
    padding:0;
}

body{
    /* Setting default text color, background and a font stack */
    font-size:13px;
    color:#9bb370;
    background-color:#f9faf7;
    font-family:Rockwell, 'Courier New', Courier, Georgia, serif;
}

p{
    font-family:Arial, Helvetica, sans-serif;
    font-size:20px;
}

h1{
    /* The Donation Center text */
    border-bottom:1px solid #E3EBD2;
    color:#639600;
    font-size:70px;
    line-height:1;
    margin-left:-20px;
    padding:0 0 0 30px;
}

h2{
    /* The subtitle, notice the line-height property */
    border-left:1px solid #E3EBD2;
    color:#ABC084;
    font-size:35px;
    height:35px;
    line-height:75px;
    margin:-70px 0 0;
    padding:55px 0 0 10px;
}

h3{
    color:#639600;
    font-size:38px;
}

#main{
    /* The main container div */
    margin:40px auto;
    padding:0 0 0 20px;
    position:relative;
    width:860px;
}
您可能會在演示頁面中註意到,捐贈中心標題和副標題如何形成一組有趣的行。這些實際上分別是 h1 和 h2 的下邊界和左邊界。
styles.css - 第 2 部分
.chart{
    /* The Google Chart is set as this div's background via the style attribute.
    The negative text-indent moves the text outside the box */

    margin:0 0 0 300px;
    text-indent:-300px;
    width:200px;
}

.donations,.chart{
    color:#ABC084;
    font-size:50px;
    font-weight:bold;
    float:left;
    height:200px;
    line-height:200px;
}

.donations{ text-align:right; width:340px;}
.comments{ margin-top:60px;}
.entry{ margin-bottom:50px;}

.comment{
    background-color:#edf2e4;
    padding:20px;
    position:relative;
    margin-bottom:20px;
}

.name{
    color:#639600;
    font-size:24px;
    font-style:italic;
    font-weight:bold;
    position:relative;
}

.name a.url{
    color:#C0D39C;
    font-weight:normal;
    padding-left:10px;
}

.tip{
    width:0;
    height:0;
    bottom:-40px;
    left:20px;

    /* A neat CSS trick which creates a triangle shape*/
    /* from the div's top border */

    border:20px solid #f9faf7;
    border-width:20px 15px;
    border-top-color:#edf2e4;
    position:absolute;
}
通過將 div 的寬度和高度設置為零並為邊框的寬度指定一個較大的值,也可以使用 CSS 創建三角形。
有了這個,我們的 PHP 和 MySQL 捐贈中心就完成了!
結論
您可以使用這個捐贈中心將通常匿名的捐贈資金行為轉變為更加社會化和開放的過程。您可以修改代碼以包含 Twitter 和 Facebook 集成,或以您認為合適的任何其他方式對其進行改進。
你怎麼看?您將如何改進此代碼?