帶有 jQuery 和 CSS3 的 BounceBox 通知插件
本週早些時候,在開發 ZineScripts 的優惠券代碼系統時,我發現需要能夠動態地創建一個消息框並將其呈現給 Zine 的訪問者。通常的例程包括挖掘 jQuery 的插件存儲庫並最終使用燈箱替代方案,但我決定花時間構建一次性通知解決方案,今天我將與您分享。
第 1 步 - XHTML
切入正題,創建這種效果需要什麼?
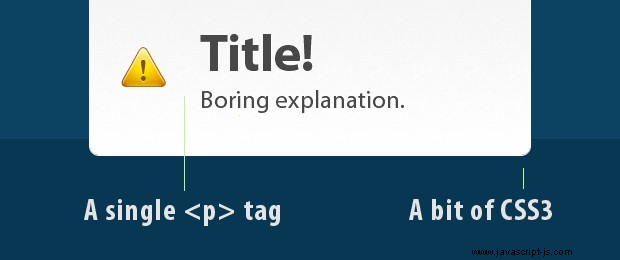
您唯一需要做的就是在您的頁面上創建一個 div 並將一些內容放入其中。像這樣的:
<div id="box">
<p><b>Title!</b>Boring explanation.</p>
</div>
在我們的示例中,消息標題、消息正文和警告圖標都是使用單個
創建的 帶有一些 CSS 魔法的標籤。警告圖標是它的背景,標題是包含在段落中的常規粗體標記。
第 2 步 - CSS
我們今天做的插件,為盒子的定位添加了自己的 CSS 規則,這使得彈跳效果成為可能,但我們仍然需要在樣式表文件中編寫盒子的設計代碼。
styles.css - 第 1 部分
/* The bouncing box */

#box{
    background:url('img/box_bg.jpg') repeat-x center top #fcfcfc;
    height:115px;
    padding:20px;
    margin-top:-10px;
    padding-top:30px;
    width:400px;
    border:1px solid #fcfcfc;
    color:#494848;
    text-shadow:1px 1px 0 white;
    font-family:'Myriad Pro',Arial,Helvetica,sans-serif;
}

#box p{
    font-size:25px;
    background:url('img/warning.png') no-repeat 10px center;
    padding-left:90px;
}

#box p b{
    font-size:52px;
    display:block;
}

#box,
#main,
a.button{
    -moz-border-radius:10px;
    -webkit-border-radius:10px;
    border-radius:10px;
}
在這裡,我們正在設計 bounceBox 的設計 .還有一些由 jQuery 內聯應用的規則,它們分配一個 'fixed' 定位到框並將其置於頁面中間,這是動畫所必需的。這樣一來,設計風格和功能風格之間就有了明確的劃分。
styles.css - 第 2 部分
/* Styling the big button */

a.button{
    color:white;
    letter-spacing:-2px;
    padding:20px;
    display:block;
    text-shadow:1px 1px 0 #145982;
    font-family:'Myriad Pro',Arial,Helvetica,sans-serif;
    font-size:80px;
    font-weight:bold;
    text-align:center;
    width:350px;
    border:1px solid #60b4e5;

    margin:60px auto;

    /*
        CSS3 gradients for webkit and mozilla browsers,
        fallback color for the rest:
    */

    background-color: #59aada;
    background-image: -moz-linear-gradient(#5eb2e2, #4f9cca);
    background-image: -webkit-gradient(linear, 0% 0%, 0% 100%, from(#5eb2e2), to(#4f9cca));
}

a.button:hover{
    /* Lighter gradients for the hover effect */
    text-decoration:none;
    background-color: #5eb2e2;
    background-image: -moz-linear-gradient(#6bbbe9, #57a5d4);
    background-image: -webkit-gradient(linear, 0% 0%, 0% 100%, from(#6bbbe9), to(#57a5d4));
}
在代碼的第二部分中,我們將一些 CSS3 規則應用於按鈕以實現優美的外觀。注意兩個漸變 針對 Mozilla Firefox 和 Webkit 瀏覽器(Safari 和 Chrome)的規則。不幸的是,與其他 CSS3 規則不同,它們沒有共享用於顯示漸變的通用語法,這在一定程度上增加了開發人員的負擔。
如果瀏覽器不支持 CSS 漸變,指定備用背景顏色也很重要。

第 3 步 - jQuery
首先讓我們從創建我們的bounceBox 插件開始。正如我們之前所見,創建一個 jQuery 插件只需擴展 $.fn 具有新功能的對象。 '這個' 新函數的 jQuery 元素集等效於調用該方法的 jQuery 元素集。
bouncebox-plugin/jquery.bouncebox.1.0.js
(function($){

    /* The plugin extends the jQuery Core with four methods */

    /* Converting an element into a bounce box: */
    $.fn.bounceBox = function(){

        /*
            Applying some CSS rules that center the
            element in the middle of the page and
            move it above the view area of the browser.
        */

        this.css({
            top     : -this.outerHeight(),
            marginLeft  : -this.outerWidth()/2,
            position    : 'fixed',
            left        : '50%'
        });

        return this;
    }

    /* The boxShow method */
    $.fn.bounceBoxShow = function(){

        /* Starting a downward animation */

        this.stop().animate({top:0},{easing:'easeOutBounce'});
        this.data('bounceShown',true);
        return this;
    }

    /* The boxHide method */
    $.fn.bounceBoxHide = function(){

        /* Starting an upward animation */

        this.stop().animate({top:-this.outerHeight()});
        this.data('bounceShown',false);
        return this;
    }

    /* And the boxToggle method */
    $.fn.bounceBoxToggle = function(){

        /*
            Show or hide the bounceBox depending
            on the 'bounceShown' data variable
        */

        if(this.data('bounceShown'))
            this.bounceBoxHide();
        else
            this.bounceBoxShow();

        return this;
    }

})(jQuery);
我們定義了四個單獨的方法,它們將 div 轉換為bounceBox(並應用定位 CSS 規則)、顯示、隱藏或使用 animate() 在兩者之間切換 jQuery方法。
對於切換,我們在 data 方法中保留了一個內部變量,它標記了框是顯示還是隱藏。
包含 jQuery 庫和 jquery.bounce.1.0.js 後,所有這些方法都可供您使用 文件到頁面。要獲得整潔的彈跳效果,您需要 jQuery easing 插件 同樣,它包含在 zip 的插件目錄中。
插件使用起來真的很簡單,從下面的代碼可以看出。
script.js
$(document).ready(function(){

    /* Converting the #box div into a bounceBox: */
    $('#box').bounceBox();

    /* Listening for the click event and toggling the box: */
    $('a.button').click(function(e){

        $('#box').bounceBoxToggle();
        e.preventDefault();
    });

    /* When the box is clicked, hide it: */
    $('#box').click(function(){
        $('#box').bounceBoxHide();
    });
});
上面的代碼在文檔就緒事件觸發時執行,因此我們確定所有頁面元素都可用於 jQuery。然後我們要做的第一件事就是隱藏 #box div 到一個bounceBox,並將監聽器綁定到按鈕上的點擊事件和盒子本身。
您可以將任何您想要的 HTML 代碼放入 box div 中,它會被正確地轉換為一個bounceBox。您還可以同時在頁面上擁有多個彈跳框。
有了這個我們的 BounceBox 插件就完成了!
結論
您可以使用此 jQuery 插件以醒目的方式向用戶呈現通知。您可以輕鬆地將註冊表、時事通訊註冊甚至某種廣告作為 box div 的內容。隨意嘗試並在評論部分分享您所做的事情。