使用 jQuery 和 CSS 製作照片效果
通常,在您的設計或開發任務中,您面臨的挑戰需要採用不同的方法,而不僅僅是一頭扎進編碼中。研究和實驗是這一過程的重要組成部分。
這就是為什麼本週教程的結構與平時略有不同的原因。首先我們會看到面臨的主要問題及其解決方案,然後我們會在此基礎上進行構建。
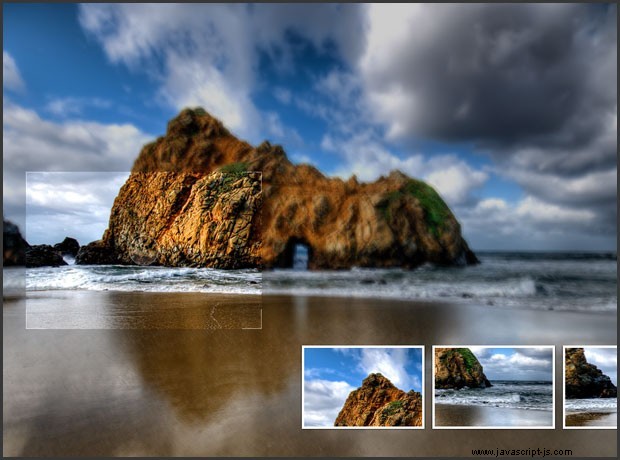
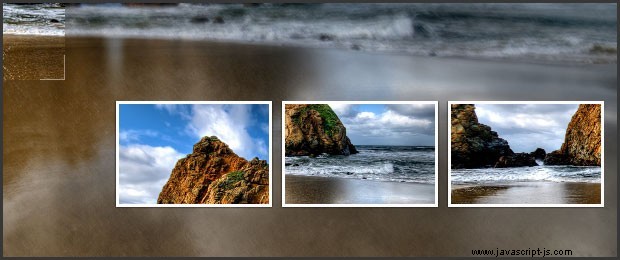
我們正在使用我們剛剛發布的 PhotoShoot jQuery 插件創建照片拍攝效果。有了它,您可以將頁面上的常規 div 轉換為模擬相機感覺的照片拍攝階段。使用這個插件,我們可以讓訪問者拍攝背景圖片。
在開始本教程之前,我建議您從上面的按鈕下載 zip 存檔。
問題 1 - 圖像模糊
JavaScript 不支持直接模糊圖像。例如,沒有這樣的事情 就像 document.getElemetById('image').style.blur=2,不管它有多麼有用。
我使用並整合到插件中的技術實際上非常簡單 - 它只是堆疊了一堆 div,每個都將圖像作為背景,並且降低了不透明度,一個在另一個之上。那些 div 的位置隨機偏離了幾個像素,所以你最終會得到一個模糊的效果。
問題 2 - 隱藏光標
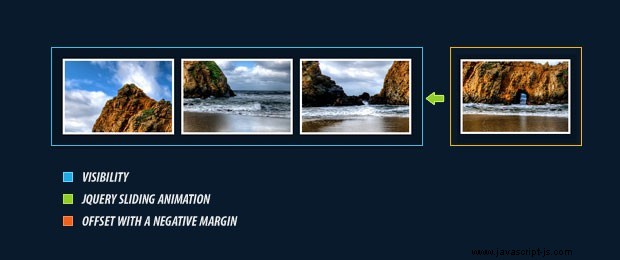
CSS 沒有提供從視圖中隱藏光標的方法。例如。你不能 指定一個 CSS 規則,如 cursor :none .不過有一個簡潔的解決方法。 CSS 使您能夠在 .cur 中指定自定義光標 帶有 css:url() 的文件 規則。這些文件支持透明,所以你只需要製作一個完全透明的光標,並將它分配到你希望光標隱藏的區域。
不幸的是,谷歌瀏覽器存在光標完全空白的問題,因此必須定制一個包含一個白色像素的特殊版本(總比沒有好)。
另一個麻煩製造者是 Opera,它完全不支持自定義光標。沒有解決方法。不過這沒什麼大不了的,其他一切在 Opera 中運行良好。
問題 3 - 不支持遮罩
解決這個問題的方法是使用取景器 div 的背景屬性來顯示原始圖像。通過指定一個負的上邊距和左邊距並在每次鼠標移動時更新它,我們可以給用戶一種取景器清除下方風景模糊的印象。
這些問題的解決方案都在插件中為我們實現了,這減輕了很多開發負擔,我們可以在此基礎上開始構建。
第 1 步 - XHTML
由於大部分工作由 PhotoShoot jQuery 插件處理,我們的工作被簡化為只提供一個將轉換為照片拍攝階段的 div(我們仍然需要傳遞一個配置對象來保存我們想要顯示的圖像,以及其他一些選項)。
demo.html
<div id="main">

<!-- The plugin automatically inserts the needed markup here -->

</div>
您可以在頁面上的任何位置使用此 div。您需要在樣式表中指定固定的寬度和高度才能使其正常工作。頁面加載完畢並初始化插件後,會在這個div中插入額外的代碼。
demo.html
<div id="main">

<div class="blur" style="......"></div>
<div class="blur" style="......"></div>
<!--  8 more blur divs -->

<div class="overlay" style="opacity: 0.2;"></div>

<div style="......" class="viewFinder">
<img src="photoShoot/viewfinder.png" width="300" height="200">
</div>

<!-- Additional html for the shots is inserted here. Not part of the plug-in.  -->

</div>
這裡發生了很大的變化。如前所述,模糊效果是通過將透明 div 相互堆疊來實現的 - blur 分區。在此之後是疊加 div,根據傳遞給插件的 opacity 選項將其下方的圖層變暗。
最後我們有了取景器,它跟隨鼠標在該區域上的移動,並以圖像的非模糊版本作為其背景。
為了確保最大的靈活性,插件提供了一種在點擊發生時執行用戶定義函數的方法。這正是我們用來模擬相機閃光燈並在專輯 div 中插入新鏡頭的方法,這不是插件的一部分。
第 2 步 - CSS
該插件帶有自己的樣式表 (photoShoot/jquery.photoShoot-1.0.css 在演示文件中),它定義了照片拍攝組件的外觀,所以我們只剩下設置頁面其餘部分的樣式了。
styles.css
#main{
    /* This div is converted to a photoShoot stage by the Photo Shoot plug-in */
    margin:0 auto;
    width:960px;
    height:600px;
}

.shot{
    /* These contain a scaled down version of the background image: */

    border:3px solid #FCFCFC;
    float:right;
    position:relative;
    margin-left:10px;
    overflow:hidden;

    /* Adding a CSS3 shadow below the shots: */

    -moz-box-shadow:0 0 2px black;
    -webkit-box-shadow:0 0 2px black;
    box-shadow:0 0 2px black;
}

.shot img{
    display:block;
}

.album{
    /* This div holds the shots */
    bottom:50px;
    height:110px;
    overflow:hidden;
    position:absolute;
    right:20px;
    width:490px;
}

.album .slide{
    /* The slide div is contained in album  */
    width:700px;
    height:110px;
    position:relative;
    left:-210px;
}
每個鏡頭都由我們自己的自定義 shoot 動態插入 發生單擊事件時的函數(如您將在本教程的下一步中看到的那樣)。這些鏡頭基本上是背景圖像的縮小版本(這意味著圖像被下載一次並多次使用),根據事件發生時取景器的位置,它們上下偏移。
專輯 和幻燈片 div 是由我們自己的 jQuery 腳本(不是插件)添加的。這裡的原理是slide div大於它的parent,album div,並且shot在插入的時候是向左滑動的,稍後再說。
第 3 步 - jQuery
photoShoot 插件本身不會在這裡討論,您可以在其官方頁面上閱讀更多信息。然而,我們確實需要一些額外的 jQuery 代碼:
- 插入 .album 到 #main div;
- 從數組中選擇一個隨機的 flickr 圖像以饋送到插件;
- 創建選項對象;
- 定義自定義鏡頭 插件點擊鼠標調用的函數;
- 使用 .photoshoot() 調用插件 方法。
script.js
$(document).ready(function(){

    // This code is executed after the DOM has been completely loaded

    // Assigning the jQuery object to a variable for speed:
    var main = $('#main');

    // Setting the width of the photoshoot area to
    // 1024 px or the width of the document - whichever is smallest:

    main.width(Math.min(1024,$(document).width()));

    // Creating an array with four possible backgrounds and their sizes:
    var pics = new Array(
                { url:'http://farm4.static.flickr.com/3595/3405361333_77f2a5e731_b.jpg', size:{x:1024,y:677}},
                { url:'http://farm4.static.flickr.com/3028/2753126743_4249a4e948_b.jpg', size:{x:1024,y:768}},
                { url:'http://farm4.static.flickr.com/3641/3595250019_5a1237899a_b.jpg', size:{x:1024,y:768}},
                { url:'http://farm3.static.flickr.com/2592/4018062274_1f7f23597d_o.jpg', size:{x:1158,y:756}}
    );

    // Choosing a random picture to be passed to the PhotoShoot jQuery plug-in:
    var bg = pics[parseInt(Math.random()*4)];

    // Creating an options object (try tweeking the variables):
    var opts = {
        image       :   bg.url,
        onClick     :   shoot,
        opacity     :   0.8,
        blurLevel   :   4
    }

    // Calling the photoShoot plug-in and converting the #main div to a photo shoot stage:
    main.photoShoot(opts);

    // Adding the album holder to the stage:
    $('<div class="album">').html('<div class="slide" />').appendTo(main);

    // Our own shoot function (it is passed as onClick to the options array above):
    function shoot(position){
        // This function is called by the plug-in when the button is pressed

        // Setting the overlay's div to white will create the illusion of a camera flash:
        main.find('.overlay').css('background-color','white');

        // The flash will last for 100 milliseconds (a tenth of the second):
        setTimeout(function(){main.find('.overlay').css('background-color','')},100);

        // Creating a new shot image:
        var newShot = $('<div class="shot">').width(150).height(100);
        newShot.append( $('<img src="'+bg.url+'" width="'+(bg.size.x/2)+'" height="'+(bg.size.y/2)+'" />').css('margin',-position.top*0.5+'px 0 0 -'+position.left*0.5+'px') );

        // Removing the fourth shot (the count starts from 0):
        $('.shot').eq(3).remove();

        // Adding the newly created shot to the album div, but moved 160px to the right.
        // We start an animation to slide it in view:

        newShot.css('margin-right',-160).prependTo('.album .slide').animate({marginRight:0},'slow');
    }
});
每次單擊該區域時,幻燈片都會添加一個新鏡頭 div 右側有負邊距。在此之後動畫開始,它在視圖中滑動它並將其他鏡頭推到左側,隱藏最左邊的鏡頭。
使用 remove 刪除不可見的鏡頭很重要 () 方法。這樣我們就可以防止 DOM 中出現不需要的元素。
這樣我們的拍照效果就完成了!
結論
今天我們使用了一種解決問題的方法,使用純 CSS 和 JavaScript 來創建照片拍攝效果。您可以自由使用此處演示的技術並在代碼的基礎上進行構建。有許多可能的用途,尤其是在導航系統和促銷網站中。
如果您喜歡本教程,請務必在 twitter 上關注我們以獲取最新的 Web 開發新聞和鏈接。
非常感謝 haglundc 在本教程中使用的風景照片。
你怎麼看?您將如何使用它?