一個 jQuery Twitter Ticker(更新)
簡介
在本教程中,我們將創建一個使用 Twitter 搜索 API 的 jQuery、CSS 和 PHP 推特代碼。它將顯示您或您朋友的最新推文。為了使用 twitter 更新的 v1.1 API,我們必須使用 PHP 代理腳本,它會為我們安全地與 API 通信。
最初,本教程發佈於 2009 年,使用了 Twitter 的搜索 API,該 API 僅支持 JavaScript,不需要身份驗證。這讓事情變得容易多了,但是從 2013 年 6 月 11 日開始,twitter 停止了這個 API。下面是本教程的更新版本,它使用 PHP 腳本與更新的基於 OAuth 的 v1.1 API 進行通信。要使其正常工作,您必須從 twitter 的開發站點創建一個 twitter 應用程序。
第 0 步 - 創建 Twitter 應用程序
所有對 twitter API 的請求都必須使用 API 密鑰進行簽名。獲得它們的唯一方法是從 Twitter 的開發者網站創建一個應用程序。請按以下步驟操作:
- 訪問 https://dev.twitter.com 並使用您的 Twitter 用戶名和密碼登錄;
- 點擊右上角的“創建新應用”按鈕;
- 填寫必填字段,然後單擊“創建”。創建應用後,它將具有隻讀訪問權限,這在我們的示例中非常好;
- 在應用程序頁面上,單擊“創建我的訪問令牌”。這將允許應用程序從您的帳戶中讀取數據,就好像它是您一樣(只讀)。這是某些 API 端點所要求的。
這將為您提供訪問令牌、客戶端密碼和其他密鑰,您必須在 proxy.php 中輸入這些信息 在教程的最後一步,讓演示工作。
第 1 步 - XHTML
XHTML 部分非常簡單。
demo.html
<div id="twitter-ticker">
<!-- Twitter container, hidden by CSS and shown if JS is present -->
<div id="top-bar">
<!-- This contains the title and icon -->
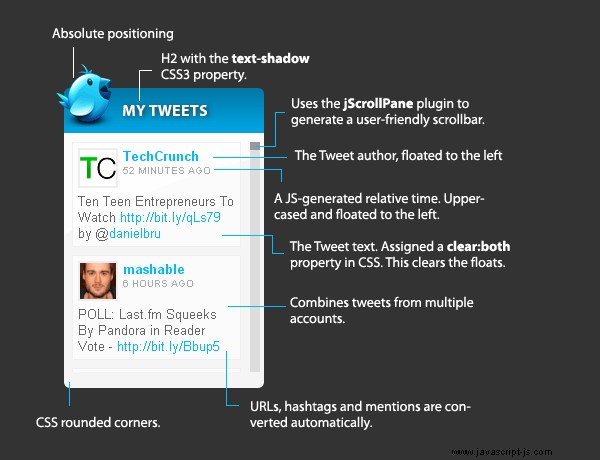
<div id="twitIcon"><img src="img/twitter_64.png" width="64" height="64" alt="Twitter icon" /></div>
<!-- The twitter icon -->
<h2 class="tut">My tweets</h2>
<!-- Title -->
</div>
<div id="tweet-container"><img id="loading" src="img/loading.gif" width="16" height="11" alt="Loading.." /></div>
<!-- The loading gif animation - hidden once the tweets are loaded -->
<div id="scroll"></div>
<!-- Container for the tweets -->
</div> twitter 代碼僅在 JavaScript 時運行 存在並且啟用 .這就是為什麼我們將它隱藏在 CSS 中並使用 jQuery 顯示它的原因。這將確保它只有在正常工作時才會顯示。
在設計中,我使用了來自freakyframes 的令人驚嘆的推特圖標。
讓我們轉向 CSS

第 2 步 - CSS
如果您打算修改演示,則應該從這裡開始。
demo.css
body,h1,h2,h3,p,quote,small,form,input,ul,li,ol,label{
    /* Resetting some of the page elements */
    margin:0px;
    padding:0px;
}

h2.tut{
    /* This is the "MY TWEETS" title */
    color:white;
    font-family:"Myriad Pro", Arial, Helvetica, sans-serif;
    font-size:16px;
    padding:12px 0 0 58px;
    text-transform:uppercase;

    /* The CSS3 text-shadow property */
    text-shadow:2px 1px 6px #333;
}

#twitter-ticker{
    /* Styling the ticker */
    width:200px;
    height:300px;
    background:url(img/slickbg.png) no-repeat #f5f5f5;
    color:#666666;
    display:none;

    /* Rounded corners */
    -moz-border-radius:10px 10px 6px 6px;
    -khtml-border-radius: 6px;
    -webkit-border-radius: 6px;
    border-radius:6px;

    text-align:left;
}

#tweet-container{
    /* This is where the tweets are inserted */
    height:230px;
    width:auto;
    overflow:hidden;
}

#twitIcon{
    /* Positioning the icon holder absolutely and moving it to the upper-left */
    position:absolute;
    top:-25px;
    left:-10px;
    width:64px;
    height:64px;
}

#top-bar{
    height:45px;
    background:url(img/top_bar.png) repeat-x;
    border-bottom:1px solid white;
    position:relative;
    margin-bottom:8px;

    /* Rounding the top part of the ticker, works only in Firefox unfortunately */
    -moz-border-radius:6px 6px 0 0;
}

.tweet{
    /* Affects the tweets */
    padding:5px;
    margin:0 8px 8px;

    border:1px solid #F0F0F0;
    background:url(img/transparent.png);

    width:auto;
    overflow:hidden;
}

.tweet .avatar,
.tweet .user,
.tweet .time{
    float:left;
}

.tweet .time{
    text-transform:uppercase;
    font-size:10px;
    color:#AAAAAA;
    white-space:nowrap;
}

.tweet .avatar img{
    width:36px;
    height:36px;
    border:2px solid #eeeeee;
    margin:0 5px 5px 0;
}

.tweet .txt{
    /* Using the text container to clear the floats */
    clear:both;
}

.tweet .user{
    font-weight:bold;
}

a, a:visited {
    /* Styling the links */
    color:#00BBFF;
    text-decoration:none;
    outline:none;
}

a:hover{
    text-decoration:underline;
}

#loading{
    /* The loading gif animation */
    margin:100px 95px;
}
下面你可以看到推特代碼的詳細解釋。
現在讓我們看一下jQuery源碼。
第 3 步 - jQuery
jQuery 前端將與 proxy.php 腳本通信。因為 PHP 將處理與 twitter API 的通信,所以 jQuery 部分將非常簡單。
以下是它的工作原理:
- 代碼加載;
- JS 向 proxy.php 發送一個發布請求,其中包含要顯示的 Twitter 用戶名數組(在 tweetUsers 中 數組);
- 傳遞給 $.post() 的回調函數將為推文構建標記並將它們呈現在推特小部件中;
現在這裡是實現這一點的代碼:
demo.html
<!-- In the head section: -->
<link rel="stylesheet" type="text/css" href="demo.css" />
<link rel="stylesheet" type="text/css" href="jScrollPane/jScrollPane.css" />

<!-- Before the closing body tag: -->
<script type="text/javascript" src="http://ajax.googleapis.com/ajax/libs/jquery/1.10.1/jquery.min.js"></script>
<script type="text/javascript" src="jScrollPane/jquery.mousewheel.js"></script>
<script type="text/javascript" src="jScrollPane/jScrollPane.min.js"></script>
<script type="text/javascript" src="script.js"></script>
首先,我們包含我們的 demo.css 和 jScrollPane.css .這些樣式的股票代碼。
稍後我們包含 jQuery 庫 來自 Google 的 CDN,鼠標滾輪 插件和 jScrollPane 插件。
最後是 script.js ,如下圖:
script.js
$(function(){

    var tweetUsers = ['tutorialzine','TechCrunch','smashingmag','mashable'],
        container = $('#tweet-container');

    $('#twitter-ticker').slideDown('slow');

    $.post('proxy.php', {handles:tweetUsers}, function(response){

        // Empty the container
        container.html('');

        $.each(response.statuses, function(){

            var str = ' <div class="tweet">\
                        <div class="avatar"><a href="http://twitter.com/'+this.user.screen_name+'" target="_blank"><img src="'+this.user.profile_image_url+'" alt="'+this.from_user+'" /></a></div>\
                        <div class="user"><a href="http://twitter.com/'+this.user.screen_name+'" target="_blank">'+this.user.screen_name+'</a></div>\
                        <div class="time">'+relativeTime(this.created_at)+'</div>\
                        <div class="txt">'+formatTwitString(this.text)+'</div>\
                        </div>';

            container.append(str);

        });

        // Initialize the jScrollPane plugin
        container.jScrollPane({
            mouseWheelSpeed:25
        });

    });

    // Helper functions

    function formatTwitString(str){
        str=' '+str;
        str = str.replace(/((ftp|https?):\/\/([-\w\.]+)+(:\d+)?(\/([\w/_\.]*(\?\S+)?)?)?)/gm,'<a href="$1" target="_blank">$1</a>');
        str = str.replace(/([^\w])\@([\w\-]+)/gm,'[email protected]<a href="http://twitter.com/$2" target="_blank">$2</a>');
        str = str.replace(/([^\w])\#([\w\-]+)/gm,'$1<a href="http://twitter.com/search?q=%23$2" target="_blank">#$2</a>');
        return str;
    }

    function relativeTime(pastTime){
        var origStamp = Date.parse(pastTime);
        var curDate = new Date();
        var currentStamp = curDate.getTime();

        var difference = parseInt((currentStamp - origStamp)/1000);

        if(difference < 0) return false;

        if(difference <= 5)              return "Just now";
        if(difference <= 20)         return "Seconds ago";
        if(difference <= 60)         return "A minute ago";
        if(difference < 3600)            return parseInt(difference/60)+" minutes ago";
        if(difference <= 1.5*3600)       return "One hour ago";
        if(difference < 23.5*3600)       return Math.round(difference/3600)+" hours ago";
        if(difference < 1.5*24*3600) return "One day ago";

        var dateArr = pastTime.split(' ');
        return dateArr[4].replace(/\:\d+$/,'')+' '+dateArr[2]+' '+dateArr[1]+(dateArr[3]!=curDate.getFullYear()?' '+dateArr[3]:'');
    }

});
您可以在第 27 行看到我們使用了 jScrollPane 插件。它在推文的右側創建了一個方便的滾動條。感謝 mouseWheel 插件它還能夠檢測和滾動鼠標滾輪移動的頁面。
改變 在代碼中顯示的 twitter 帳戶,您需要修改 tweetUsers 數組。
如果您提供兩個或多個推特名稱,他們的推文將一起顯示。只有 50 個最近的 過去 7 天 的推文 將被退回。
值得注意的是,Twitter 對搜索 api 的 URL 設置了 140 個字符 的最大限制 .這對於大約 7 個 Twitter 用戶名來說已經足夠了。
現在讓我們看看 proxy.php 腳本是如何與 Twitter API 通信的!
第 4 步 - PHP
正如我上面提到的,Twitter 代碼的原始版本使用舊的搜索 API,因此不需要服務器端代碼。但這是基於 OAuth 協議構建的新 API 的要求。為了讓事情變得更簡單,我們將使用一個 PHP 庫,它使使用 Twitter 的 v1.1 API 變得輕而易舉 - codebird.php。下載庫並將其包含在腳本文件夾中後,您就可以開始了:
proxy.php
require_once ('codebird/codebird.php');

// Set a proper JSON header
header('Content-type: application/json');

/*----------------------------
    Twitter API settings
-----------------------------*/

// Consumer key
$twitter_consumer_key = '';

// Consumer secret. Don't share it with anybody!
$twitter_consumer_secret = '';

// Access token
$twitter_access_token = '';

// Access token secrent. Also don't share it!
$twitter_token_secret = '';

/*----------------------------
    Initialize codebird
-----------------------------*/

// Application settings
\Codebird\Codebird::setConsumerKey($twitter_consumer_key, $twitter_consumer_secret);

$cb = \Codebird\Codebird::getInstance();

// Your account settings
$cb->setToken($twitter_access_token, $twitter_token_secret);

/*----------------------------
    Handle the API request
-----------------------------*/

// Is the handle array passed?
if(!isset($_POST['handles']) || !is_array($_POST['handles'])){
    exit;
}

// Does a cache exist?

$cache = md5(implode($_POST['handles'])).'.cache';

if(file_exists($cache) && time() - filemtime($cache) < 15*60){
    // There is a cache file, and it is fresher than 15 minutes. Use it!

    echo file_get_contents($cache);
    exit;
}

// There is no cache file. Build it!

$twitter_names = array();

foreach($_POST['handles'] as $handle){

    if(!preg_match('/^[a-z0-9\_]+$/i', $handle)){
        // This twitter name is not valid. Skip it.
        continue;
    }

    $twitter_names[] = 'from:'.$handle;
}

$search_string = implode(' OR ', $twitter_names);

// Issue a request for the Twitter search API using the codebird library
$reply = (array) $cb->search_tweets("q=$search_string&count=50");
$result = json_encode($reply);

// Create/update the cache file
file_put_contents($cache, $result);

// Print the result
echo $result;
該腳本接收它需要在 $_POST 中搜索的 twitter 句柄 大批。然後它會創建一個 15 分鐘有效的緩存文件(如果您需要更多實時結果,請降低此值)以最大限度地減少對 Twitter API 的請求。最後將響應打印為 JSON 格式供前端處理。
這樣,推特代碼就完成了!
結論
今天我們使用 Twitter 的新 API 構建了一個方便的 jQuery Ticker,它將在您的博客或網站上顯示您的最新推文。您可以以任何您認為合適的方式自由修改和構建代碼。