一個很棒的帶有 jQuery 的 CSS3 燈箱庫
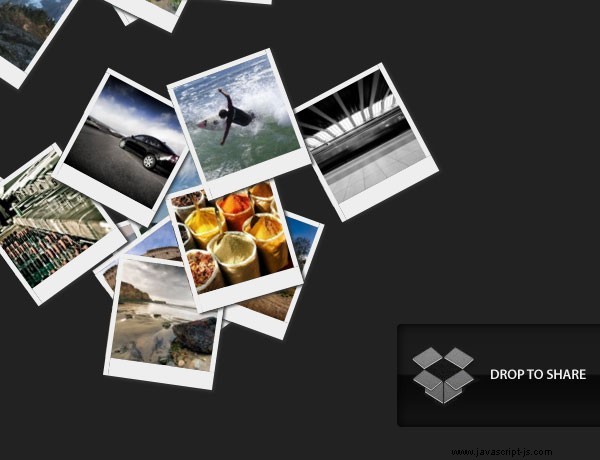
在本教程中,我們將利用最新的 CSS3 和 jQuery 技術創建一個很棒的圖片庫。該腳本將能夠掃描您的網絡服務器上的圖像文件夾,並在其周圍構建一個完整的拖放式燈箱庫。
它將是搜索引擎友好的,甚至與可以追溯到 IE6 的瀏覽器兼容(儘管失去了一些令人敬畏的東西)。
我們正在使用 jQuery , jQuery UI (用於拖放)和用於 lightbox 的 fancybox jQuery 插件 顯示除了 PHP 和 CSS 用於交互性和样式。
在繼續閱讀之前,我建議您下載示例文件 並有 demo 在標籤頁中打開以供參考。
注意: 您可以在 Epic Bootstrap 上找到使用 Bootstrap 框架製作的更現代的燈箱圖庫。
那麼讓我們從第一步開始吧。
第 1 步 - XHTML
主要思想是將 PHP 作為後端,它將為每個圖像生成必要的 XHTML。生成的代碼稍後包含在 demo.php 中 並完成圖庫 XHTML 前端。
demo.php
<!-- The gallery container: -->
<div id="gallery">

<?php
/* PHP code, covered in detail in step 3 */
?>

<!-- The droppable share box -->
<div class="drop-box">
</div>

</div>

<div class="clear"></div>

<!-- This is later converted to the modal window with the url of the image: -->
<div id="modal" title="Share this picture">
<form>
<fieldset>
<label for="name">URL of the image</label>
<input type="text" name="url" id="url" class="text ui-widget-content ui-corner-all" onfocus="this.select()" />
</fieldset>
</form>

</div>
這裡沒有什麼太花哨的。注意模態 div - 它用於生成當用戶在共享框上放置圖片時顯示的模式窗口。但稍後會詳細介紹。
第 2 步 - CSS
現在我們已經有了所有的標記,是時候給它設置樣式了。首先,我們需要在頁面的 head 部分包含 CSS 文件。
demo.php
<link rel="stylesheet" type="text/css" href="demo.css" />
<link rel="stylesheet" href="http://ajax.googleapis.com/ajax/libs/jqueryui/1.7.2/themes/ui-darkness/jquery-ui.css" type="text/css" media="all" />
<link rel="stylesheet" type="text/css" href="fancybox/jquery.fancybox-1.2.6.css">
完成之後,我們就可以開始編寫樣式了。
demo.css
body{
    /* Styling the body */
    color:white;
    font-size:13px;
    background: #222222;
    font-family:Arial, Helvetica, sans-serif;
}

#gallery{
    /* The pics container */
    width:100%;
    height:580px;
    position:relative;
}

.pic, .pic a{
    /* Each picture and the hyperlink inside it */
    width:100px;
    height:100px;
    overflow:hidden;
}

.pic{
    /* Styles specific to the pic class */
    position:absolute;
    border:5px solid #EEEEEE;
    border-bottom:18px solid #eeeeee;

    /* CSS3 Box Shadow */
    -moz-box-shadow:2px 2px 3px #333333;
    -webkit-box-shadow:2px 2px 3px #333333;
    box-shadow:2px 2px 3px #333333;
}

.pic a{
    /* Specific styles for the hyperlinks */
    text-indent:-999px;
    display:block;
    /* Setting display to block enables advanced styling for links */
}

.drop-box{
    /* The share box */
    width:240px;
    height:130px;
    position:absolute;
    bottom:0;
    right:0;
    z-index:-1;

    background:url(img/drop_box.png) no-repeat;
}

.drop-box.active{
    /* The active style is in effect when there is a pic hovering above the box */
    background-position:bottom left;
}

label, input{
    /* The modal dialog URL field */
    display:block;
    padding:3px;
}

label{
    font-size:10px;
}

fieldset{
    border:0;
    margin-top:10px;
}

#url{
    /* The URL field */
    width:240px;
}
pic 可能需要額外說明的上述類之一 CSS 類。這用於將圖像設置為看起來像寶麗來。為了實現這一點,它基本上在每張圖片周圍放置了一個白色邊框。
類中還使用了 box-shadow CSS3 屬性,在每個寶麗來下投下陰影。
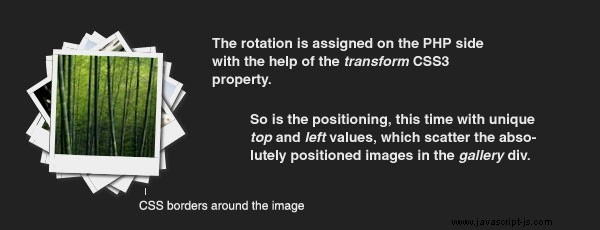
如果您查看了畫廊的演示,您會注意到圖像分散在頁面上並以隨機方式旋轉。這僅在 PHP 端使用 CSS 完成,稍後您將看到。
其餘的樣式都比較簡單,這裡就不詳細介紹了。
第 3 步 - PHP
您還記得,在第 1 步中,我們介紹了 XHTML 部分,並提到 PHP 負責生成包含單個圖像的標記。以下是實際完成的方式:
demo.php
/* Configuration Start */
$thumb_directory = 'img/thumbs';
$orig_directory = 'img/original';
$stage_width=600;
$stage_height=400;
/* Configuration end */

$allowed_types=array('jpg','jpeg','gif','png');
$file_parts=array();
$ext='';
$title='';
$i=0;

/* Opening the thumbnail directory and looping through all the thumbs: */
$dir_handle = @opendir($thumb_directory) or die("There is an error with your image directory!");
$i=1;

while ($file = readdir($dir_handle))
{
    /* Skipping the system files: */
    if($file=='.' || $file == '..') continue;

    $file_parts = explode('.',$file);
    $ext = strtolower(array_pop($file_parts));

    /* Using the file name (withouth the extension) as a image title: */
    $title = implode('.',$file_parts);
    $title = htmlspecialchars($title);

    /* If the file extension is allowed: */
    if(in_array($ext,$allowed_types))
    {
        /* Generating random values for the position and rotation: */
        $left=rand(0,$stage_width);
        $top=rand(0,400);
        $rot = rand(-40,40);

        if($top>$stage_height-130 && $left > $stage_width-230)
        {
            /* Prevent the images from hiding the drop box */
            $top-=120+130;
            $left-=230;
        }

        /* Outputting each image: */
        echo '
        <div id="pic-'.($i++).'" class="pic" style="top:'.$top.'px;left:'.$left.'px;background:url('.$thumb_directory.'/'.$file.') no-repeat 50% 50%; -moz-transform:rotate('.$rot.'deg); -webkit-transform:rotate('.$rot.'deg);">

        <a class="fancybox" rel="fncbx" href="'.$orig_directory.'/'.$file.'" target="_blank">'.$title.'</a>

        </div>';
    }
}

/* Closing the directory */
closedir($dir_handle);
首先,我們用 opendir 打開縮略圖目錄(使用 @ 修飾符防止任何可能的錯誤顯示給用戶)並循環遍歷所有圖像。
在循環中,我們跳過非圖像文件,為每個圖像生成一些 XHTML 代碼,直接打印到屏幕上。
如 CSS 部分所述,PHP 處理頁面上圖像的旋轉和散射。每個圖像都位於隨機的 X 和 Y 坐標上,並以 -40 到 40 度之間的角度旋轉(以防止圖像倒置)。這些是使用 rand() 生成的 PHP 函數並作為 CSS 樣式包含在圖片的 style 屬性中 .
圖庫使用了兩個圖像文件夾 - thumbs ,其中包含 100x100 像素的縮略圖和 原始 ,其中包含圖像的大版本。縮略圖和原始圖像必須具有相同的名稱,否則圖庫將無法正常運行。
唯一剩下的就是加入一些交互性。
第 4 步 - jQuery
現在我們手頭上有一個漂亮的 CSS 庫。但是,如果我們不能在屏幕上拖動漂亮的圖片並將它們放大到精美的燈箱顯示中,那沒有任何意義,不是嗎?
這就是 jQuery 發揮作用的地方。
script.js
$(document).ready(function(){
    // Executed once all the page elements are loaded
    var preventClick=false;
    $(".pic a").bind("click",function(e){

        /* This function stops the drag from firing a click event and showing the lightbox */
        if(preventClick)
        {
            e.stopImmediatePropagation();
            e.preventDefault();
        }
    });

    $(".pic").draggable({

        /* Converting the images into draggable objects */
        containment: 'parent',
        start: function(e,ui){
            /* This will stop clicks from occuring while dragging */
            preventClick=true;
        },
        stop: function(e, ui) {
            /* Wait for 250 milliseconds before re-enabling the clicks */
            setTimeout(function(){ preventClick=false; }, 250);
        }
    });

    $('.pic').mousedown(function(e){
        /* Executed on image click */
        var maxZ = 0;

        /* Find the max z-index property: */
        $('.pic').each(function(){
            var thisZ = parseInt($(this).css('zIndex'))
            if(thisZ>maxZ) maxZ=thisZ;
        });

        /* Clicks can occur in the picture container (with class pic) and in the link inside it */
        if($(e.target).hasClass("pic"))
        {
            /* Show the clicked image on top of all the others: */
            $(e.target).css({zIndex:maxZ+1});
        }
        else $(e.target).closest('.pic').css({zIndex:maxZ+1});
    });

    /* Converting all the links to a fancybox gallery */
    $("a.fancybox").fancybox({
        zoomSpeedIn: 300,
        zoomSpeedOut: 300,
        overlayShow:false
    });

    /* Converting the share box into a droppable: */
    $('.drop-box').droppable({
        hoverClass: 'active',
        drop:function(event,ui){

            /* Fill the URL text field with the URL of the image. */
            /* The id of the image is appended as a hash #pic-123 */
            $('#url').val(location.href.replace(location.hash,'')+'#' + ui.draggable.attr('id'));
            $('#modal').dialog('open');
        }
    });

    /* Converts the div with id="modal" into a modal window  */
    $("#modal").dialog({
        bgiframe: true,
        modal: true,
        autoOpen:false,

        buttons: {
            Ok: function() {
                $(this).dialog('close');
            }
        }
    });

    if(location.hash.indexOf('#pic-')!=-1)
    {
        /* Checks whether a hash is present in the URL */
        /* and shows the respective image */
        $(location.hash+' a.fancybox').click();
    }
});
首先,我們為圖片綁定了一個點擊功能,這會在我們開始拖動圖片時阻止燈箱顯示。
在此之後,我們使所有圖片可拖動 ,然後我們設置燈箱 .
稍後我們將“Drop to share”框變成droppable ,這使它能夠檢測圖片何時懸停和丟棄。這允許我們向容器添加特殊的懸停樣式,並在放置時打開模態窗口。
模態 window 本身是 jQuery UI 附帶的一個用戶界面組件。它將所有頁面元素隱藏在半透明覆蓋下,從而為用戶屏蔽它們。唯一引起他們注意的是消息窗口,在我們的例子中,它包含帶有圖像 URL 的文本框,在 id 為 modal 的 div 中定義 在第一步中。
最後,我們有幾行代碼檢查是否有 #pic-123 類型的哈希 存在於 URL 中,這將導致相應的圖像在頁面加載時顯示在燈箱中。
有了這個,我們很棒的 CSS3 庫就完成了!
結論
今天我們創建了一個精美的畫廊,它使用了廣泛的網絡技術,為您帶來一種全新的動態體驗。
此外,添加到現有網站非常容易 - 您只需上傳並提供包含圖像的文件夾,無需數據庫。
您可以在自己的站點中自由修改和使用此圖庫。請務必通過我們的Tutorial Mash-ups與社區分享您基於此圖庫的所有精彩創作 (在評論部分上方)。
此外,如果您喜歡這篇文章,您可能想訂閱我們的 RSS 提要或在 twitter 上關注我們。