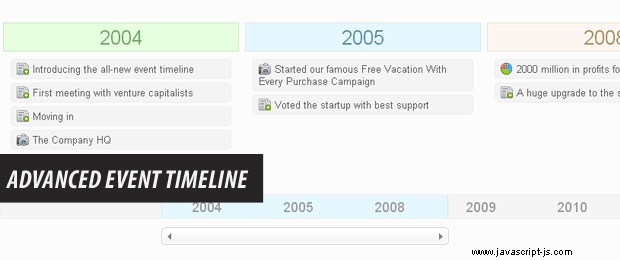
使用 PHP、CSS 和 jQuery 的高級事件時間線
首先,我想花時間感謝你們,Tutorialzine 的讀者們,感謝你們過去一年的支持,並祝你們 2010 年新的快樂!很多有趣的教程正在開發中,並且還計劃了一些不錯的更改,我相信您會喜歡的。
現在讓我們以全新的方式開始新的一年!
這一切都始於上週,當時我收到了一位讀者的來信:
我一直在尋找好的教程創意,所以 Vinnie 準時發送了他的電子郵件!
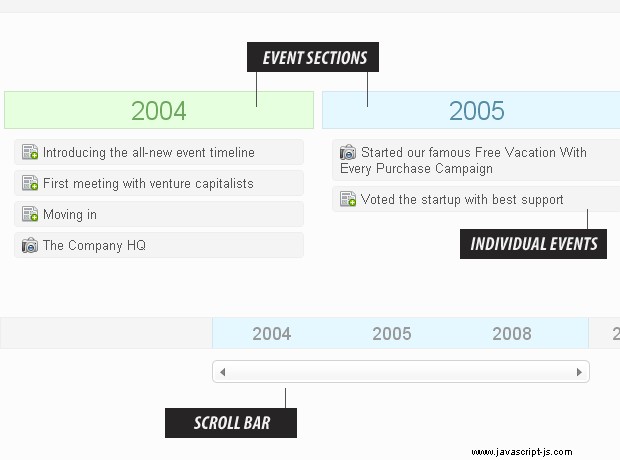
今天我們在 PHP、MySQL、CSS 和 jQuery 的幫助下製作了一個高級事件時間線,它將顯示一個帶有可點擊事件的漂亮時間線。添加新的將像在數據庫中插入一行一樣簡單。
第 1 步 - XHTML
首先,一定要從上面的按鈕中抓取示例文件,這樣你就可以輕鬆地跟踪發生了什麼。
本教程的第一步是創建 XHTML 結構,如 demo.php 所示 .
demo.php
<div id="timelineLimiter"> <!-- Hides the overflowing timelineScroll div -->
<div id="timelineScroll"> <!-- Contains the timeline and expands to fit -->

<!-- PHP code that generates the event list -->

<div class="clear"></div>
</div>

<div id="scroll"> <!-- The year time line -->
<div id="centered"> <!-- Sized by jQuery to fit all the years -->
<div id="highlight"></div> <!-- The light blue highlight shown behind the years -->
<?php echo $scrollPoints ?> <!-- This PHP variable holds the years that have events -->
<div class="clear"></div>

</div>
</div>

<div id="slider"> <!-- The slider container -->
<div id="bar"> <!-- The bar that can be dragged -->
<div id="barLeft"></div>  <!-- Left arrow of the bar -->
<div id="barRight"></div>  <!-- Right arrow, both are styled with CSS -->
</div>
</div>

</div>
我省略了一些生成事件的 PHP 代碼,以便我們可以更好地查看標記(我們將在下一步中回到它)。
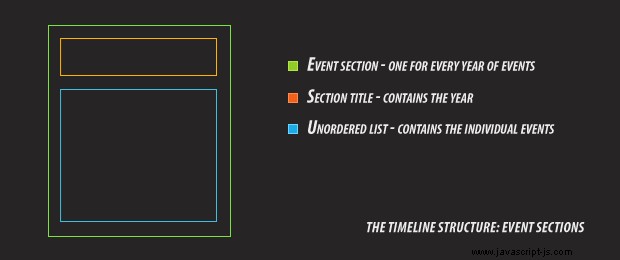
主要思想是我們有兩個 div - timelineLimiter 和 timelineScroll 定位在裡面。前者佔用屏幕的寬度,後者擴展以適應插入其中的所有事件部分。這樣,只有一部分較大的內部 div 是可見的,其餘部分可以通過我們將在第 4 步中製作的 jQuery 滑塊左右滾動。
現在讓我們看看 PHP 後端。
第 2 步 - PHP
PHP 選擇數據庫中的所有事件並在 $dates 中按年份對事件進行分組 大批。它稍後循環遍歷它並將所有事件輸出為 屬於每個事件年份的無序列表中的元素。
demo.php
// We first select all the events from the database ordered by date:

$dates = array();
$res = mysql_query("SELECT * FROM timeline ORDER BY date_event ASC");

while($row=mysql_fetch_assoc($res))
{
    // Store the events in an array, grouped by years:
    $dates[date('Y',strtotime($row['date_event']))][] = $row;
}

$colors = array('green','blue','chreme');
$scrollPoints = '';

$i=0;
foreach($dates as $year=>$array)
{
    // Loop through the years:

    echo '
        <div class="event">
        <div class="eventHeading '.$colors[$i++%3].'">'.$year.'</div>
        <ul class="eventList">';

    foreach($array as $event)
    {
        // Loop through the events in the current year:

        echo '<li class="'.$event['type'].'">
            <span class="icon" title="'.ucfirst($event['type']).'"></span>
            '.htmlspecialchars($event['title']).'

            <div class="content">
                <div class="body">'.($event['type']=='image'?'<div style="text-align:center"><img src="'.$event['body'].'" alt="Image" /></div>':nl2br($event['body'])).'</div>
                <div class="title">'.htmlspecialchars($event['title']).'</div>
                <div class="date">'.date("F j, Y",strtotime($event['date_event'])).'</div>
            </div>
            </li>';
    }

    echo '</ul></div>';

    // Generate a list of years for the time line scroll bar:
    $scrollPoints.='<div class="scrollPoints">'.$year.'</div>';

}
這樣就生成了頁面的完整標記。現在我們已經準備好應用一些樣式了。
第 3 步 - CSS
在我們將 CSS 樣式表插入到文檔的開頭部分之後,我們就可以開始製定規則了。這裡只包括更有趣的。您可以在 styles.css 中查看其餘部分 .
styles.css
.event{
    /* Contains the section title and list with events */
    float:left;
    padding:4px;
    text-align:left;
    width:300px;
    margin:0 5px 50px;
}

.eventList li{
    /* The individual events */
    background:#F4F4F4;
    border:1px solid #EEEEEE;
    list-style:none;
    margin:5px;
    padding:4px 7px;

    /* CSS3 rounded corners */
    -moz-border-radius:4px;
    -webkit-border-radius:4px;
    border-radius:4px;
}

.eventList li:hover{
    /* The hover state: */
    cursor:pointer;
    background:#E6F8FF;
    border:1px solid #D4E6EE;
    color:#548DA5;
}

li span{
    /* The event icon */
    display:block;
    float:left;
    height:16px;
    margin-right:5px;
    width:16px;
}

/* Individual background images for each type of event: */

li.news span.icon {     background:url(img/icons/newspaper.png) no-repeat; }
li.image span.icon {    background:url(img/icons/camera.png) no-repeat; }
li.milestone span.icon {    background:url(img/icons/chart.png) no-repeat; }

#timelineLimiter{
    /* Hides the overflowing timeline */
    width:100%;
    overflow:hidden;
    padding-top:10px;
    margin:40px 0;
}

#scroll{
    /* The small timeline below the main one. Hidden here and shown by jQuery if JS is enabled: */
    display:none;
    height:30px;

    background:#F5F5F5;
    border:1px solid #EEEEEE;
    color:#999999;
}

.scrollPoints{
    /* The individual years */
    float:left;
    font-size:1.4em;
    padding:4px 10px;
    text-align:center;
    width:100px;

    position:relative;
    z-index:10;
}
這裡 .event 類對事件年份部分進行樣式設置(這些是對同一年發生的事件進行分組的 div)。
在代碼中間附近,您可以看到我們使用了一些適用於大多數瀏覽器的 CSS3 圓角(IE 和 Opera 不支持)。
我們還為每種事件類型(圖片、新聞或里程碑)定義了單獨的背景圖片。
第 4 步 - jQuery
最後一步是在瀏覽器中插入一層交互性。我們將在 demo.php 的 head 部分中包含 jQuery JavaScript 庫的幫助下完成這項工作 .
我把下面的代碼分成兩部分,這樣更容易理解。
script.js - 第 1 部分
$(document).ready(function(){

    /* This code is executed after the DOM has been completely loaded */

    /* The number of event sections / years with events */

    var tot=$('.event').length;

    $('.eventList li').click(function(e){

        showWindow('<div>'+$(this).find('div.content').html()+'</div>');
    });

    /* Each event section is 320 px wide */
    var timelineWidth = 320*tot;

    var screenWidth = $(document).width();

    $('#timelineScroll').width(timelineWidth);

    /* If the timeline is wider than the screen show the slider: */
    if(timelineWidth > screenWidth)
    {
        $('#scroll,#slider').show();
        $('#centered,#slider').width(120*tot);

        /* Making the scrollbar draggable: */
        $('#bar').width((120/320)*screenWidth).draggable({

            containment: 'parent',
            drag: function(e, ui) {

            if(!this.elem)
            {
                /* This section is executed only the first time the function is run for performance */

                this.elem = $('#timelineScroll');

                /* The difference between the slider's width and its container: */
                this.maxSlide = ui.helper.parent().width()-ui.helper.width();

                /* The difference between the timeline's width and its container */
                this.cWidth = this.elem.width()-this.elem.parent().width();

                this.highlight = $('#highlight');
            }

            /* Translating each movement of the slider to the timeline: */
            this.elem.css({marginLeft:'-'+((ui.position.left/this.maxSlide)*this.cWidth)+'px'});

            /* Moving the highlight: */
            this.highlight.css('left',ui.position.left)
        }

    });

    $('#highlight').width((120/320)*screenWidth-3);
}
});
正如您可能已經註意到,在 tut 的 PHP 部分(如果不檢查 - 在第 33 行附近),對於每個事件,我們都包含一組 div 元素,其中包含附加信息(標題、文本和日期)。這些被 display:none 隱藏 在我們的 CSS 文件中,並由 jQuery 訪問,以便彈出窗口可以填充數據而無需發送 AJAX 請求(更不用說此內容對搜索引擎可見並且非常適合 SEO)。所以這是一個雙贏的解決方案。
數據本身正在以下腳本的第二部分中獲取:
script.js - 第 2 部分
function showWindow(data)
{
    /* Each event contains a set of hidden divs that hold
additional information about the event: */

    var title = $('.title',data).text();
    var date = $('.date',data).text();
    var body = $('.body',data).html();

    $('<div id="overlay">').css({

        width:$(document).width(),
        height:$(document).height(),
        opacity:0.6

    }).appendTo('body').click(function(){

        $(this).remove();
        $('#windowBox').remove();
    });

    $('body').append('<div id="windowBox"><div id="titleDiv">'+title+'</div>'+body+'<div id="date">'+date+'</div></div>');

    $('#windowBox').css({

        width:500,
        height:350,
        left: ($(window).width() - 500)/2,
        top: ($(window).height() - 350)/2
    });
}
在這個函數中,我們基本上將上面第 1 部分(調用該函數)傳遞的參數視為常規 HTML,並使用標準 jQuery 選擇器來填充標題、日期和正文變量。
第 5 步 - MySQL
僅當您計劃在自己的服務器上運行演示,或者想添加到當前站點時,才需要最後一步。
為了讓這一切順利進行,您必須從 timeline.sql 重新創建時間線 MySQL 表 ,在下載檔案中提供。您還需要在 connect.php 中填寫您的數據庫憑據 .
至此,我們的活動時間線就完成了!
結論
今天,我們創建了一個時間表,您可以對其進行修改,以展示標記您日子的重要事件。它很容易修改,您可以在您或您客戶的項目中自由使用它。
如果您喜歡,請務必發表評論:)