製作一個非常酷的 jQuery 庫
簡介
使用流行的 java 腳本庫(如 jQuery)的主要好處之一是可用插件的數量驚人,可以啟動任何開發項目。
今天我們將使用 PHP、CSS、jQuery 和 jQuery Lightbox 插件來構建一個自定義圖庫,掃描一個文件夾並輸出一個漂亮的圖庫。
無需下載插件 - 我已將其包含在演示文件中,因此獲取它們 繼續閱讀。
XHTML
我們從 XHTML 前端開始。
demo.php
<div id="container">

<div id="heading"> <!-- the heading -->
<h1>A cool jQuery gallery</h1>
</div>
<div id="gallery"> <!-- this is the containing div for the images -->

<?php
//our php code goes here
?>

<div class="clear"></div> <!-- using clearfix -->
</div>

<div id="footer"> <!-- some tutorial info -->
</div>

</div> <!-- closing the container div -->
這基本上就是它的全部內容。請注意突出顯示的區域 - 這是我們放置 PHP 代碼的地方,它將生成畫廊圖像。現在讓我們來看看這是如何完成的。
PHP
這個想法很簡單——我們的 PHP 後端將掃描一個我們用畫廊圖像設置的文件夾,並將它變成一個精美的 CSS 和 jQuery 畫廊。這種策略的好處在於,建立畫廊非常容易,並且將圖像添加到現有的畫廊是一種魅力 - 只需通過 FTP 將它們轉儲到畫廊的目錄中,它就可以開始了。
demo.php
$directory = 'gallery';  //where the gallery images are located

$allowed_types=array('jpg','jpeg','gif','png'); //allowed image types

$file_parts=array();
$ext='';
$title='';
$i=0;

//try to open the directory
$dir_handle = @opendir($directory) or die("There is an error with your image directory!");

while ($file = readdir($dir_handle))    //traverse through the files
{
    if($file=='.' || $file == '..') continue;   //skip links to the current and parent directories

    $file_parts = explode('.',$file);   //split the file name and put each part in an array
    $ext = strtolower(array_pop($file_parts));  //the last element is the extension

    $title = implode('.',$file_parts);  //once the extension has been popped out, all that is left is the file name
    $title = htmlspecialchars($title);  //make the filename html-safe to prevent potential security issues

    $nomargin='';
    if(in_array($ext,$allowed_types))   //if the extension is an allowable type
    {
        if(($i+1)%4==0) $nomargin='nomargin';   //the last image on the row is assigned the CSS class "nomargin"
        echo '
        <div class="pic '.$nomargin.'" style="background:url('.$directory.'/'.$file.') no-repeat 50% 50%;">
        <a href="'.$directory.'/'.$file.'" title="'.$title.'" target="_blank">'.$title.'</a>
        </div>';

        $i++;   //increment the image counter
    }
}

closedir($dir_handle);  //close the directory
通過遍歷目錄中的文件並跳過非圖像文件,我們為每個圖像輸出一些 XHTML 代碼。這段代碼(第 28-39 行)包含一個 div 容器,帶有一個 CSS 類 pic (在某些情況下是 nomargin ,稍後會詳細介紹),我們設置它的背景 通過 style 到圖像文件 屬性。我們通過將其位置指定為 50% 50% 將圖像定位在背景的中心 .這會將其水平和垂直居中,因此僅顯示適合 div 容器大小的中間部分。這會創建一個漂亮的縮略圖,而無需實際調整圖像大小。
這最適用於分辨率較小的圖像,因此您應該考慮在上傳這些 10 兆像素的照片之前調整它們的大小。
div 包含一個超鏈接,該超鏈接鏈接到圖像並具有 title 的圖像文件名。 lightBox 使用了這兩個屬性 插件來生成燈箱畫廊。因此,通過重命名文件,您可以更改其下方顯示的標題。
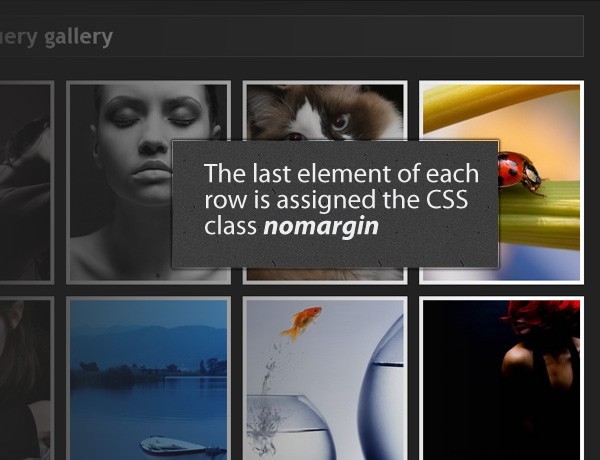
您可能想知道 nomargin 的意義何在 班級?圖庫中的每張圖片都有一個右邊距和一個下邊距。但這意味著每行的最後一個元素不可能與標題 div 的右側部分對齊,並且看起來很業餘。所以我們分配了這個特殊的類,它會清除每行最後一個元素的右邊距並給我們一個正確的對齊方式。
CSS
一切都已準備就緒,但我們仍然要讓它看起來很酷。
demo.css
/* first reset some of the elements for browser compatibility */
body,h1,h2,h3,p,td,quote,small,form,input,ul,li,ol,label{
    margin:0px;
    padding:0px;
    font-family:Arial, Helvetica, sans-serif;
}

body{   /* style the body */
    margin-top:20px;
    color:white;
    font-size:13px;
    background-color:#222222;
}

.clear{ /* the clearfix class */
    clear:both;
}

a, a:visited {  /* a:visited is needed so it works properly in IE6 */
    color:#00BBFF;
    text-decoration:none;
    outline:none;
}

a:hover{    /* the hover effect */
    text-decoration:underline;
}

#container{ /* the main container div */
    width:890px;
    margin:20px auto;
}

#heading,#footer{   /* the header and the footer share some of their style rules */
    background-color:#2A2A2A;
    border:1px solid #444444;
    height:20px;
    padding:6px 0 25px 15px;
    margin-bottom:30px;
    overflow:hidden;
}

#footer{    /* ..but not all */
    height:10px;
    margin:20px 0 20px 0;
    padding:6px 0 11px 15px;
}

div.nomargin{   /* our special nomargin class */
    margin-right:0px;
}

.pic{   /* divs that hold all the pictures in the gallery */
    float:left;
    margin:0 15px 15px 0;
    border:5px solid white;
    width:200px;
    height:250px;
}

.pic a{ /* in every .pic container there is a hyperlink exactly the size of the container */
    width:200px;
    height:250px;
    text-indent:-99999px;
    display:block;  /* don't forget that widths and heights of hyperlinks are useless without display:block */
}

h1{ /* style the heading */
    font-size:28px;
    font-weight:bold;
    font-family:"Trebuchet MS",Arial, Helvetica, sans-serif;
}

h2{ /* the footer text */
    font-weight:normal;
    font-size:14px;
    color:white;
}
jQuery
為了讓一切順利,我們需要包含 jQuery 在我們的頁面中添加 java 腳本庫,並添加 lightBox 插入。以下代碼取自 demo.php 的 head 部分 :
<link rel="stylesheet" type="text/css" href="lightbox/css/jquery.lightbox-0.5.css">
<link rel="stylesheet" type="text/css" href="demo.css" />

<script type="text/javascript" src="http://ajax.googleapis.com/ajax/libs/jquery/1.3.2/jquery.min.js"></script>
<script type="text/javascript" src="lightbox/js/jquery.lightbox-0.5.pack.js"></script>
<script type="text/javascript" src="script.js"></script>
在第 1 行,我們包含 lightbox 插件的 CSS 文件,用於設置顯示圖像的燈箱的樣式。在第 2 行,我們包含了我們自己的 CSS 文件。
第 4 行是我們包含來自 Google 的 CDN 的 jQuery 庫的地方。後來出現了燈箱插件本身和我們自己的 script.js 文件。
現在我們已經準備好畫龍點睛了。
script.js
// after the page has finished loading
$(document).ready(function(){

    $('.pic a').lightBox({
    // we call the lightbox method, and convert all the hyperlinks in the .pic container into a lightbox gallery

        imageLoading: 'lightbox/images/loading.gif',
        imageBtnClose: 'lightbox/images/close.gif',
        imageBtnPrev: 'lightbox/images/prev.gif',
        imageBtnNext: 'lightbox/images/next.gif'

    });

});
燈箱() 方法將對像作為可選參數。我們提供任何參數的唯一原因是我更改了插件的默認位置,將其放在子文件夾 /lightbox 這有助於更清晰的文件結構。不幸的是,插件使用的圖像無法訪問,必須手動提供。
有了這個,我們的畫廊就完成了。
結論
在本教程中,您學習瞭如何借助 jQuery lightBox 插件創建時尚的圖片庫。您可以在您的項目中使用示例代碼,並且可以以您認為合適的任何方式自由修改它。您也可以按原樣使用它,只需進行最少的修改即可將圖庫添加到您的網站。

