一個基於 AJAX 的購物車,帶有 PHP、CSS 和 jQuery
簡介
在本教程中,我們將創建一個 AJAX 驅動的購物車。所有產品都將存儲在 MySQL 數據庫中,由 PHP 顯示和處理數據。
jQuery 將驅動頁面上的 AJAX-es,並在 simpletip 插件的幫助下添加到交互式簽出過程中。
所以繼續,下載演示文件 並開始閱讀。
第 1 步 - MySQL 數據庫
如果您想設置一個工作演示,您需要在 數據庫管理器 中執行以下 SQL 代碼 (例如 phpMyAdmin)。它將設置表格並插入一些產品。該代碼也可在 table.sql 中找到 在演示文件中。
table.sql
CREATE TABLE IF NOT EXISTS `internet_shop` (
  `id` int(6) NOT NULL auto_increment,
  `img` varchar(32) collate utf8_unicode_ci NOT NULL default '',
  `name` varchar(64) collate utf8_unicode_ci NOT NULL default '',
  `description` text collate utf8_unicode_ci NOT NULL,
  `price` double NOT NULL default '0',
  PRIMARY KEY  (`id`),
  UNIQUE KEY `img` (`img`)
) ENGINE=MyISAM  DEFAULT CHARSET=utf8 COLLATE=utf8_unicode_ci AUTO_INCREMENT=7 ;

INSERT INTO `internet_shop` VALUES(1, 'iPod.png', 'iPod', 'The original and popular iPod.', 200);
INSERT INTO `internet_shop` VALUES(2, 'iMac.png', 'iMac', 'The iMac computer.', 1200);
INSERT INTO `internet_shop` VALUES(3, 'iPhone.png', 'iPhone', 'This is the new iPhone.', 400);
INSERT INTO `internet_shop` VALUES(4, 'iPod-Shuffle.png', 'iPod Shuffle', 'The new iPod shuffle.', 49);
INSERT INTO `internet_shop` VALUES(5, 'iPod-Nano.png', 'iPod Nano', 'The new iPod Nano.', 99);
INSERT INTO `internet_shop` VALUES(6, 'Apple-TV.png', 'Apple TV', 'The new Apple TV. Buy it now!', 300);
在此之後,您應該在 connect.inc.php 中填寫您的 MySQL 憑據 .
第 2 步 - XHTML
首先,我們從主要標記開始。
demo.php
<div id="main-container"> <!-- the main container element -->

<div class="tutorialzine">    <!-- some headings -->
<h1>Shopping cart</h1>
<h3>The best products at the best prices</h3>
</div>

<div class="container">   <!-- the first section - products -->

<span class="top-label">
<span class="label-txt">Products</span> <!-- section label -->
</span>

<div class="content-area">
<div class="content drag-desired">    <!-- assigning a common content class and an individually targeted drag-desired class -->

<?php
// php code that generates the products
?>

<div class="clear"></div>   <!-- clearing the floats -->
</div>
</div>

<div class="bottom-container-border"> <!-- bottom part of the section -->
</div>

</div>    <!-- closing the products section -->

<div class="container">   <!-- the second section - shopping cart -->

<span class="top-label">
<span class="label-txt">Shopping Cart</span>    <!-- label for the section -->
</span>

<div class="content-area">
<div class="content drop-here">   <!-- content class, shared with the product section above, and the targeted drop-here class -->
<div id="cart-icon">
<img src="img/Shoppingcart_128x128.png" alt="shopping cart" class="pngfix" width="128" height="128" />    <!-- using the pngfix class -->
<img src="img/ajax_load_2.gif" alt="loading.." id="ajax-loader" width="16" height="16" /> <!-- the rotating gif - hidden by default and shown during ajax interactions -->
</div>

<form name="checkoutForm" method="post" action="order.php">   <!-- the form -->
<div id="item-list">  <!-- in this div we insert all the products in the shopping cart -->

</div>
</form>   <!-- closing the form -->

<div class="clear"></div>   <!-- clearing -->

<div id="total"></div>  <!-- the total price goes here -->
<div class="clear"></div>   <!-- clearing the floats -->

<a href="" onclick="document.forms.checkoutForm.submit(); return false;" class="button">Checkout</a>    <!-- the submit button, hidden by default, notice the onclick attribute -->

</div>
</div>

<div class="bottom-container-border"> <!-- bottom part of the section -->
</div>

</div><!-- closing the main container -->
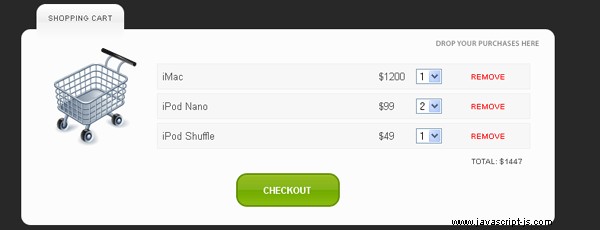
如您所見,我們將內容組織成兩個主要部分,它們使用的 XHTML 標記幾乎相同 - 第一個部分顯示所有產品,第二個部分用作購物卡。
下面你可以看到產品部分結構的詳細解釋。

這些產品是由我們的 PHP 代碼生成的,您可以在第 18 行看到。我們將在幾分鐘內深入研究。現在讓我們看看我們是如何將 XHTML 佈局轉變為最終設計的。
第 3 步 - CSS
這次的css代碼比較長,所以我將它分成幾部分。
demo.css
body,h1,h2,h3,p,td,quote,small,form,input,ul,li,ol,label{
/* resetting some of the styles for browser compatibility */
    margin:0px;
    padding:0px;
    font-family:Arial, Helvetica, sans-serif;
}

body{
    color:#555555;
    font-size:13px;
    background-color:#282828;
}

.clear{ /* implementing the clear-fix hack for fixing floated layouts */
    clear:both;
}

#main-container{    /* this is the main container, holding the two sections */
    width:700px;
    margin:20px auto;
}

.container{ /* the main container of our content sections - the products and the shopping cart */
    margin-bottom:40px;
}

.top-label{ /* the outer span comprising the label */
    background:url(img/label_bg.png) no-repeat; /* showing the left part of label_bg.png - a wide round-cornered image */
    display:inline-block;
    margin-left:20px;
    position:relative;
    margin-bottom:-15px;    /* the whole label is lowered on the product section */
}

.label-txt{ /* the inner span - red border in the illustration above */
    background:url(img/label_bg.png) no-repeat top right;   /* shows the right part of the wider label_bg.png */
    display:inline-block;
    font-size:10px;
    height:36px;
    margin-left:10px;   /* leaves space on the left, so that the outer span can show its background */
    padding:12px 15px 0 5px;
    text-transform:uppercase;
}

.content-area{  /* The top part of the rounded container image, see the illustration above */
    background:url(img/container_top.png) no-repeat #fcfcfc;
    padding:15px 20px 0 20px;
}

.content{   /* shared by the two sections */
    padding:10px;
}

.drag-desired{  /* individually targeted properties */
    background:url(img/drag_desired_label.png) no-repeat top right;
    padding:30px;
}

.drop-here{ /* not shared with the other sections */
    background:url(img/drop_here_label.png) no-repeat top right;
}

.bottom-container-border{   /* the bottom rounded graphic, that completes the section */
    background:url(img/container_bottom.png) no-repeat;
    height:14px;
}

.product{   /* styling the products */
    border:2px solid #F5F5F5;
    float:left;
    margin:15px;
    padding:10px;
}

.product img{
    cursor:move;
}

p.descr{
    padding:5px 0;
}

small{
    display:block;
    margin-top:4px;
}

.tooltip{   /* the tooltips, this div is created by the simpletip plugin */
    position: absolute;
    top: 0;
    left: 0;
    z-index: 3;
    display: none;

    background-color:#666666;
    border:1px solid #666666;
    color:#fcfcfc;

    padding:10px;

    -moz-border-radius:12px;    /* rounded corners */
    -khtml-border-radius: 12px;
    -webkit-border-radius: 12px;
    border-radius:12px;
}
注意工具提示類。它由 simpletip 插件 自動創建 ,但默認情況下沒有應用樣式。這就是為什麼我們在這裡設計它。我用過 border-radius 屬性,目前並非所有瀏覽器都支持,但對於不支持的瀏覽器會優雅降級。
現在讓我們看看針對購物車部分的樣式。
#cart-icon{  /* the div that contains the shopping cart icon */
    width:128px;
    float:left;
    position:relative;  /* changing the position to relative so that ajax-loader is positioned relative to it */
}

#ajax-loader{
    position:absolute;  /* absolute positioning makes an element relative to its parent if the latter has positioning different from the default  */
    top:0px;
    left:0px;
    visibility:hidden;
}

#item-list{ /* the contents of the shopping cart goes into this div */
    float:left;
    width:490px;
    margin-left:20px;
    padding-top:15px;
}

a.remove,a.remove:visited{  /* the REMOVE link */
    color:red;
    font-size:10px;
    text-transform:uppercase;
}

#total{ /* the total cost div */
    clear:both;
    float:right;
    font-size:10px;
    font-weight:bold;
    padding:10px 12px;
    text-transform:uppercase;
}

#item-list table{   /* every product in the shopping cart is positioned inside the item-list div */
    background-color:#F7F7F7;
    border:1px solid #EFEFEF;
    margin-top:5px;
    padding:4px;
}

a.button,a.button:visited{  /* the CHECKOUT button */
    display:none;

    height:29px;
    width:136px;

    padding-top:15px;
    margin:0 auto;
    overflow:hidden;

    color:white;
    font-size:12px;
    font-weight:bold;
    text-align:center;
    text-transform:uppercase;

    background:url(img/button.png) no-repeat center top;    /* showing only the top part of the background image */
}

a.button:hover{
    background-position:bottom; /* on hover we show the bottom part of the image */
    text-decoration:none;
}

/* Some less interesting classes */

a, a:visited {
    color:#00BBFF;
    text-decoration:none;
    outline:none;
}

a:hover{
    text-decoration:underline;
}

h1{
    font-size:28px;
    font-weight:bold;
    font-family:"Trebuchet MS",Arial, Helvetica, sans-serif;
}

h2{
    font-weight:normal;
    font-size:20px;

    color:#666666;
    text-indent:30px;
    margin:20px 0;
}

.tutorialzine h1{
    color:white;
    margin-bottom:10px;
    font-size:48px;
}

.tutorialzine h3{
    color:#F5F5F5;
    font-size:10px;
    font-weight:bold;
    margin-bottom:30px;
    text-transform:uppercase;
}

.tutorial-info{
    color:white;
    text-align:center;
    padding:10px;
    margin-top:-20px;
}
正如任何前端開發人員都會告訴你的那樣,我們這裡缺少一些東西。你猜對了 - IE6 的特殊處理 .
我個人計劃很快在我的項目中完全停止對 IE6 的支持——如果不是因為它,上面的代碼至少會縮短四分之一,而且調試時間也會少很多。
但無論如何,這裡是我們專門針對 IE6 的方式:
demo.php
<!--[if lt IE 7]>
<style type="text/css">
    .pngfix { behavior: url(pngfix/iepngfix.htc);}  /* this is a special htc file that fixes the IE6 transparency issues */
    .tooltip{width:200px;}; /* provide a default width for the tooltips */
</style>
<![endif]-->
那裡。現在讓我們看看 PHP 後端。
第 4 步 - PHP
我們以多種方式和場所使用 PHP。首先我們看一下產品列表是如何在主頁面生成的。
demo.php
$result = mysql_query("SELECT * FROM internet_shop");    // selecting all the products
while($row=mysql_fetch_assoc($result))
{
    echo '<div class="product"><img src="img/products/'.$row['img'].'" alt="'.htmlspecialchars($row['name']).'" width="128" height="128" class="pngfix" /></div>';
}
我們使用 PHP 的另一個地方是 tips.php , 它採用 圖像文件名 作為參數,檢查與該圖像關聯的產品,並將工具提示數據輸出為 html。這稍後被 simpletip 使用 插件。
ajax/tips.php
define('INCLUDE_CHECK',1);
require "../connect.php";

if(!$_POST['img']) die("There is no such product!");

$img=mysql_real_escape_string(end(explode('/',$_POST['img'])));

$row=mysql_fetch_assoc(mysql_query("SELECT * FROM internet_shop WHERE img='".$img."'"));

if(!$row) die("There is no such product!");

echo '<strong>'.$row['name'].'</strong>
<p class="descr">'.$row['description'].'</p>
<strong>price: $'.$row['price'].'</strong>
<small>Drag it to your shopping cart to purchase it</small>';
我們還使用 PHP 返回在購物車中添加產品所需的數據。不同的是,這次我們將數據返回為 JSON(一個 javascript 對象)。
ajax/addtocart.php
define('INCLUDE_CHECK',1);
require "../connect.php";

if(!$_POST['img']) die("There is no such product!");

$img=mysql_real_escape_string(end(explode('/',$_POST['img'])));
$row=mysql_fetch_assoc(mysql_query("SELECT * FROM internet_shop WHERE img='".$img."'"));

echo '{status:1,id:'.$row['id'].',price:'.$row['price'].',txt:\'\
\
<table width="100%" id="table_'.$row['id'].'">\
<tr>\
<td width="60%">'.$row['name'].'</td>\
<td width="10%">$'.$row['price'].'</td>\
<td width="15%"><select name="'.$row['id'].'_cnt" id="'.$row['id'].'_cnt" onchange="change('.$row['id'].');">\
<option value="1">1</option>\
<option value="2">2</option>\
<option value="3">3</option></slect>\
\
</td>\
<td width="15%"><a href="#" onclick="remove('.$row['id'].');return false;" class="remove">remove</a></td>\
</tr>\
</table>\'}';
輸出的對像有 status , id , 價格 和 txt 特性。這些被我們的 AJAX 函數使用,稍後您會看到。
請注意我是如何用反斜杠轉義字符串的每一行的。這樣做是因為 javascript 不支持多行字符串。
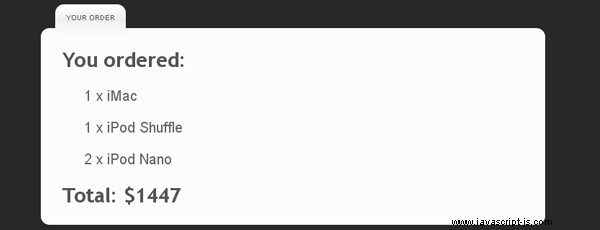
我們最後使用 PHP 的地方是 order.php ,用於處理訂單。目前,它只輸出您的訂單。您可以對其進行修改以包含電子郵件表單、貝寶功能或任何使其成為功能在線商店的東西。
order.php
<?php

define('INCLUDE_CHECK',1);
require "connect.php";

if(!$_POST) // if there is no data submitted to the form
{
    if($_SERVER['HTTP_REFERER'])    // redirect
    header('Location : '.$_SERVER['HTTP_REFERER']);
    exit;   // and exit
}

?>

<!-- XHTML code.. -->

<?php

$cnt = array();
$products = array();

foreach($_POST as $key=>$value)
{
    $key=(int)str_replace('_cnt','',$key);
    $products[]=$key;   // store the product ids in an array
    $cnt[$key]=$value;  // create a key / value pair where for each product id there is a corresponding value being the number of products
 purchased}

$result = mysql_query("SELECT * FROM internet_shop WHERE id IN(".join($products,',').")");  // selecting all the products with the IN() function

if(!mysql_num_rows($result))    // no products found
{
    echo '<h1>There was an error with your order!</h1>';
}
else
{
    echo '<h1>You ordered:</h1>';
    while($row=mysql_fetch_assoc($result))
    {
        echo '<h2>'.$cnt[$row['id']].' x '.$row['name'].'</h2>';
        $total+=$cnt[$row['id']]*$row['price'];
    }

    echo '<h1>Total: $'.$total.'</h1>';
}

?>
PHP 部分到此結束。唯一剩下的就是一些 jQuery 魔法。
第 5 步 - jQuery
我們將充分利用 jQuery,因此我們需要包含額外的 jQuery UI 庫以及基本庫。
<script type="text/javascript" src="http://ajax.googleapis.com/ajax/libs/jquery/1.3.2/jquery.min.js"></script>
<script type="text/javascript" src="http://ajax.googleapis.com/ajax/libs/jqueryui/1.7.2/jquery-ui.min.js"></script>
<script type="text/javascript" src="simpletip/jquery.simpletip-1.3.1.pack.js"></script> <!-- the jQuery simpletip plugin -->
<script type="text/javascript" src="script.js"></script> <!-- our script.js file -->
現在我們可以繼續我們的腳本了。
script.js
var purchased=new Array();    //an array containing all the products we've purchased so far
var totalprice=0;   //the total price

$(document).ready(function(){

    $('.product').simpletip({   //using the simpletip plugin

        offset:[40,0],
        content:'<img style="margin:10px;" src="img/ajax_load.gif" alt="loading" />', // default content
        onShow: function(){

            var param = this.getParent().find('img').attr('src');
            // fix for IE6
            if($.browser.msie && $.browser.version=='6.0')
            {
                param = this.getParent().find('img').attr('style').match(/src=\"([^\"]+)\"/);
                param = param[1];
            }

            // after the tooltip is shown, load the tips.php file and pass the image name as a parameter
            this.load('ajax/tips.php',{img:param});
        }

    });

    $(".product img").draggable({   // enable all product images to be dragged

    containment: 'document',
    opacity: 0.6,
    revert: 'invalid',
    helper: 'clone',
    zIndex: 100

    });

    $("div.content.drop-here").droppable({  // convert the shopping cart to a droppable

            drop:
                function(e, ui)
                {
                    var param = $(ui.draggable).attr('src');
                    // IE6 fix
                    if($.browser.msie && $.browser.version=='6.0')
                    {
                        param = $(ui.draggable).attr('style').match(/src=\"([^\"]+)\"/);
                        param = param[1];
                    }

                    addlist(param); // the special addlist function - see below
                }

    });

});
這裡的主要思想是我們使用圖像的 src 屬性作為發送到 PHP 後端的唯一鍵。數據庫中的每個產品都有一個文件名,我們可以通過它的產品圖像找到產品。
這整個代碼塊是在頁面加載完成後執行的,因此我們可以確定頁面上的所有元素都已初始化。
下面是 script.js 的第二部分 .
function addlist(param)
{
    // the addlist function ads a product to the shopping cart

    $.ajax({    // sending an ajax request to addtocart.php
    type: "POST",
    url: "ajax/addtocart.php",
    data: 'img='+encodeURIComponent(param), // the product image as a parameter
    dataType: 'json',   // expecting json
    beforeSend: function(x){$('#ajax-loader').css('visibility','visible');},    // showing the loading gif
    success: function(msg){

        $('#ajax-loader').css('visibility','hidden');   // hiding the loading gif animation
        if(parseInt(msg.status)!=1)
        {
            return false;   // if there has been an error, return false
        }
        else
        {
            var check=false;
            var cnt = false;

            for(var i=0; i<purchased.length;i++)
            {
                if(purchased[i].id==msg.id) // find if we have already bought this prduct
                {
                    check=true;
                    cnt=purchased[i].cnt;

                    break;
                }
            }

            if(!cnt)    // if we haven't bought it yet, or we have removed it from the purchases, we insert it in the shopping cart
                $('#item-list').append(msg.txt);

            if(!check)  // if we haven't bought it yet, insert it in the purchased array
            {
                purchased.push({id:msg.id,cnt:1,price:msg.price});
            }

            else    // else if we've bought it
            {
                if(cnt>=3) return false; // 3 products of type max

                purchased[i].cnt++;
                $('#'+msg.id+'_cnt').val(purchased[i].cnt); // update the select box
            }

            totalprice+=msg.price;  // recalculate the price
            update_total(); // update the total div

        }

        $('.tooltip').hide();   // hiding the tooltip (sometimes it stays on screen after the drag)

    }
    });
}

function findpos(id)    // a helper function that finds the position at which the product is inserted in the array, returns the position
{
    for(var i=0; i<purchased.length;i++)
    {
        if(purchased[i].id==id)
            return i;
    }

    return false;
}

function remove(id) // remove a product from the shopping cart
{
    var i=findpos(id);  // find its position in the array

    totalprice-=purchased[i].price*purchased[i].cnt;    // recalculate the price
    purchased[i].cnt = 0;   // reset the counter

    $('#table_'+id).remove();   // remove it from the cart
    update_total(); // update the total price counter on the page
}

function change(id) // evoked when we change the number of products via the select area
{
    var i=findpos(id);

    totalprice+=(parseInt($('#'+id+'_cnt').val())-purchased[i].cnt)*purchased[i].price;

    purchased[i].cnt=parseInt($('#'+id+'_cnt').val());
    update_total();
}

function update_total() // function that updates the total price div on the page
{
    if(totalprice)
    {
        $('#total').html('total: $'+totalprice);    // if we've bought somehitng, show the total price div and the purchase button
        $('a.button').css('display','block');
    }
    else    // hide them
    {
        $('#total').html('');
        $('a.button').hide();
    }
}
這段代碼中有幾個地方使用了 id 用於指向產品。 id 是一個唯一標識符,一旦我們插入一個新項目,它就由 MySQL 數據庫分配。
它由 AJAX 請求傳遞,我們需要將其轉換為我們的產品數組的索引位置才能使用它,這就是 findpos() 的目的 功能。
這樣我們的購物車就完成了!
結論
今天我們製作了一個功能強大的 AJAX 驅動的購物車。您可以免費下載代碼並以任何您希望的方式對其進行修改。您可以在此基礎上進行構建,甚至將其變成一個成熟的在線商店。