製作一個流暢的內容滑塊
簡介
網站管理員不斷尋找優化內容在其網站上呈現方式的方法。隨著“首屏”等術語的出現,提供引人注目的功能性用戶界面變得越來越重要。
在本教程中,我們將在 jQuery 和 MopSlider 插件的幫助下為電腦商店製作一個流暢的內容滑塊。滑塊將使用 PHP 生成,我們使用純 txt 文件作為筆記本配置的數據源。我們還使用了來自 tonev.deviantart.com 的筆記本電腦圖標。
第 1 步 - 數據源
在設計新功能時,您有很多關於如何存儲所需數據的選擇。出於本教程的目的,我們將所有筆記本電腦配置放入一個純 txt 文件中。此策略非常適合使用少於 100 個項目的簡單只讀 Web 應用程序。
與常規 MySQL 數據存儲相比,優勢在於您只需要一個文本編輯器即可修改數據和添加新模型,更不用說實現更簡單了。
下面是文本文件的示例結構。
db/slider.db.txt
Product Model | Product Description | Price | Path To Image | URL
Second Product | Description | Price | Path To Image | URL
Third Product | Description | Price | Path To Image | URL
每個項目佔據自己的行。行數是內容滑塊中的項目數。
有幾個數據列,用“|”分隔 .這些是模型 , 說明 , 價格 , 產品圖片 和一個 URL 了解更多信息。您可以通過添加或刪除列來修改此結構,但請記住將更改應用到 demo.php 循環 ,我們稍後會看一下。
此文件位於 db 文件夾。為了防止我們的文本數據庫被輸入並在網絡瀏覽器中打開,我們必須添加一個特殊的 .htaccess 文件。這是由 Apache Web 服務器執行的,它包含的規則將應用於當前目錄。
db/.htaccess
# This will prevent opening the db dir in a browser

deny from all

# Will return a 403 error
此行防止目錄及其所有文件在 Web 瀏覽器中打開。
現在讓我們來看看 XHTML。
第 2 步 - XHTML
頁面的標記非常簡單。
<div id="main"> <!-- The main container -->
<div class="titles"> <!-- Placeholder for the headings -->
<h1>Notebooks</h1>
<h2>Fresh on the market</h2>
</div>
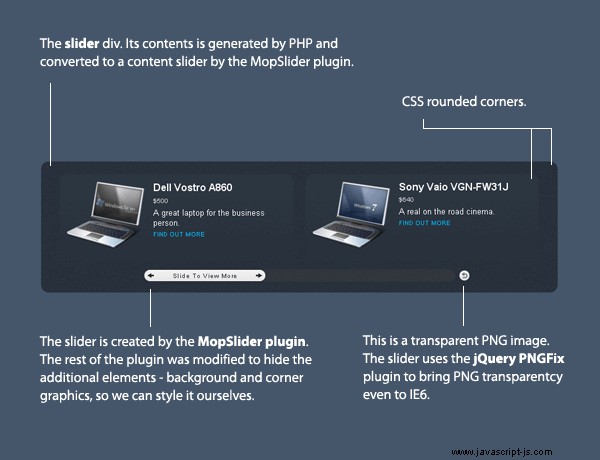
<div class="container"> <!-- Styled and rounded -->
<div id="slider"> <!-- Contains the generated products -->
<?=$products?> <!-- PHP var that holds the products -->
</div>
<div class="clear"></div>
<!-- Clearing the floats, the old-fashioned way -->
</div>
</div> 這幾乎是不言自明的。現在讓我們轉到我們的 CSS。
第 3 步 - CSS
正是 CSS 使得編寫像上面這樣乾淨簡單的 XHTML 成為可能。
demo.css
body,h1,h2,h3,p,quote,small,form,input,ul,li,ol,label{
    /* resetting some of the page elements */
    margin:0px;
    padding:0px;
}

body{
    /* styling the body */
    color:white;
    font-size:13px;
    background: url(img/bg.png);
    font-family:Arial, Helvetica, sans-serif;
}

h1{
    color:white;
    font-size:28px;
    font-weight:bold;
    font-family:"Trebuchet MS",Arial, Helvetica, sans-serif;
}

h2{
    font-family:"Arial Narrow",Arial,Helvetica,sans-serif;
    font-size:10px;
    font-weight:normal;
    letter-spacing:1px;
    padding-left:2px;
    text-transform:uppercase;
    white-space:nowrap;
}

.clear{
    /* Clear the floats */
    clear:both;
}

#main{
    /* The main container */
    width:800px;
    margin:0 auto;
}

.container,.titles{
    /* These classes share some common rules */
    color:white;
    margin-top:30px;
    width:100%;

    /* Hiding everything that overflows off the sides */
    overflow:hidden;

    background:url(img/bg_dark.png) #28313b;
    padding:20px 10px 10px;

    /* CSS rounded corners */
    -moz-border-radius:12px;
    -khtml-border-radius: 12px;
    -webkit-border-radius: 12px;
    border-radius:12px;
}

.titles{
    width:140px;
    padding:10px 15px;
    height:55px;
}

.product{
    /* The products class */
    width:370px;
    height:150px;
    background:url(img/product_bg.png) repeat-x;
    padding-top:10px;

    -moz-border-radius:12px;
    -khtml-border-radius: 12px;
    -webkit-border-radius: 12px;
    border-radius:12px;
}

.product .pic{
    /* The product image */
    float:left;
    width:128px;
    height:128px;
    padding:0 10px 5px;
    margin-top:-15px;
}

.product .link,.product .price{
    /* Common rules */
    font-size:10px;
    text-transform:uppercase;
    padding:4px 0;
}

.product .price{
    /* Custom rule */
    color:#CCCCCC;
}

.product .title{
    font-size:16px;
    font-weight:bold;
}

a, a:visited {
    /* Styling the hyperlink */
    color:#00BBFF;
    text-decoration:none;
    outline:none;
}

a:hover{
    /* The hover state */
    text-decoration:underline;
}
讓我們繼續下一步。
第 4 步 - jQuery
讓我們看看 script.js 中有什麼 文件。
script.js
$(document).ready(function(){

    /* After the page has finished loading */
    $("#slider").mopSlider({
        'w':800,
        'h':150,
        'sldW':500,
        'btnW':200,
        'itemMgn':20,
        'indi':"Slide To View More",
        'type':'tutorialzine',  /* A custom theme */
        'shuffle':0
    });

});
您可以在 第 11 行 看到 我們提供“tutorialzine ”作為主題。是什麼賦予了?該插件帶有兩個主題 - paper , 和 黑色 .不幸的是,這些似乎都不適合當前的頁面設計。這就是為什麼我稍微調整了插件以啟用這個自定義主題。
與內置的不同,這個隱藏了所有的圖形、圓角和背景,只留下滑動條和內容。這使我們能夠以我們喜歡的方式對其進行皮膚設計並將其集成到任何頁面設計中,但您必須記住正確設置它的樣式。
在本例中,我們為 container 設置了樣式 包含滑塊的 div,它工作得很好。
讓我們繼續 PHP 代碼。
第 5 步 - PHP
PHP 處理讀取 slider.db.txt 的重要任務 並填充 滑塊 div 與產品。這發生在 demo.php 的開頭 .
demo.php
$slides = file('db/slider.db.txt');
/* Read the file with file() - returns an array where */
/* every file row becomes a new array element */

$products='';
foreach($slides as $v)
{
    $data = preg_split('/\s*\|\s*/',$v);
    /* Split the file row by the vertical lines */
    /* Using preg_split to remove unnecessary spaces and tabulations */

    $products.='
    <div class="product">
    <div class="pic"><img src="'.$data[3].'" width="128" height="128" alt="'.htmlspecialchars($data[0]).'" /></div>
    <div class="title">'.$data[0].'</div>
    <div class="price">$'.$data[2].'</div>
    <div class="description">'.$data[1].'</div>
    <div class="link"><a href="'.$data[4].'" target="blank">Find out more</a></div>
    <div class="clear"></div>
    </div>';

    /* $data becomes an array with the product's properties */
}
如果要修改 slider.db.txt, 您必須更改上述循環,以便在需要的地方顯示數據。
這樣我們的內容滑塊就完成了!
結論
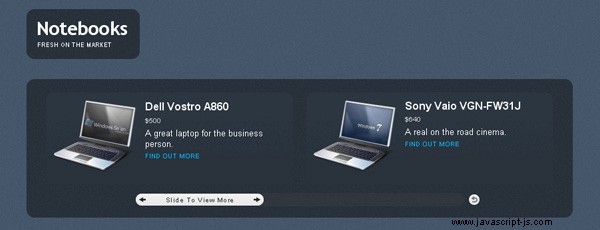
今天我們創建了一個內容滑塊,它將幫助您優化網站的空間並為訪問者提供吸引眼球的功能。
您可以以任何您認為合適的方式自由修改代碼並將其集成到您的網站中。