在 JavaScript 中從零開始構建一個簡單的 MVC 應用程序
我想使用模型-視圖-控制器架構模式用純 JavaScript 編寫一個簡單的應用程序。所以我做到了,就在這裡。希望它可以幫助您理解 MVC,因為當您剛開始時,它是一個難以理解的概念。
我製作了這個 todo 應用程序,它是一個簡單的小瀏覽器應用程序,允許您對 todos 進行 CRUD(創建、讀取、更新和刪除)。它只包含一個 index.html , style.css , 和 script.js ,非常好用,簡單且無依賴/無框架,可用於學習目的。
先決條件
- 基本的 JavaScript 和 HTML
- 熟悉最新的 JavaScript 語法
目標
使用純 JavaScript 在瀏覽器中創建待辦事項應用程序,並熟悉 MVC(和 OOP - 面向對象編程)的概念。
- 查看演示
- 查看源代碼
什麼是模型視圖控制器?
MVC 是組織代碼的一種可能模式。這是一個受歡迎的。
- 型號 - 管理應用程序的數據
- 查看 - 模型的可視化表示
- 控制器 - 鏈接用戶和系統
模型 是數據。在這個 todo 應用程序中,這將是實際的 todo,以及添加、編輯或刪除它們的方法。
視圖 是數據的顯示方式。在這個 todo 應用程序中,這將是 DOM 和 CSS 中呈現的 HTML。
控制器 連接模型和視圖。它接受用戶輸入,例如單擊或鍵入,並處理用戶交互的回調。
模型從不接觸視圖。視圖從不接觸模型。控制器將它們連接起來。
初始設置
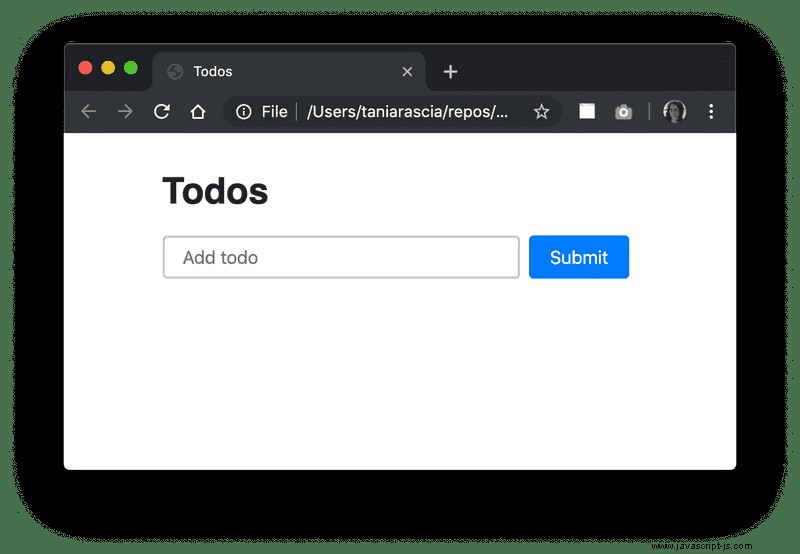
這將是一個完全 JavaScript 的應用程序,這意味著一切都將通過 JavaScript 處理,而 HTML 將僅包含正文中的單個根元素。
index.html<!DOCTYPE html>
<html lang="en">
<head>
<meta charset="utf-8" />
<meta name="viewport" content="width=device-width, initial-scale=1.0" />
<meta http-equiv="X-UA-Compatible" content="ie=edge" />
<title>Todo App</title>
<link rel="stylesheet" href="style.css" />
</head>
<body>
<div id="root"></div>
<script src="script.js"></script>
</body>
</html>
我寫了一點 CSS 只是為了讓它看起來可以接受,你可以在這裡找到並保存到 style.css .關於CSS我就不多寫了,因為這不是本文的重點。
好的,現在我們有了 HTML 和 CSS,是時候真正開始編寫應用程序了。
入門
我們將使它變得非常好和簡單,以了解哪個類與 MVC 的哪個部分相關。我會做一個 Model 類,View 類和 Controller 類,它接受模型和視圖。該應用程序將是控制器的一個實例。
class Model {
  constructor() {}
}

class View {
  constructor() {}
}

class Controller {
  constructor(model, view) {
    this.model = model
    this.view = view
  }
}

const app = new Controller(new Model(), new View())
很好很抽象。
型號
讓我們首先關注模型,因為它是三個部分中最簡單的。它不涉及任何事件或 DOM 操作。它只是存儲和修改數據。
型號class Model {
constructor() {
// The state of the model, an array of todo objects, prepopulated with some data
this.todos = [
{id: 1, text: 'Run a marathon', complete: false},
{id: 2, text: 'Plant a garden', complete: false},
]
}
addTodo(todoText) {
const todo = {
id: this.todos.length > 0 ? this.todos[this.todos.length - 1].id + 1 : 1,
text: todoText,
complete: false,
}
this.todos.push(todo)
}
// Map through all todos, and replace the text of the todo with the specified id
editTodo(id, updatedText) {
this.todos = this.todos.map((todo) =>
todo.id === id ? {id: todo.id, text: updatedText, complete: todo.complete} : todo,
)
}
// Filter a todo out of the array by id
deleteTodo(id) {
this.todos = this.todos.filter((todo) => todo.id !== id)
}
// Flip the complete boolean on the specified todo
toggleTodo(id) {
this.todos = this.todos.map((todo) =>
todo.id === id ? {id: todo.id, text: todo.text, complete: !todo.complete} : todo,
)
}
}
我們有一個 addTodo , editTodo , deleteTodo , 和 toggleTodo .這些都應該很容易解釋 - add 將一個新的 todo 附加到數組,edit 找到要編輯的 todo 的 id 並替換它,從數組中刪除過濾器一個 todo,並切換 complete 布爾屬性。
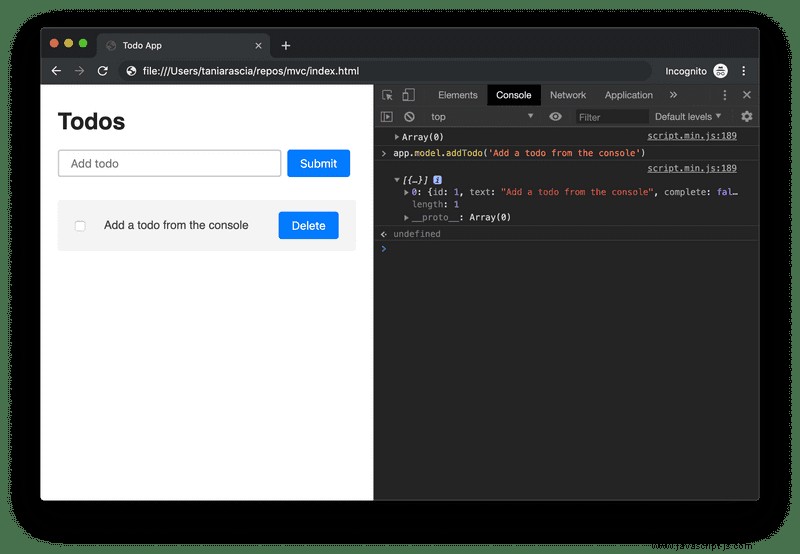
由於我們都是在瀏覽器中進行的,並且可以從窗口(全局)訪問應用程序,因此您可以輕鬆地測試它們,輸入如下內容:
app.model.addTodo('Take a nap')
將在列表中添加一個待辦事項,您可以記錄 app.model.todos 的內容 .
這對於現在的模型來說已經足夠了。最後,我們會將待辦事項存儲在本地存儲中,使其成為半永久性的,但目前待辦事項只會在您刷新頁面時刷新。
正如我們所看到的,模型只處理實際數據,並修改該數據。它不理解或不知道輸入 - 是什麼在修改它,或者 輸出 - 最終會顯示什麼。
至此,如果您通過控制台手動鍵入所有操作,並在控制台中查看輸出,那麼您就擁有了一個功能齊全的 CRUD 應用程序所需的一切。
查看
我們將通過操作 DOM 創建視圖 - 文檔對像模型。由於我們在沒有 React 的 JSX 或模板語言的幫助下使用純 JavaScript 執行此操作,因此會有點冗長和醜陋,但這就是直接操作 DOM 的本質。
控制器和模型都不應該知道任何關於 DOM、HTML 元素、CSS 或任何這些的信息。任何與它相關的東西都應該在視圖中。
我要做的第一件事就是創建輔助方法來檢索元素並創建元素。
查看class View {
constructor() {}
// Create an element with an optional CSS class
createElement(tag, className) {
const element = document.createElement(tag)
if (className) element.classList.add(className)
return element
}
// Retrieve an element from the DOM
getElement(selector) {
const element = document.querySelector(selector)
return element
}
}到目前為止,一切都很好。現在在構造函數中,我將設置視圖所需的所有內容。那將是:
- 應用的根元素 -
#root - 標題標題 -
h1 - 用於添加待辦事項的表單、輸入和提交按鈕 -
form,input,button - 待辦事項列表 -
ul
我將在構造函數中將它們全部設為變量,以便我們可以輕鬆引用它們。
查看class View {
constructor() {
// The root element
this.app = this.getElement('#root')
// The title of the app
this.title = this.createElement('h1')
this.title.textContent = 'Todos'
// The form, with a [type="text"] input, and a submit button
this.form = this.createElement('form')
this.input = this.createElement('input')
this.input.type = 'text'
this.input.placeholder = 'Add todo'
this.input.name = 'todo'
this.submitButton = this.createElement('button')
this.submitButton.textContent = 'Submit'
// The visual representation of the todo list
this.todoList = this.createElement('ul', 'todo-list')
// Append the input and submit button to the form
this.form.append(this.input, this.submitButton)
// Append the title, form, and todo list to the app
this.app.append(this.title, this.form, this.todoList)
}
// ...
}現在視圖中不會改變的部分已經設置好了。
還有兩個小東西 - 輸入(新待辦事項)值的 getter 和 resetter。
查看get _todoText() {
return this.input.value
}
_resetInput() {
this.input.value = ''
}現在所有的設置都完成了。最複雜的部分是顯示待辦事項列表,這是每次待辦事項發生變化時都會發生變化的部分。
查看displayTodos(todos) {
// ...
}
displayTodos 方法將創建 ul 和 li s 組成的待辦事項列表,並顯示它們。每次更改、添加或刪除待辦事項時,displayTodos 將使用 todos 再次調用方法 從模型中,重置列表並重新顯示它們。這將使視圖與模型狀態保持同步。
我們要做的第一件事是在每次調用時刪除所有的 todo 節點。然後,我們將檢查是否存在任何待辦事項。如果他們不這樣做,我們將顯示一個空列表消息。
查看// Delete all nodes
while (this.todoList.firstChild) {
this.todoList.removeChild(this.todoList.firstChild)
}
// Show default message
if (todos.length === 0) {
const p = this.createElement('p')
p.textContent = 'Nothing to do! Add a task?'
this.todoList.append(p)
} else {
// ...
}現在我們將遍歷待辦事項並為每個現有待辦事項顯示一個複選框、範圍和刪除按鈕。
查看else {
// Create todo item nodes for each todo in state
todos.forEach(todo => {
const li = this.createElement('li')
li.id = todo.id
// Each todo item will have a checkbox you can toggle
const checkbox = this.createElement('input')
checkbox.type = 'checkbox'
checkbox.checked = todo.complete
// The todo item text will be in a contenteditable span
const span = this.createElement('span')
span.contentEditable = true
span.classList.add('editable')
// If the todo is complete, it will have a strikethrough
if (todo.complete) {
const strike = this.createElement('s')
strike.textContent = todo.text
span.append(strike)
} else {
// Otherwise just display the text
span.textContent = todo.text
}
// The todos will also have a delete button
const deleteButton = this.createElement('button', 'delete')
deleteButton.textContent = 'Delete'
li.append(checkbox, span, deleteButton)
// Append nodes to the todo list
this.todoList.append(li)
})
}現在視圖已設置,模型已設置。我們只是沒有辦法連接它們 - 沒有事件監視用戶進行輸入,也沒有處理程序來處理此類事件的輸出。
控制台仍然作為臨時控制器存在,您可以通過它添加和刪除待辦事項。
控制器
最後,控制器是模型(數據)和視圖(用戶所見)之間的鏈接。這是我們目前在控制器中的內容。
控制器class Controller {
constructor(model, view) {
this.model = model
this.view = view
}
}
我們在視圖和模型之間的第一個鏈接是創建一個調用 displayTodos 的方法 每次待辦事項發生變化。我們也可以在 constructor 中調用一次 顯示初始待辦事項(如果有)。
class Controller {
  constructor(model, view) {
    this.model = model
    this.view = view

    // Display initial todos
    this.onTodoListChanged(this.model.todos)
  }

  onTodoListChanged = (todos) => {
    this.view.displayTodos(todos)
  }
}
控制器將在事件被觸發後處理它們。當你提交一個新的待辦事項,或點擊刪除按鈕,或點擊待辦事項的複選框時,將觸發一個事件。視圖必須監聽這些事件,因為它們是視圖的用戶輸入,但它會將響應事件所發生的事情的責任分派給控制器。
我們將為控制器中的事件創建處理程序。
控制器handleAddTodo = (todoText) => {
this.model.addTodo(todoText)
}
handleEditTodo = (id, todoText) => {
this.model.editTodo(id, todoText)
}
handleDeleteTodo = (id) => {
this.model.deleteTodo(id)
}
handleToggleTodo = (id) => {
this.model.toggleTodo(id)
}設置事件監聽器
現在我們有了這些處理程序,但控制器仍然不知道何時調用它們。我們必須在視圖中的 DOM 元素上放置事件監聽器。我們會回复submit 表單上的事件和 click 和 change 待辦事項列表上的事件。 (我現在跳過“編輯”,因為它稍微複雜一些。)
bindAddTodo(handler) {
  this.form.addEventListener('submit', event => {
    event.preventDefault()

    if (this._todoText) {
      handler(this._todoText)
      this._resetInput()
    }
  })
}

bindDeleteTodo(handler) {
  this.todoList.addEventListener('click', event => {
    if (event.target.className === 'delete') {
      const id = parseInt(event.target.parentElement.id)

      handler(id)
    }
  })
}

bindToggleTodo(handler) {
  this.todoList.addEventListener('change', event => {
    if (event.target.type === 'checkbox') {
      const id = parseInt(event.target.parentElement.id)

      handler(id)
    }
  })
}
我們需要從視圖中調用處理程序,因此我們要將監聽事件的方法綁定到視圖。
控制器this.view.bindAddTodo(this.handleAddTodo)
this.view.bindDeleteTodo(this.handleDeleteTodo)
this.view.bindToggleTodo(this.handleToggleTodo)
// this.view.bindEditTodo(this.handleEditTodo) - We'll do this one last
現在當一個 submit , click 或 change 事件發生在指定元素上,將調用相應的處理程序。
響應模型中的回調
我們遺漏了一些東西 - 事件正在偵聽,處理程序被調用,但沒有任何反應。這是因為模型不知道視圖應該更新,也不知道如何使視圖更新。我們有 displayTodos 視圖上的方法來解決這個問題,但正如前面提到的,模型和視圖不應該相互了解。
就像監聽事件一樣,模型應該回火給控制器,讓它知道發生了什麼事。
我們已經製作了 onTodoListChanged 控制器上的方法來處理這個問題,我們只需要讓模型知道它。我們將把它綁定到模型上,就像我們對視圖上的處理程序所做的那樣。
在模型中,添加 bindTodoListChanged 對於 onTodoListChanged .
bindTodoListChanged(callback) {
  this.onTodoListChanged = callback
}
然後你會在控制器中綁定它,就像在視圖中一樣。
控制器this.model.bindTodoListChanged(this.onTodoListChanged)
現在在模型中的每個方法之後,您將調用 onTodoListChanged 回調。
deleteTodo(id) {
  this.todos = this.todos.filter(todo => todo.id !== id)

  this.onTodoListChanged(this.todos)
}
添加本地存儲
至此,應用程序基本完成,所有概念都已演示。我們可以通過將數據持久化在瀏覽器的本地存儲中來讓它更持久一點,這樣刷新後會在本地持久化。
現在我們可以將初始 todo 值設置為本地存儲或空數組中的內容。
型號class Model {
constructor() {
this.todos = JSON.parse(localStorage.getItem('todos')) || []
}
}
我們將製作一個 commit 更新 localStorage 值的私有方法 以及模型狀態。
_commit(todos) {
  this.onTodoListChanged(todos)
  localStorage.setItem('todos', JSON.stringify(todos))
}
每次更改 this.todos 後 ,我們可以這樣稱呼它。
deleteTodo(id) {
  this.todos = this.todos.filter(todo => todo.id !== id)

  this._commit(this.todos)
}
添加實時編輯功能
這個難題的最後一部分是編輯現有待辦事項的能力。編輯總是比添加或刪除要復雜一些。我想讓它變得簡單,不需要編輯按鈕或替換 span 帶有 input 或任何東西。我們也不想調用 editTodo 每次輸入一個字母,因為它會重新渲染整個待辦事項列表 UI。
我決定在視圖上創建一個方法,用新的編輯值更新一個臨時狀態變量,另一個調用 handleEditTodo 更新模型的控制器中的方法。一個 input event 是當您輸入 contenteditable 時觸發的事件 元素和 focusout 當你離開 contenteditable 時觸發 元素。
constructor() {
  // ...
  this._temporaryTodoText
  this._initLocalListeners()
}

// Update temporary state
_initLocalListeners() {
  this.todoList.addEventListener('input', event => {
    if (event.target.className === 'editable') {
      this._temporaryTodoText = event.target.innerText
    }
  })
}

// Send the completed value to the model
bindEditTodo(handler) {
  this.todoList.addEventListener('focusout', event => {
    if (this._temporaryTodoText) {
      const id = parseInt(event.target.parentElement.id)

      handler(id, this._temporaryTodoText)
      this._temporaryTodoText = ''
    }
  })
}
現在,當您單擊任何待辦事項時,您將進入“編輯”模式,該模式將更新臨時狀態變量,當您在待辦事項之外進行 Tab 或單擊時,它將保存在模型中並重置臨時狀態。
只要確保綁定 editTodo 處理程序。
this.view.bindEditTodo(this.handleEditTodo)結論
你有它。一個純 JavaScript 中的無依賴 todo 應用程序,演示了模型-視圖-控制器架構的概念。這是完整的演示和源代碼的鏈接。
- 查看演示
- 查看源代碼
我希望本教程能幫助你理解 MVC。使用這種鬆耦合模式可以為應用程序添加大量樣板和抽象,但它也是一種可預測的、熟悉的模式,在許多框架中普遍使用,並且作為開發人員需要了解的一個重要概念。