快速反應原生:立即開始學習使用 JavaScript 進行原生 iOS 開發!
本書是關於開始使用 React Native 進行移動 iOS 開發的指南。您可以在 https://github.com/azat-co/react-native-quickly 找到源代碼和手稿。您可以在此處在線閱讀這本書,或者在 reactnativequickly.com 上閱讀,或者如果您喜歡視頻 ,您可以在 Node.University 觀看項目視頻:http://node.university/courses/react-native-quickly。
在本書中,我將向您介紹用於原生移動 iOS 和 Android 開發的 React Native……並且快速完成。我們將涵蓋諸如
之類的主題- 為什麼 React Native 很棒
- 為 iOS 設置 React Native 開發
- Hello World 和 React Native CLI
- 樣式和 Flexbox
- 主要的 React Native UI 組件
- 將模塊導入 Xcode 項目
- 項目:計時器
- 項目:天氣應用
這本書是關於快速開始使用 React 而不是關於 React Native,它在技術上是一個獨立的庫(或者有些人甚至可以稱之為框架)。但是,在使用 React 進行 Web 開發的八章之後,我發現通過利用這個很棒的庫將我們的知識應用到移動開發中會很有趣。你會驚訝於你已經從 React 中了解了多少 React Native 技能。
在使示例過於復雜或過於簡單之間總是存在平衡,因此不切實際和無用。在本書中準備好構建兩個移動應用程序:計時器和天氣應用程序。天氣應用程序有 3 個截屏視頻,您可以在 Node.Unversity 觀看。他們將引導您瀏覽天氣應用程序。
項目的源代碼(以及提交問題/錯誤的手稿)在 https://github.com/azat-co/react-native-quickly 存儲庫中。享受吧!
為什麼 React Native 很棒
React Native 應用程序與混合或所謂的 HTML5 應用程序不同。如果您不熟悉混合方法,那就是當網站被包裹在無頭瀏覽器中時。無頭瀏覽器是沒有 URL 欄或導航按鈕的瀏覽器視圖。基本上,開發人員使用 JavaScript、HTML 和 CSS 等常規 Web 技術以及可能使用 jQuery Mobile、Ionic、Ember 或 Backbone 等框架來構建響應式網站。然後他們將它與這個無頭瀏覽器一起打包為一個原生應用程序。最後,您可以跨平台重用相同的代碼庫,但通常缺乏使用混合應用程序的體驗。與原生應用程序相比,它們通常不那麼活潑,或者缺乏某些功能。最流行的混合應用框架包括 Sencha Touch、Apache Cordova、PhoneGap 和 Ionic。
另一方面,React Native 應用程序不是包裝在無頭瀏覽器中的網站。它是與 React 的 JavaScript 通信的原生 Objective C 或 Java 代碼。與原生開發相比,這可以帶來以下好處:
- 熱/實時重新加載。開發人員無需重新編譯即可重新加載他們的應用,從而加快了開發速度並消除了對複雜的所見即所得 (WYSIWYG) 編輯器和 IDE 的需求。
- 彈性盒佈局系統。這是一個類似於 CSS 的綜合佈局系統,允許跨平台開發。
- Chrome 調試。開發者可以使用已經熟悉的 DevTools。
- 編寫一次,即可跨平台運行。
- 輕鬆從 Web React 移植,例如使用 ComponentKit 等框架。
- 利用大量開源工具、實用程序、庫、知識、最佳實踐、ES6/7+ 以及有關 JavaScript(世界上最流行的編程語言)的書籍。
- 使用比網絡技術(HTML5/包裝器方法)更好、更強大的原生元素。
- 反應。沒有特定的數據綁定、事件管理或視圖的微觀管理,所有這些都會增加複雜性。 React 使用聲明式方法和易於擴展的單向數據流。
由於這些原因,大小公司都在跳上 React Native 的火車並放棄混合和原生方法也就不足為奇了。每天我都會閱讀博客文章,說某某公司或某些 iOS 開發人員已切換到 React Native,以及他們對這一舉措的滿意程度。您準備好開始似乎是下一代移動開發了嗎?
設置 React Native 開發
本章只討論 iOS 的 React Native 開發。我將只使用通用的跨平台組件——例如,Navigator 而不是 NavigatorIOS ——所以提供的代碼也應該適用於 Android。但是,我不會詳細介紹如何編譯 Android 項目。
如果您不使用 Mac OS X 在 Apple 硬件上工作,您可以按照本指南在 Linux 或 Windows 操作系統上安裝運行 Mac OS X 的虛擬機。展望未來,我假設我們都在使用 Mac OS X(無論是否虛擬)來構建 iOS 應用程序。
要安裝所有內容,您可以手動完成或使用包管理器。由於我們在 Mac OS X 環境中工作,我建議使用 Homebrew(又名 brew)來安裝一些必需的工具。如果你還沒有 Homebrew,你可以訪問它的網站 http://brew.sh,或者運行這個 Ruby 命令(Mac OS X 自帶 Ruby):
$ ruby -e "$(curl -fsSL https://raw.githubusercontent.com/Homebrew/install/master/install)"
我們將需要以下工具和庫:
- Node.js v5.1 和 npm v3.3.12——如果您閱讀了第 1-8 章,您應該已經擁有它們。如果您直接跳到這裡,請按照附錄 B 中的說明進行操作。
- Watchman v4.1.0——該工具將根據源代碼文件的變化進行監控和更新。使用
$ brew install [email protected]安裝它。 - Google Chrome - 該瀏覽器允許您在開發過程中調試 React Native 應用程序。這是下載鏈接。
- React Native CLI v0.1.7 - 此工具可讓您為您的 React Native 應用創建樣板。使用
$ npm install -g [email protected]安裝它 . - Xcode v7.2 - 適用於 iOS、OS X、tvOS 和 watchOS 的 IDE、編譯器和 SDK。要安裝它,請單擊 https://developer.apple.com/xcode/download 上的鏈接以打開 Mac App Store。
- Flow - JavaScript 的靜態類型檢查器。要使用 Homebrew 安裝它,請運行
$ brew install [email protected].
我建議使用 NVM v0.29.0、n 或類似的 Node 版本管理器。此步驟是可選的,但建議您這樣做,因為這意味著即使您的主版本更新,您也可以切換到 Node.js v5.1。要使用 Homebrew,請執行 $ brew install nvm 並按照說明進行操作。
您的系統應該已準備好開發 iOS 應用程序。讓我們從典型的編程示例 Hello World 開始。
[旁注]
閱讀博客文章很好,但觀看視頻課程更好,因為它們更具吸引力。
許多開發人員抱怨 Node.js 上缺乏負擔得起的高質量視頻材料。觀看 YouTube 視頻會讓人分心,花 500 美元購買 Node 視頻課程很瘋狂!
去看看 Node University,它有關於 Node 的免費視頻課程:node.university。
[旁注結束]
Hello World 和 React Native CLI
首先,導航到您想要擁有項目的文件夾。我的是 /Users/azat/Documents/Code/react/ch9/。然後運行 $ react-native init 通過創建 iOS 和 Android 項目、package.json 和其他文件和文件夾來啟動項目的終端命令:
$ react-native init hello
等待。這可能需要一些時間。此刻有幾件事正在發生。顯然,文件夾 hello 已創建。然後,該工具創建 package.json。 (我喜歡 Node 和 npm 現在無處不在。2012 年不是這樣!)在 package.json 中,react-native 全局的 CLI 放置一個本地依賴項,react-native .這類似於運行 $ npm i react-native --save .
在這一步之後,全局 react-native CLI 從 hello/node_modules/react-native/local-cli/cli.js 運行本地代碼 文件,然後運行助手 bash 腳本 hello/node_modules/react-native/init.sh .該 bash 腳本使用 index.ios.js 和 index.android.js 文件中的 React Native 代碼以及 ios 和 android 文件夾中的 iOS 和 Android 項目創建腳手架。
在 ios 文件夾中,該工具使用 Objective C 代碼創建 Xcode 項目文件。這是我們現在的重點。這是該工具創建的樣板文件夾結構:
/android
  /app
  /gradle
  - build.gradle
  - gradle.properties
  - gradlew
  - gradlew.bat
  - settings.gradle
/ios
  /hello
  /hello.xcodeproj
  /helloTests
/node_modules
  - ...
- index.android.js
- index.ios.js
- package.json
- .watchman.config
- .flowconfig
生成所有內容後,您將返回到命令提示符。我電腦上的輸出是這樣的,它甚至告訴我如何啟動應用程序:
To run your app on iOS:
   Open /Users/azat/Documents/Code/react/ch9/hello/ios/hello.xcodeproj in Xcode
   Hit the Run button
To run your app on Android:
   Have an Android emulator running (quickest way to get started), or a device connected
   cd /Users/azat/Documents/Code/react/ch9/hello
   react-native run-android
你有兩個選擇。您可以手動打開 Xcode 並從 File 菜單中選擇 Open (Command+O),打開 hello.xcodeproj 文件,然後單擊黑色矩形進行構建和運行。或者您可以使用 $ cd hello 導航到該文件夾 , 運行 $ open ios/hello.xcodeproj ,然後在Xcode中點擊“play”即可編譯運行。
如果您正確執行了這些步驟,您將看到一個顯示 React Packager 的新終端窗口。它以一條消息開頭:
 ~/Documents/Code/react/ch9/hello/node_modules/react-native/packager ~
 ┌────────────────────────────────────────────────────────────────────────────┐
 │  Running packager on port 8081.                                            │
 │                                                                            │
 │  Keep this packager running while developing on any JS projects. Feel      │
 │  free to close this tab and run your own packager instance if you          │
 │  prefer.                                                                   │
 │                                                                            │
 │  https://github.com/facebook/react-native                                  │
 │                                                                            │
 └────────────────────────────────────────────────────────────────────────────┘
Looking for JS files in
   /Users/azat/Documents/Code/react/ch9/hello

[12:15:42 PM] <START> Building Dependency Graph
[12:15:42 PM] <START> Crawling File System
[12:15:42 PM] <START> Loading bundles layout
[12:15:42 PM] <END>   Loading bundles layout (0ms)
那麼這裡發生了什麼? React Native 打包我們的 React Native JavaScript 文件並在 localhost:8081 上提供它們。沒錯,如果您在 http://localhost:8081/index.ios.bundle?platform=ios&dev=true 打開瀏覽器,它就像任何其他 Web 服務器一樣。現在在瀏覽器中打開它。搜索“你好”。您將看到 React Native 代碼捆綁在一個大文件中。對於大多數 Web 開發人員來說,這聽起來應該很熟悉。;-)
我從哪裡得到 http://localhost:8081/index.ios.bundle?platform=ios&dev=true URL?它在 hello/ios/hello/AppDelegate.m 文件中,第 34 行(您使用的版本與我相同,對吧?):
jsCodeLocation = [NSURL URLWithString:@"http://localhost:8081/index.ios.bundle?platform=ios&dev=true"];
Objective C 代碼從服務器獲取 JavaScript。這是默認選項一。還有第二個選項,目前已發表評論。它從靜態文件中獲取 JavaScript 代碼(同一文件中的第 42 行)。有選擇就好了!
評論告訴我們如何啟動服務器。這只是 $ npm start 命令,運行 $ react-native start ,所以我們也可以使用後者。所以如果你在項目之間切換或者你不想使用 Xcode 自動打開的終端進程,你總是可以啟動一個新的服務器。請記住,與任何服務器一樣,您不能讓其中兩個在同一個端口上偵聽。因此,在 localhost:8081 上啟動新服務器之前,請終止舊進程。
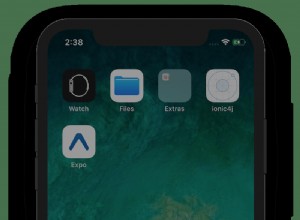
啟動模擬器窗口需要一些時間。我更喜歡使用 iPhone 6,而不是 iPhone 6 Plus。這樣我的屏幕上有更多的發展空間。現在你應該已經打開了模擬器窗口。閒逛。沒什麼可看的,如圖1所示。
繼續打開 index.io.js 文件。您可以看到熟悉的 JavaScript/Node 代碼。如果你對 ES6(或 ES2015——它的正式名稱)還不熟悉,請查看第 10 章和附錄 I。
在文件的開頭,有一條解構語句,用於從 React Native 中導入對象:
var React = require('react-native');
var {
  AppRegistry,
  StyleSheet,
  Text,
  View,
} = React;
接下來就可以看到你的好老朋友React.createClass() 使用 render 方法:
var hello = React.createClass({
    render: function() {
        return (
            <View style={styles.container}>
                <Text style={styles.welcome}>
                  Welcome to React Native!
                </Text>
                <Text style={styles.instructions}>
                  To get started, edit index.ios.js
                </Text>
                <Text style={styles.instructions}>
                    Press Cmd+R to reload,{'\n'} Cmd+D or shake for dev menu
                </Text>
             </View>
        );
    }
});
天哪,有了這樣的好評論,我很快就會倒閉——這意味著我不需要寫書了。;-) 正如他們所說,在模擬器中按 Command+R 將重新加載它。繼續並更改“歡迎使用 React Native!”到“你好世界!”保存 index.ios.js,然後在 Simulator 窗口中重新加載應用程序。
注意:如果你使用一些非標準的鍵盤佈局,比如 Dvorak 或 Colemak(就像我一樣),在 Simulator 窗口中你必須使用標準的 US 佈局來設置快捷鍵,以及輸入文本。
觀察變化並註意我們如何不必重新構建 Xcode 項目。在我們保存文件後,Watchman 更新了包。新代碼在 localhost:8081 的服務器上提供。您可以看到文本“Hello World!”如果您訪問 http://localhost:8081/index.ios.bundle?platform=ios&dev=true,則在瀏覽器中。一旦我們重新加載模擬器,新代碼就在那裡!
index.ios.js 中還有兩個更有趣的東西(然後我們將繼續單獨探索每個組件):StyleSheet 和 AppRegistry .它們不在 web React 中,所以讓我解釋一下。
樣式和彈性盒
前者是一種在元素中創建佈局、樣式和格式的方法。我們用 StyleSheet.create() 創建一個對象 .例如,這些是我們的 Hello World 樣式:
var styles = StyleSheet.create({
  container: {
    flex: 1,
    justifyContent: 'center',
    alignItems: 'center',
    backgroundColor: '#F5FCFF',
  },
  welcome: {
    fontSize: 20,
    textAlign: 'center',
    margin: 10,
  },
  instructions: {
    textAlign: 'center',
    color: '#333333',
    marginBottom: 5,
  },
});
我希望你能猜出一些屬性的含義,比如 backgroundColor 和 fontSize .它們類似於 background-color 和 font-size 在 CSS 中,你已經知道 React 使用 camelCase 而不是破折號。其他樣式屬性,例如 flex , 特定於 React Native。這就是他們的意思:
flexjustifyContentalignItems傳統知識flexDirection
樣式屬性中的數字是點,而不是像素。不同之處在於,點可以表示 1 個或更多像素,具體取決於屏幕,因此使用點可以讓開發人員從編寫 if/else 中解放出來 各種屏幕格式的條件。最值得注意的是,在 iPhone 3GS 等舊 iPhone 上,1 點是 1 像素 (1:1)。另一方面,在配備 Retina 屏幕的新 iPhone 上,例如 iPhone 6,1 點是一個 2×2 的正方形像素 (1:2)。
該文件的最後一條語句類似於 ReactDOM.render() 來自網絡 React 開發:
AppRegistry.registerComponent('hello', () => hello);
它註冊了我們的組件,hello ,在註冊表中。您可以將胖箭頭函數(第二個參數)中的名稱更改為其他任何名稱,但不要更改第一個參數。 ES6 粗箭頭在第 10 章和附錄 I 中介紹。現在,讓我們更詳細地探索 React Native 組件。
主要的 React Native UI 組件
您可能已經註意到,在 render 我們使用特殊標籤/元素的方法,例如 <View> 和 <Text> 而不是 <div> 或 <p> .那些特殊元素或 React Native 組件來自 react-native 圖書館。那裡有一大堆,我相信很快就會有更多。有特定於 iOS 和 Android 的組件以及可以跨平台工作的合成組件。通常,僅 iOS 組件具有 IOS 在他們名字的末尾(例如,NavigatorIOS ) 而通用跨平台組件沒有這樣的結尾(例如,Navigator )。
描述所有 React Native 組件需要一本書。此外,正如我之前所說,社區和 Facebook 開發人員自己不斷地不斷地添加新組件並更新現有組件。最好參考官方文檔以獲取支持組件的完整最新列表。但是,為了能夠使用 React Native 開發最小的移動應用程序,您需要學習主要(在我看來)組件。他們是:
View— 基本視圖組件。每個渲染必須至少有一個空的View.Text— 文本組件。與 web React 中的文本不同,所有文本都必須包含在此組件中。TextInput——表單輸入字段組件。使用它來捕獲用戶輸入。ScrollView— 帶有可滾動內容的視圖。當您的內容無法在一個屏幕上顯示時使用它。ListView— 使用結構化數據查看。用它來輸出列表或表格。TouchableHighlight——用戶觸摸組件。使用它來捕獲用戶觸摸事件,類似於 Web 開發中的錨標記。Switch— 布爾開/關開關。將其用於設置和表單。Navigator— 高度可定制的導航組件。使用它在屏幕之間導航並實現導航欄和/或麵包屑導航欄。
之所以選擇所有這些組件,是因為了解它們將為您提供構建一些有用的應用程序的最低限度,正如您將在 Timer 和 Weather App 項目中看到的那樣。而且,這些組件是通用的;也就是說,您可以(並且應該)將它們用於 iOS 和 Android。也許您甚至可以為 index.ios.js 和 index.android.js 使用相同的代碼庫。
對於本書的這一部分,我將使用 Timer 和 Weather App 項目中的代碼片段,以使示例比一些 foo-bars 更真實。定時器的代碼在 timer . Weather App 的代碼在 weather .
查看
正如我之前提到的,View 是最基本的組成部分。如果你不知道用什麼,那就用 View .您可以在 View 中包裝多個其他組件 ,類似於將它們包裝在 <div> , 因為 render() 必須只返回一個元素 .例如,要輸出剩餘秒數及其下方的標籤,請將它們包裝在 View 中 :
var Timer = React.createClass({
   render() {
     // ...
     return (
       <View>
         <Text style={styles.heading}>{this.props.time}</Text>
         <Text>Seconds left</Text>
       </View>
     )
    }
})
文字
Text 組件用於渲染文本。像大多數其他組件一樣,我們可以為它提供樣式。例如,這個 Text 元素使用 Flex,字體大小為 36,上邊距為 40,邊距為 10:
var TimerWrapper = React.createClass({
  // ...
  render() {
    return (
      <ScrollView>
        <View style={styles.container}>
          <Text style={styles.heading}>Timer</Text>
         ...
        </View>
      </ScrollView>
    )
  }
})

var styles = StyleSheet.create({
  ...
  heading: {
    flex: 1,
    fontSize: 36,
    paddingTop: 40,
    margin: 10
  },
  ...
})
結果如圖1所示。

方便的是,我們可以在 style 中組合兩個或多個樣式對象 使用數組的屬性。例如,這個 Text 元素使用來自 navBarText 的樣式 和 navBarButtonText :
        <Text style={[styles.navBarText, styles.navBarButtonText, ]}>
          {'<'} {previousRoute.name}
        </Text>
style 屬性和样式組合併非 Text 獨有 .您可以將它們應用到其他組件。
文本輸入
TextInput 是一個輸入字段組件。您通常會在表單中使用它來捕獲用戶輸入,例如電子郵件地址、密碼、姓名等。該組件具有一些熟悉的屬性,例如:
placeholder— 值為空時顯示的示例文本value—輸入字段的值style——一種風格屬性
其他屬性特定於 React Native。主要有:
enablesReturnKeyAutomatically——如果false(默認值),通過禁用返回鍵來防止用戶提交空文本值。onChange— 在值更改時調用的方法。將事件對像作為參數傳遞。onChangeText— 在值更改時調用的方法。將文本值作為參數傳遞。onEndEditing— 當用戶按下虛擬鍵盤上的返回鍵時調用的方法。multiline——如果true(默認為false),該字段可以包含多行。keyboardType— 枚舉器值之一,例如'default','numeric', 或'email-address'.returnKeyType— 返回鍵的枚舉數,例如'default','go','google','join','next','route','search','send','yahoo','done', 或'emergency-call'.僅限 iOS。
TextInput 的最新屬性的完整列表 對於 iOS 和 Android 位於 https://facebook.github.io/react-native/docs/textinput.html#props。
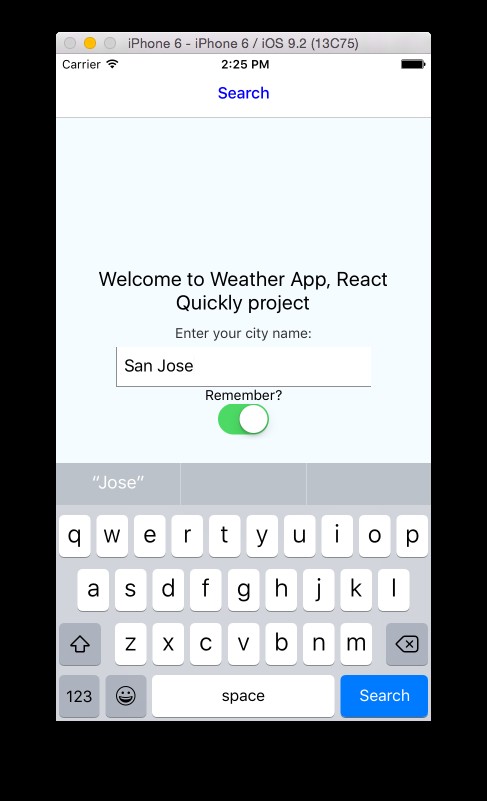
考慮這個示例,它使用處理程序 this.search 呈現城市名稱輸入字段 .鍵盤上的按鈕會說搜索,值被分配給狀態(一個受控組件!),佔位符是舊金山:
  <TextInput
    placeholder="San Francisco"
    value={this.state.cityName}
    returnKeyType="search"
    enablesReturnKeyAutomatically={true}
    onChangeText={this.handleCityName}
    onEndEditing={this.search}
    style={styles.textInput}/>
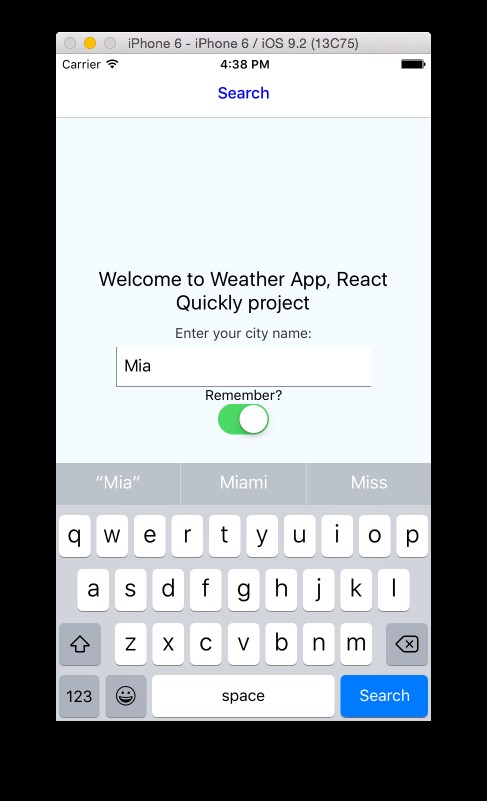
結果如圖2所示,可以觀察到虛擬鍵盤上的Search鍵。
使用 onChangeText 屬性,我們將輸入字段的值作為處理函數的參數(handleCityName(event) )。例如處理城市名稱,設置cityName的狀態 在受控組件中,我們需要實現 handleCityName 像這樣:
  ...
  handleCityName(cityName) {
    this.setState({ cityName: cityName})
  },
  ...
另一方面,如果您需要的不僅僅是文本,還有 onChange .當事件來到 onChange 處理函數,event 參數有一個名為 nativeEvent 的屬性 ,而該屬性又具有一個名為 text 的屬性 .您可以實現 onChange 像這樣的處理程序:
...
onNameChanged: function(event) {
  this.setState({ name: event.nativeEvent.text });
},
...
render() {
  return (
    <TextInput onChange={this.onNameChange} ... />
  )
}
})
滾動視圖
這是View的增強版 零件。它允許內容可滾動,因此您可以使用觸摸手勢上下滾動。當內容不適合一個屏幕時,這很有用。例如,我可以使用 ScrollView 作為我的 render() 的根 因為我知道 timerOptions 可以是一個非常大的數組,因此會渲染很多行數據(Button 組件):
var TimerWrapper = React.createClass({
  // ...
  render() {
    return (
      <ScrollView>
        <View style={styles.container}>
          <Text style={styles.heading}>Timer</Text>
          <Text style={styles.instructions}>Press a button</Text>
          <View style={styles.buttons}>
            {timerOptions.map((item, index, list)=>{
              return <Button key={index} time={item} startTimer={this.startTimer} isMinutes={this.state.isMinutes}/>
            })}
          </View>
          ...
        </View>
      </ScrollView>
    )
  }
})
列表視圖
ListView 是從提供的數據呈現行列表的視圖。在大多數情況下,您希望包裝一個 ListView 在 ScrollView .數據必須採用某種格式。使用 dataSource = new ListView.DataSource() 創建數據源對象,然後使用 dataSource.cloneWithRows(list) 使用標準 JavaScript 數組中的數據填充數據源。
這是一個例子。首先我們創建數據源對象:
let dataSource = new ListView.DataSource({
  rowHasChanged: (row1, row2) => row1 !== row2
})
然後我們使用 cloneWithRows 從數組中填充數據的方法,response.list :
this.props.navigator.push({
  name: 'Forecast',
  component: Forecast,
  passProps: {
    forecastData: dataSource.cloneWithRows(response.list),
    forecastRaw: response
  }
})
忽略 navigator 現在打電話。它會在本章後面出現。
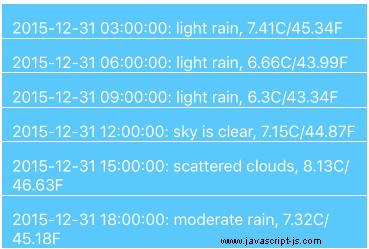
我們有了數據,現在讓我們渲染 ListView 通過提供屬性 dataSource 和 renderRow .例如,這是預測信息列表,每一行是某一天的預測。 ListView 的父級是 ScrollView :
module.exports = React.createClass({
  render: function() {
    return (
      <ScrollView style={styles.scroll}>
        <Text style={styles.text}>{this.props.forecastRaw.city.name}</Text>
        <ListView dataSource={this.props.forecastData} renderRow={ForecastRow} style={styles.listView}/>
      </ScrollView>
    )
  }
})
你可以猜到,renderRow ,即 ForecastRow 在此示例中,另一個組件負責從提供的數據源呈現單個項目。如果沒有方法或狀態,你可以創建一個無狀態組件(更多關於無狀態組件的內容在第 10 章)。在 ForecastRow ,我們輸出日期(dt_txt ), 描述 (description ) 和溫度 (temp ):
const ForecastRow = (forecast)=> {
  return (
    <View style={styles.row}>
      <View style={styles.rightContainer}>
        <Text style={styles.subtitle}></Text>
        <Text style={styles.subtitle}>
          {forecast.dt_txt}: {forecast.weather[0].description}, {forecast.main.temp}
        </Text>
       </View>
    </View>
  )
}
可以實現ListView的功能 用一個簡單的 Array.map() 構造。在這種情況下,不需要數據源。
TouchableHighlight
TouchableHighlight 捕獲用戶觸摸事件。開發人員實現類似於錨點的按鈕 (<a> ) 網頁開發中的標籤。該操作作為 onPress 的值傳遞 財產。要實現一個按鈕,我們還需要在裡面放一些文字。
例如,這是一個觸發 startTimer 的按鈕 並且具有由 time 組成的文本 屬性和單詞“分鐘”或“秒”:
var Button = React.createClass({
  startTimer(event) {
    // ...
  },
  render() {
    return (
      <TouchableHighlight onPress={this.startTimer}>
        <Text style={styles.button}>{this.props.time} {(this.props.isMinutes) ? 'minutes' : 'seconds'}</Text>
      </TouchableHighlight>
    )
  }
})
TouchableHighlight的樣式 本身什麼都不是;因此,當我們實現按鈕時,我們要么設置 TouchableHighlight 內的文本樣式 (圖 3)或使用帶有 Image 的圖像 組件。

與 TouchableHighlight 類似的組件 分別是:
TouchableNativeFeedbackTouchableOpacityTouchableWithoutFeedback
開關
您可能已經看過並使用過 Switch 組件或類似的原生元素多次。圖 9-X 顯示了一個可視化示例。這是一個與復選框沒有什麼不同的小開關。這是一個布爾開/關輸入元素,在表單和應用設置中派上用場。

實現 Switch 時 ,您至少提供兩個屬性,onValueChange 和 value (又是一個受控組件!)。例如,此切換使應用程序保存或不保存城市名稱:
      ...
        <Text>Remember?</Text>
        <Switch onValueChange={this.toggleRemember} value={this.state.isRemember}></Switch>
      ....
在處理程序 toggleRemember ,我將狀態設置為與當前this.state.isRemember相反的值 :
  // ...
  toggleRemember() {
    this.setState({ isRemember: !this.state.isRemember}, ()=>{
      // Remove the city name from the storage
      if (!this.state.isRemember) this.props.storage.removeItem('cityName')
    })
  },
  // ...
導航器
Navigator 是一個高度可定制的導航組件,用於在應用程序的屏幕之間進行導航。我們可以使用它來實現導航欄和/或麵包屑導航欄。導航欄是屏幕頂部的菜單,帶有按鈕和標題。
還有NavigatorIOS ,Facebook 不使用它,因此沒有得到社區的官方支持和維護。 NavigatorIOS 有一個內置的導航欄,但它只適用於 iOS 開發。另一個缺點是 NavigatorIOS 當這些路由的屬性發生變化時,不會刷新路由/屏幕。反之,Navigator 可以在 iOS 和 Android 上使用,它會在傳遞給它們的屬性更改時刷新路由。您可以根據自己的喜好自定義導航欄。
因為 Navigator 是靈活的,我找到了一些方法來實現它。有一種方法,您有一個路由堆棧,然後使用路由 ID 和前進/後退方法進行導航。我決定採用這種模式,它使用抽象和 NavigatorIOS 接口(passProps )。假設 App 組件是您使用 AppRegistry 註冊的組件 .然後你要渲染 Navigator 在 App 的 render 方法:
const App = React.createClass({
  render() {
    return (
      <Navigator
        initialRoute={{
          name: 'Search',
          index: 0,
          component: Search,
          passProps: {
            storage: storage
          }
        }}
        ref='navigator'
        navigationBar={
          <Navigator.NavigationBar
            routeMapper={NavigationBarRouteMapper}
            style={styles.navBar}
          />
        }
        renderScene={(route, navigator) => {
          let props = route.passProps
          props.navigator = navigator
          props.name = route.name
          return React.createElement(route.component, props)
        }}
      />
    )
  }
})
你可以觀察到 Navigator 的幾個屬性 :
initialRoute——第一個route我們渲染的對象。ref—App的屬性 將具有Navigator的元素 目的。我們可以使用它跳轉到新場景。navigationBar— 帶有標題和左右按鈕的頂部菜單。renderScene— 在每條路線的導航事件上觸發的方法。我們得到route對象並使用route.component渲染組件 和route.passProps.
導航到新屏幕,例如 Forecast (Forecast 組件)並將屬性傳遞給它,調用 navigator.push() :
        // ...
        this.props.navigator.push({
          name: 'Forecast',
          component: Forecast,
          passProps: {
            forecastData: dataSource.cloneWithRows(response.list),
            forecastRaw: response
          }
        })
        // ...
在這個例子中,我使用每個 push() 傳遞組件和道具 稱呼。如果您使用的是路由堆棧,它基本上是一個組件列表,那麼您可以只傳遞一個組件的 ID 或名稱,而不是整個對象,然後從堆棧中獲取對象。像往常一樣,給鯰魚剝皮的方法不止一種。
將模塊導入 Xcode 項目
如果你想使用社區 React Native 組件,即不屬於 react-native 的組件怎麼辦? ,但作為獨立的 npm 模塊提供?您可以將模塊導入您的項目!
在 Timer 中,我們需要在時間到時播放聲音。截至撰寫本文時(2016 年 1 月),還沒有官方的聲音組件,但有幾個用戶空間模塊。其中之一是 react-native-audioplayer .首先,在項目文件夾中使用 npm 安裝它:
$ npm install [email protected] --save
我們目前專注於iOS,所以安裝如下:
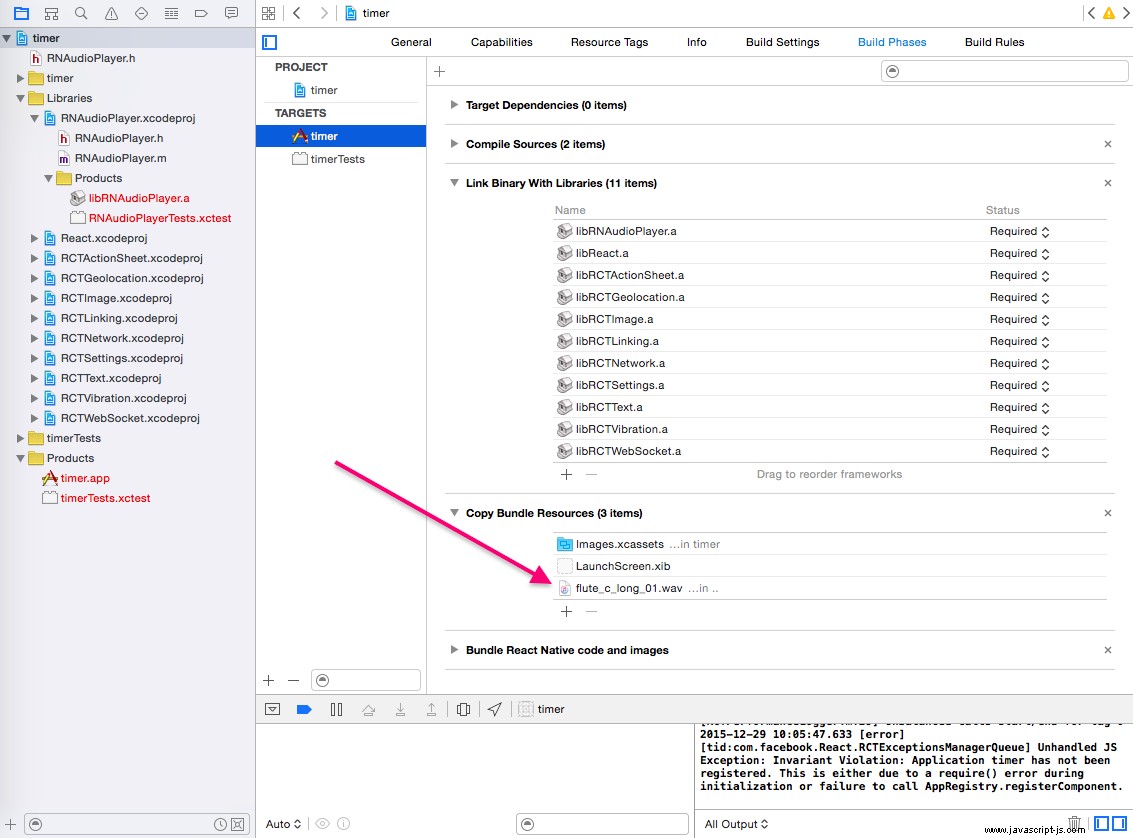
- 在 Xcode 中打開您的項目。
- 在 Xcode 中,在左側邊欄中找到 Project Navigator。
- 在項目導航器中,右鍵單擊庫。
- 在上下文菜單中,單擊將文件添加到“計時器”。 (如果需要,用另一個項目名稱代替“計時器”。)
- 導航到
node_modules/react-native-audioplayer.添加文件RNAudioPlayer.xcodeproj.結果如圖 5 所示。
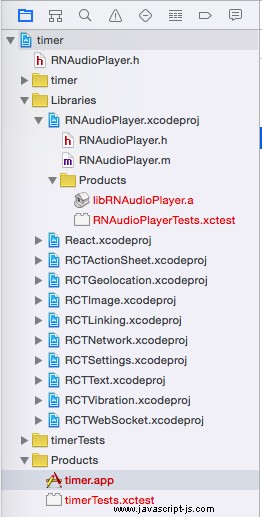
- 在項目導航器中,選擇您的項目(計時器)。
- 在 Targets 列表中單擊 timer 的構建目標(圖 9-X)。
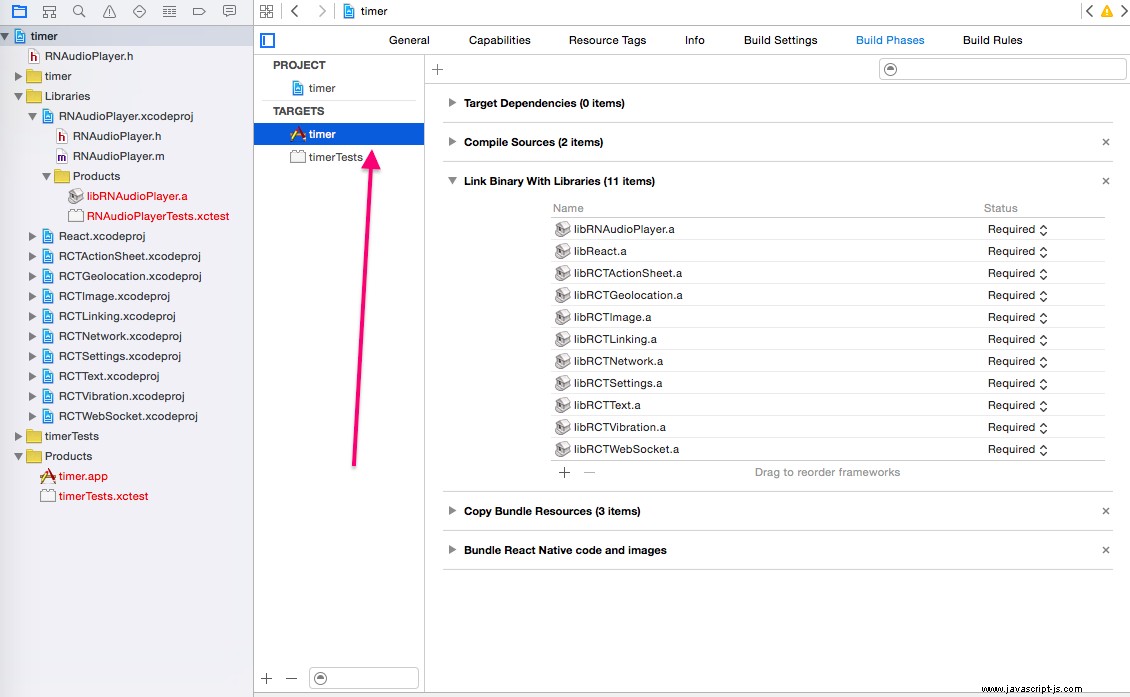
- 單擊“構建階段”選項卡將其打開。
- 通過單擊將 Link Binary With Libraries 展開。
- 單擊加號按鈕 (+) 並在 Workspace 下添加 libRNAudioPlayer.a,或者直接從 Project Navigator 中拖放 libRNAudioPlayer.a。它在
Libraries/RNAudioPlayer.xcodeproj/Products下 . - 運行您的項目(按 Command+R 或單擊表示“播放”的黑色矩形)。
如果您做的一切正確,在 index.ios.js 文件中,您可以使用 require() 導入模塊 :
AudioPlayer = require('react-native-audioplayer')
並使用 play() 播放聲音 :
AudioPlayer.play('flute_c_long_01.wav')
聲音文件需要包含在包中。為此,請選擇 Copy Bundle Resources 並添加 flute_c_long_01.wav ,或您自己的聲音文件,如圖 7 所示。
這就是所有的準備工作。現在我們可以實現Timer了!
項目:計時器
您已經看到了 Timer 應用程序中的點點滴滴(圖 8),它位於 timer 中 .我認為如果我們立即進行實施將是有益的。主文件是index.ios.js .它包含三個組件,與我的 React Quickly (Manning, 2016), (GitHub) 中的瀏覽器/Web React Timer 不同:
TimerWrapper— 一個智能組件,包含定時器的大部分邏輯Timer— 時間到時播放聲音並顯示剩餘秒數的啞組件Button— 一個顯示按鈕並通過調用父級傳遞給它的處理程序來觸發倒計時開始的組件(TimerWrapper)
我們開始 index.ios.js 文件,導入 React Native、它的對象和音頻播放器:
'use strict'

var React = require('react-native'),
  AudioPlayer = require('react-native-audioplayer')

var {
  AppRegistry,
  StyleSheet,
  Text,
  View,
  ScrollView,
  TouchableOpacity,
  Switch
} = React
下一條語句聲明了計時器按鈕的選項數組,我們將使用 Switch 將其轉換為秒數或分鐘數 :
const timerOptions = [5, 7, 10, 12, 15, 20]
我增強了 TimerWrapper 來自第 5 章項目的動態生成按鈕和秒到分鐘的切換。開關使用 isMinutes 狀態,所以讓我們將其設置為 false 一開始。提醒你一下,這個例子使用了一些 ES6+/ES2015+ 語法。如果您不熟悉或不確定是否熟悉,請查看第 10 章和附錄 I。
var TimerWrapper = React.createClass({
  getInitialState () {
    return {time: null, int: null, isMinutes: false}
  },
isMinutes的初始值 是 false . toggleTime 是 Switch 的處理程序 .我們翻轉 isMinutes 的值 與邏輯非 (! )。將時間設置為 null 很重要 ,否則每次我們撥動開關時都會觸發聲音。聲音播放以 time 為條件 是 0 ,所以如果我們將其設置為 null ,它不會播放。聲音邏輯在 Timer 零件。當我們改變 isMinutes 的狀態時,React 算法決定重新渲染它 :
  toggleTime(){
    let time = this.state.time
    if (time == 0 ) time = null
    this.setState({isMinutes: !this.state.isMinutes, time: time})
  },
下一個方法啟動計時器。如果您按照第 5 章中的項目進行操作,您就會知道它是如何工作的。 React Native 提供了一個用於定時器的 API,即 clearInterval() 和 setInterval() 作為全局對象。 time中的數字 狀態始終以秒為單位,即使我們在按鈕上看到分鐘並且開關已打開:
  startTimer(time) {
    clearInterval(this.state.int)
    var _this= this
    var int = setInterval(function() {
      console.log('2: Inside of setInterval')
      var tl = _this.state.time - 1
      if (tl == 0) clearInterval(int)
      _this.setState({time: tl})
    }, 1000)
    console.log('1: After setInterval')
    return this.setState({time: time, int: int})
  },
在 render 方法,我們使用一個簡單的 map() 生成一列按鈕的迭代器。它包含在 ScrollView 中 ,所以你真的可以用 timerOptions 通過添加更多元素來創建數組,看看發生了什麼:
  render() {
    return (
      <ScrollView>
        <View style={styles.container}>
          <Text style={styles.heading}>Timer</Text>
          <Text style={styles.instructions}>Press a button</Text>
          <View style={styles.buttons}>
            {timerOptions.map((item, index, list)=>{
              return <Button key={index} time={item} startTimer={this.startTimer} isMinutes={this.state.isMinutes}/>
            })}
          </View>
在按鈕之後,我們有一個文本標籤,上面寫著 Minutes 和 Switch 受控組件:
          <Text>Minutes</Text>
          <Switch onValueChange={this.toggleTime} value={this.state.isMinutes}></Switch>
          <Timer time={this.state.time}/>
        </View>
      </ScrollView>
    )
  }
})
我們在 TimerWrapper 中渲染的按鈕 來自這個組件。它有一個三元條件(又名 Elvis 運算符)來設置分鐘,通過將它們乘以 60(每分鐘 60 秒)或秒:
var Button = React.createClass({
  startTimer(event) {
    let time = (this.props.isMinutes) ? this.props.time*60 : this.props.time
    return this.props.startTimer(time)
  },
渲染時,我們使用 TouchableOpacity , 功能類似於 TouchableHighlight 但在視覺表示上有所不同(觸摸時它是透明的)。 There is a ternary condition to output the word “minutes” or “seconds” based on the value of the isMinutes 屬性:
  render() {
    return (
      <TouchableOpacity onPress={this.startTimer}>
        <Text style={styles.button}>{this.props.time} {(this.props.isMinutes) ? 'minutes' : 'seconds'}</Text>
      </TouchableOpacity>
    )
  }
})
The Timer component renders the number of seconds left as well as playing the sound when this number is 0 :
var Timer = React.createClass({
   render() {
     if (this.props.time == 0) {
      AudioPlayer.play('flute_c_long_01.wav')
     }
     if (this.props.time == null || this.props.time == 0) return <View><Text  style={styles.heading}> </Text></View>
     return (
       <View>
         <Text style={styles.heading}>{this.props.time}</Text>
         <Text>Seconds left</Text>
       </View>
     )
    }
})
The styles object uses Flex. In container , there’s flexDirection , set to column . It positions elements vertically, as in a column. Another value is row , which will position them horizontally.
var styles = StyleSheet.create({
  container: {
    flex: 1,
    flexDirection: 'column',
    alignItems: 'center'
  },
  heading: {
    flex: 1,
    fontSize: 36,
    paddingTop: 40,
    margin: 10
  },
  instructions: {
    color: '#333333',
    marginBottom: 15,
  },
  button: {
    color: '#111',
    marginBottom: 15,
    borderWidth: 1,
    borderColor: 'blue',
    padding: 10,
    borderRadius: 20,
    fontWeight: '600'
  },
  buttons: {
    flex: 1,
    alignItems: 'center',
    justifyContent: 'flex-start'
  }
})
Lastly, there is the register statement:
AppRegistry.registerComponent('timer', () => TimerWrapper)
Now, we can install and import the Audio Player into the Xcode project following the steps in the previous section. Don’t forget to include the sound file as well. When you’re done, navigate to the ch9/timer folder and start the local server with $ react-native start . You should see:
React packager ready.
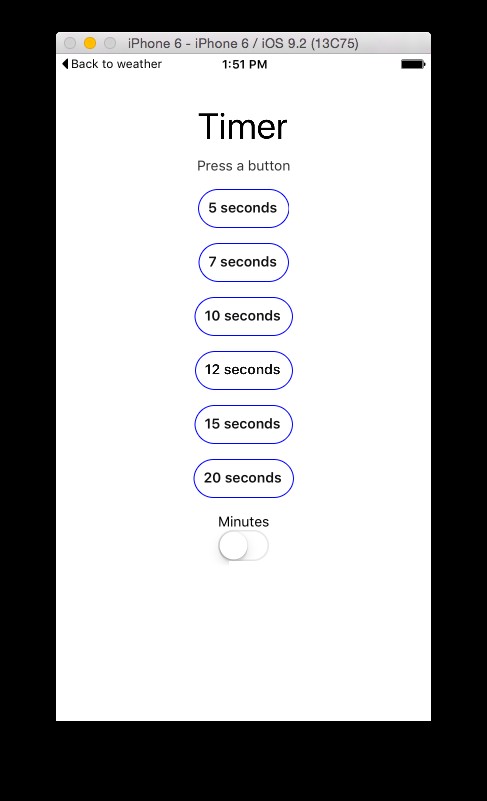
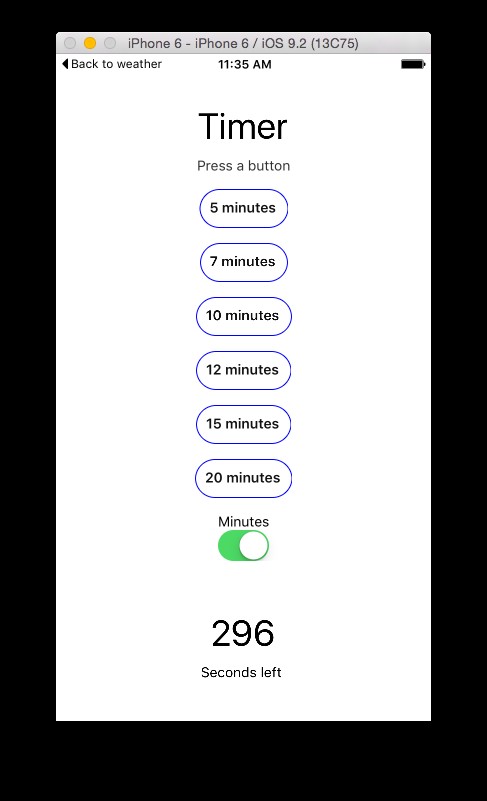
Go to your Simulator and refresh it. You should see buttons with seconds on them and the switch in the off position. Turn it on to use minutes and the buttons will change. Pressing on 5 minutes will start the countdown showing seconds left, as shown in Figure 9.
I dare you to redesign this little app (make it prettier!), publish it to the App Store, and send me the link. Maybe you can get to the top charts. Flappy Bird did.
Project:Weather App
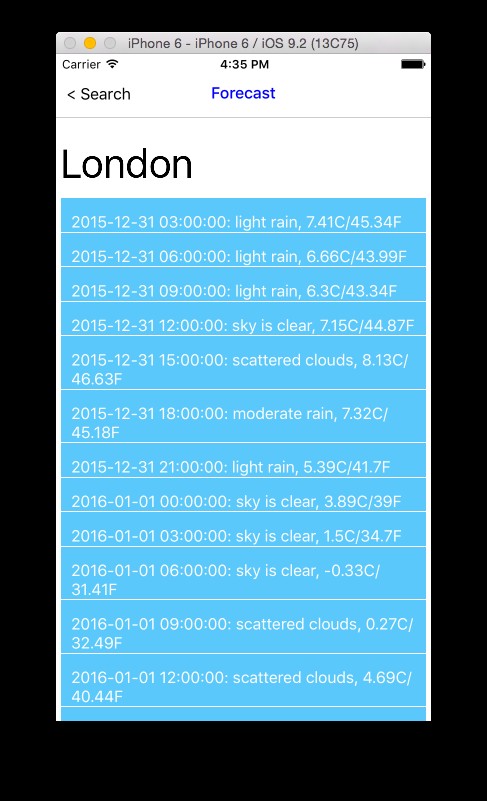
The idea of this project is to fetch weather forecasts from the OpenWeatherMap API based on the city name provided by the user (Figure 10). In this project we’ll be utilizing Navigator to switch between the screens and show a navigation menu on top with a button to go back.
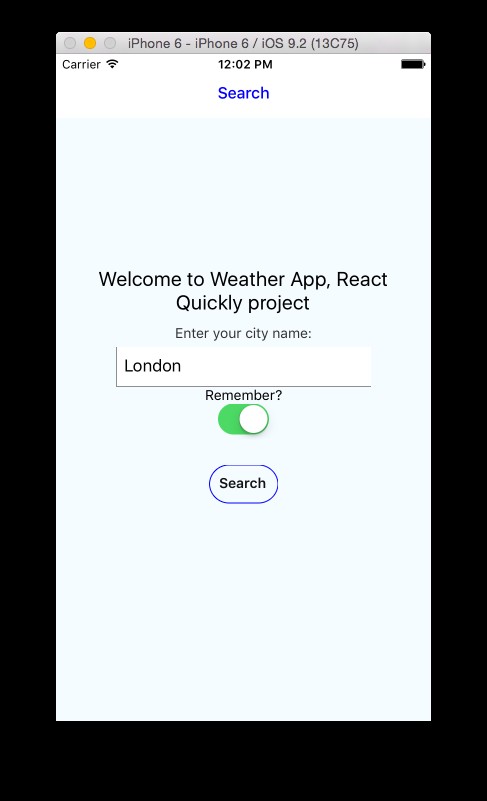
Also, there will be a “remember me” feature to save the entered city name for future uses. The persistence will be implemented with AsyncStorage .
The resulting forecast data will be shown in a grid with the date, description, and temperature in F and C, as shown in Figure 11.
To get started, use the scaffolding provided by the React Native CLI tool (if you don’t have v0.1.7, follow the instructions at the beginning of this chapter to get it):
$ react-native init weather
The command will output something like this:
This will walk you through creating a new React Native project in /Users/azat/Documents/Code/react/ch9/weather
Installing react-native package from npm...
Setting up new React Native app in /Users/azat/Documents/Code/react/ch9/weather
To run your app on iOS:
   Open /Users/azat/Documents/Code/react/ch9/weather/ios/weather.xcodeproj in Xcode
   Hit the Run button
To run your app on Android:
   Have an Android emulator running (quickest way to get started), or a device connected
   cd /Users/azat/Documents/Code/react/ch9/weather
   react-native run-android
Open the iOS project in Xcode with this command:
$ open ios/weather.xcodeproj
In addition to the already existing index.ios.js , create four files, forecast.ios.js , search.ios.js , weather-api.js , and response.json , so the project structure looks like this:
/weather
  /android
    ...
  /ios
    /weather
      /Base.Iproj
        ...
      /Images.xcassets
        ...
      - AppDelegate.h
      - AppDelegate.m
      - Info.plist
      - main.m
    /weather.xcodeproj
      /project.xcworkspace
        ...
      /xcshareddata
        ...
      /xcuserdata
        ...
      - project.pbxproj
    /weatherTests
      - Info.plist
      - weatherTests.m
  /node_modules
    ...
  - .flowconfig
  - .gitignore
  - .watchmanconfig
  - forecast.ios.js
  - index.android.js
  - index.ios.js
  - package.json
  - response.json
  - search.ios.js
  - weather-api.json
The files search.ios.js and forecast.ios.js will be the components for the first screen, which will have the input field for the city name, and the second screen, which will show the forecast, respectively. But before we start implementing Search and Forecast , let’s code the App component and the navigation that will enable us to switch between the Search and Forecast screens.
In the index.ios.js file, add the React Native classes shown in the following listing. The only classes that should be unfamiliar to you by now are AsyncStorage and PixelRatio —everything else was covered earlier in this chapter:
'use strict'

var React = require('react-native')

var {
  AppRegistry,
  StyleSheet,
  Text,
  View,
  Navigator,
  ListView,
  AsyncStorage,
  TouchableOpacity,
  PixelRatio
} = React
Import Search . The const is an ES6 thing. You can use var or learn about const and let in ES6/ES2016 cheatsheet.
const Search = require('./search.ios.js')
Now let’s create an abstraction for the storage, i.e., AsyncStorage . You can use AsyncStorage directly, but it’s better to have an abstraction like the one shown here. The AsyncStorage interface is very straightforward. It uses the getItem() , removeItem() , and setItem() 方法。 I’m sure you can guess what they mean. The only interesting part is that for getItem() we need to utilize Promise . The idea behind it is that getItem() results are asynchronous. There’s more on ES6 promises in the cheatsheet.
const storage = {
  getFromStorage(name, callback) {
    AsyncStorage.getItem(name).then((value) => {
      console.log(`AsyncStorage GET for ${name}: "${value}"`)
      if (value) callback(value)
      else callback(null)
    }).done()
  },
  setInStorage(name, value) {
    console.log(`AsyncStorage SET for ${name}: "${value}"`)
    AsyncStorage.setItem(name, value)
  },
  removeItem: AsyncStorage.removeItem
}
Remove the boilerplate component and replace it with App :
const App = React.createClass({
  render() {
    return (
The App component needs to render Navigator . We provide the Search component as the initial route:
      <Navigator
        initialRoute={{
          name: 'Search',
          index: 0,
          component: Search,
          passProps: {
            storage: storage
          }
        }}
The ref property is how we can access the Navigator instance in the App component itself. The navigator object will be in this.refs.navigator , assuming this refers to App :
ref='navigator'
The navigation bar is the menu at the top of the screen, and we render it by using the Navigator.NavigationBar component and supplying the routeMapper property (we still need to implement this):
        navigationBar={
          <Navigator.NavigationBar
            routeMapper={NavigationBarRouteMapper}
            style={styles.navBar}
          />
        }
While the navigation bar is a nice-to-have but not necessary feature, the next property is important.
It basically renders every route. In this example, I assume that the route argument has everything I need, such as components and properties. Another way to implement Navigator is to pass only IDs in route and resolve the component object from the ID by using some hash table (i.e., a route stack object).
        renderScene={(route, navigator) => {
          let props = route.passProps
You can control where the navigator object is in children by setting it to whatever property you want to use. I keep it consistent; the navigator object is placed under this.props.navigator :
          props.navigator = navigator
          props.name = route.name
After we’ve added navigator and name , the props object is ready for rendering:
return React.createElement(route.component, props)
And then, let’s close all the parentheses and tags:
        }}
      />
    )
  }
})
We are done with most of the heavy lifting. If you opted not to implement the navigation bar, you can skip NavigationBarRouteMapper . If you want to use the bar, this is how you can implement it.
The route mapper must have certain methods:LeftButton , RightButton , and Title . This pattern was inspired by the official React navigation bar example. The first method checks whether this is the initial route or not with the index == 0 健康)狀況。 Alternatively, we can check for the name of the scene, such as name == 'Search' .
var NavigationBarRouteMapper = {
  LeftButton(route, navigator, index, navState) {
    if (index == 0) return null
If we pass the first statement, we are on the Forecast. Set the previous route (Search):
var previousRoute = navState.routeStack[index - 1]
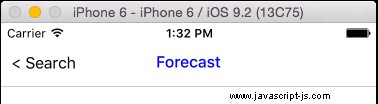
Now, return the button, which is a TouchableOpacity component with Text in it. I use angle brackets with the previous route’s name as the button label, as shown in Figure 12. You can use Next or something else. This Navigator component is highly customizable. Most likely, you’d have some nicely designed images as well.
    return (
      <TouchableOpacity
The event handler uses the pop() 方法。 Similar to Array.pop() , it removes the last element from a stack/array. The last element is the current screen, so we revert back to the previous route:
        onPress={() => navigator.pop()}
        style={styles.navBarLeftButton}>
        <Text style={[styles.navBarText, styles.navBarButtonText ]}>
          {'<'} {previousRoute.name}
        </Text>
      </TouchableOpacity>
    )
  },
We don’t need the right button in this project, but if you need it, you can implement it analogously to the left button. You might want to use a list of routes, such that you know which one is the next one based on the index of the current route.
  RightButton(route, navigator, index, navState) {
    return (
      <View/>
    )
  },
The last method is straightforward. We render the name of the route as the title. You can use the title property instead of name if you wish; just don’t forget to update it everywhere (that is, in initialRoute , renderScene , and push() in Search )。
  Title(route, navigator, index, navState) {
    return (
      <Text style={[styles.navBarText, styles.navBarTitleText]}>
        {route.name}
      </Text>
    )
  }
}
Lastly, the styles! They are easy to read. One new addition is PixelRatio . It will give us the ratio of pixels so we can control the values on a lower level:
var styles = StyleSheet.create({
  navBar: {
    backgroundColor: 'white',
    borderBottomWidth: 1 / PixelRatio.get(),
    borderBottomColor: '#CDCDCD'
  },
  navBarText: {
    fontSize: 16,
    marginVertical: 10,
  },
  navBarTitleText: {
    color: 'blue',
    fontWeight: '500',
    marginVertical: 9,
  },
  navBarLeftButton: {
    paddingLeft: 10,
  },
  navBarRightButton: {
    paddingRight: 10,
  },
  navBarButtonText: {
    color: 'black'
  }
})
Change the weather component to App in the register call:
AppRegistry.registerComponent('weather', () => App)
We are done with one file, and we have two more to go. Moving in the logical sequence of the app flow, we continue with search.ios.js by importing the objects:
'use strict'

var React = require('react-native')
const Forecast = require('./forecast.ios')

var {
  StyleSheet,
  Text,
  TextInput,
  View,
  Switch,
  TouchableHighlight,
  ListView,
  Alert
} = React
Next, we want to declare the OpenWeatherMap API key, which you can get from their website after registering as a developer. Pick the free plan unless you’re sure your app will hit the limits when it becomes number one on iTunes (or is it the App Store?). Refrain from using my keys, and get your own:
const openWeatherAppId = '2de143494c0b295cca9337e1e96b00e0',
  // This is Azat's key. Get your own!
In the event that OpenWeatherMap changes the response format or if you want to develop offline (as I do), keep the real URL commented and use the local version (weather-api.js Node.js server):
  // openWeatherUrl = 'http://api.openweathermap.org/data/2.5/forecast' // Real API
  openWeatherUrl = 'http://localhost:3000/' // Mock API, start with $ node weather-api
Because this file is imported by index.ios.js , we need to export the needed component. You can create another variable/object, but I just assign the component to module.exports for eloquence:
module.exports = React.createClass({
  getInitialState() {
When we get the initial state, we want to check if the city name was saved. If it was, then we’ll use that name and set isRemember to true , because the city name was remembered in the previous use:
    this.props.storage.getFromStorage('cityName', (cityName) => {
      if (cityName) this.setState({cityName: cityName, isRemember: true})
    })
While we wait for the asynchronous callback with the city name to be executed by the storage API, we set the value to none:
    return ({isRemember: false, cityName: ''})
  },
Next, we handle the switch by setting the state of isRemember , because it’s a controlled component:
  toggleRemember() {
    console.log('toggle: ', this.state.isRemember)
    this.setState({ isRemember: !this.state.isRemember}, ()=>{
If you remember from previous chapters (I know, it was so long ago!), setState() is actually asynchronous. We want to remove the city name if the Remember? toggle is off, so we need to implement removeItem() in the callback of setState() , and not just on the next line (we might have a race condition and the state will be old if we don’t use a callback):
      if (!this.state.isRemember) this.props.storage.removeItem('cityName')
    })
  },
On every change of the city name TextInput , we update the state. This is the handler for onChangeText , so we get the value as an argument, not the event:
  handleCityName(cityName) {
    this.setState({ cityName: cityName})
  },
The search() method is triggered by the Search button and the virtual keyboard’s “enter.” First, we define the states as local variables to eliminate unnecessary typing:
  search(event) {
    let cityName = this.state.cityName,
      isRemember = this.state.isRemember
It’s good to check that the city name is not empty. There’s a cross-platform component Alert for that:
    if (!cityName) return Alert.alert('No City Name',
      'Please enter city name',
      [{text: 'OK', onPress: () => console.log('OK Pressed!')}]
    )
The most interesting piece of logic in the entire app is how we make the external call. The answer is easy. We’ll use the new fetch API, which is already part of Chrome. We don’t care about Chrome right now too much; all we need to know is that React Native supports it. In this example, I resorted to the ES6 string interpolation (a.k.a. string template) to construct the URL. If you’re using the local server, the response will be the same (response.json ), so the URL doesn’t matter.
    fetch(`${openWeatherUrl}/?appid=${openWeatherAppId}&q=${cityName}&units=metric`, {
      method: 'GET'
    }).then((response) => response.json())
      .then((response) => {
Once we get the data, we want to store the city name. Maybe you want to do it before making the fetch 稱呼。 It’s up to you.
if (isRemember) this.props.storage.setInStorage('cityName', cityName)
The ListView will render the grid, but it needs a special object data source. Create it like this:
        let dataSource = new ListView.DataSource({
          rowHasChanged: (row1, row2) => row1 !== row2
        })
Everything is ready to render the forecast. Use the Navigator object by invoking push() and passing all the necessary properties:
        this.props.navigator.push({
          name: 'Forecast',
          component: Forecast,
passProps is an arbitrary name. I followed the NavigatorIOS syntax here. You can pick another name. For the ListView , we populate the rows from the JavaScript/Node array with cloneWithRows() :
          passProps: {
            forecastData: dataSource.cloneWithRows(response.list),
            forecastRaw: response
          }
        })
      })
      .catch((error) => {
        console.warn(error)
      })
  },
We are done with the methods of Search . Now we can render the elements:
  render: function() {
    return (
      <View style={styles.container}>
        <Text style={styles.welcome}>
          Welcome to Weather App, React Quickly project
        </Text>
        <Text style={styles.instructions}>
          Enter your city name:
        </Text>
The next element is a TextInput for the city name. It has two callbacks, onChangeText , which triggers handleCityName , and onEndEditing , which calls search :
        <TextInput
          placeholder="San Francisco"
          value={this.state.cityName}
          returnKeyType="search"
          enablesReturnKeyAutomatically={true}
          onChangeText={this.handleCityName}
          onEndEditing={this.search} style={styles.textInput}/>
The last few elements are the label for the switch, the switch itself, and the Search button:
        <Text>Remember?</Text>
        <Switch onValueChange={this.toggleRemember} value={this.state.isRemember}></Switch>
        <TouchableHighlight onPress={this.search}>
          <Text style={styles.button}>Search</Text>
        </TouchableHighlight>
      </View>
    )
  }
})
And of course the styles—without them, the layout and fonts will be all skewed. The properties are self-explanatory for the most part, so we won’t go into detail on them.
var styles = StyleSheet.create({
  navigatorContainer: {
    flex: 1
  },
  container: {
    flex: 1,
    justifyContent: 'center',
    alignItems: 'center',
    backgroundColor: '#F5FCFF',
  },
  welcome: {
    fontSize: 20,
    textAlign: 'center',
    margin: 10,
  },
  instructions: {
    textAlign: 'center',
    color: '#333333',
    marginBottom: 5,
  },
  textInput: {
    borderColor: '#8E8E93',
    borderWidth: 0.5,
    backgroundColor: '#fff',
    height: 40,
    marginLeft: 60,
    marginRight: 60,
    padding: 8,
  },
  button: {
    color: '#111',
    marginBottom: 15,
    borderWidth: 1,
    borderColor: 'blue',
    padding: 10,
    borderRadius: 20,
    fontWeight: '600',
    marginTop: 30
  }
})
So, we invoke the push() method from the Search component when we press Search. This will trigger an event in the Navigator element:namely renderScene , which renders the forecast. Let’s implement it. I promise, we are almost done!
The forecast.ios.js file starts with importations. By now, if this is unfamiliar to you, I am powerless.
'use strict'

var React = require('react-native')
var {
  StyleSheet,
  Text,
  TextInput,
  View,
  ListView,
  ScrollView
} = React
I wrote this function, mostly for Americans, to calculate F from C . It’s probably not very precise, but it’ll do for now:
const fToC = (f) => {
  return Math.round((f - 31.996)*100/1.8)/100
}
The ForecastRow component is stateless (more on stateless components in chapter 10). Its sole purpose is to render a single forecast item:
const ForecastRow = (forecast)=> {
  return (
    <View style={styles.row}>
      <View style={styles.rightContainer}>
        <Text style={styles.subtitle}></Text>
        <Text style={styles.subtitle}>
In the row, we output the date (dt_txt ), description (rainy or sunny), and temperatures in C and F (figure 9-X). The latter is achieved by invoking the fToC function defined earlier in this file:
          {forecast.dt_txt}: {forecast.weather[0].description}, {forecast.main.temp}C/{fToC(forecast.main.temp)}F
        </Text>
       </View>
    </View>
  )
}
The result will look as shown in figure 9-X.
Next, we export the Forecast component, which is a ScrollView with Text and a ListView :
module.exports = React.createClass({
  render: function() {
    return (
      <ScrollView style={styles.scroll}>
        <Text style={styles.text}>{this.props.forecastRaw.city.name}</Text>
The ListView takes dataSource and renderRow properties to render the grid. The data source must be of a special type. It cannot be a plain JavaScript/Node array:
        <ListView dataSource={this.props.forecastData} renderRow={ForecastRow} style={styles.listView}/>
      </ScrollView>
    )
  }
})
And the styles. Tadaah!
var styles = StyleSheet.create({
  listView: {
    marginTop: 10,
  },
  row: {
    flex: 1,
    flexDirection: 'row',
    justifyContent: 'center',
    alignItems: 'center',
    backgroundColor: '#5AC8FA',
    paddingRight: 10,
    paddingLeft: 10,
    marginTop: 1
  },
  rightContainer: {
    flex: 1
  },
  scroll: {
    flex: 1,
    padding: 5
  },
  text: {
    marginTop: 80,
    fontSize: 40
  },
  subtitle: {
    fontSize: 16,
    fontWeight: 'normal',
    color: '#fff'
  }
})
The last final touch is if you’re working offline and using a local URL. There are two files you need to have:
- response.json—Response to the real API call for London
- weather-api.js—Ultra-minimalistic Node web server that takes response.json and serves it to a client
Go ahead and copy response.json from GitHub. Then implement this Node.js server using only the core modules (I love Express or Swagger, but using them here is an overkill):
var http = require('http'),
  forecastData = require('./response.json')

http.createServer(function(request, response){
  response.end(JSON.stringify(forecastData))
}).listen(3000)
Start the server with $ node weather-api , bundle the React Native code with $ react-native start , and reload the Simulator. The bundler and the server must be running together, so you might need to open a new tab or a window in your terminal app/iTerm.
Note:if you get an “Invariant Violation:Callback with id 1–5” error, make sure you don’t have the Chrome debugger opened more than once.
You should see an empty city name field. That’s okay, because this is the first time you’ve launched the app. I intentionally left the logs in the storage implementation. You should see the following when you open DevTools in the Chrome tab for debugging React Native (it typically opens automatically once you enable it by going to Hardware->Shake Gestures->Debug in Chrome—not that you are going to shake your laptop!):
AsyncStorage GET for cityName: "null"
Play with the toggle, enter a name (Figure 13), and get the weather report. The app is done. Boom! Now put some nice UI on it and ship it!
Quiz
- How do you create a new React Native project:create files manually, or run
$ npm init,$ react-native init, or$ react native init? - What type of data does a
ListViewtake:array, object, or data source? (Data source) - One of the benefits of React Native vs. native development is that React Native has the live reload ability. True or false? (True)
- You can use any CSS in the styles of the React Native
StyleSheetobject. True or false? (False) - Which Objective C file can you switch the React Native bundle location in:bundle.cc, AppDelegate.m, AppDelegate.h, package.json, or index.ios.js? (AppDelegate.m)
Actions
Learning just by reading is not as effective as learning by reading and then doing.是的。 Even a good book like this. So take action NOW to solidify the knowledge.
- Watch React Native Quickly screencasts at Node.Unversity which will walk you through the Weather app
- Run Weather and Timer on your computer from the source code
- Change text such as button labels or menu names, see results in the Simulator
- Change a sound file in Timer
- Add geolocation to Weather (see Geolocation)
總結
This was a been a quick book, but we covered not not just one but two projects. In addition to that, we’ve also covered:
- How React Native is glued to the Objective C code in Xcode projects
- Main components, such as
View,Text,TextInput,Touchables, andScrollView - Implementing an app with
Navigator - How to persist the data locally on the device
- Using the
fetchAPI to communicate with an external HTTP REST API server (you can use the same method to persist the data on the external server, or do a login or logout)
React Native is an amazing piece of technology. I was really surprised, in a positive way, once I started learning and using it. There’s a lot of evidence that React Native may become the next de facto way of developing mobile apps. The live reload feature can enable developers to push code to their apps without resubmitting them to the App Store—cool, right?
Quiz Answers
$ react-native initbecause manual file creation is tedious and prone to errors- Data source
- True
- False
- AppDelegate.m