使用帶有進度條的 Vue 路由器延遲加載路由
簡介
默認情況下,在編寫 Vue.js 單頁應用程序 (SPA) 時,所有必要的資產(例如 JavaScript 和 CSS 文件)會在頁面加載時一起加載。在處理大文件時,這可能會導致用戶體驗不佳。
在 Webpack 的幫助下 ,可以使用 import() 在 Vue.js 中按需加載頁面 功能 而不是 import 關鍵字 .
為什麼按需加載?
Vue.js 中的典型 SPA 將所有功能和資產打包並交付在一起,以允許用戶使用應用程序而無需刷新頁面。如果您沒有明確地將應用程序設計為按需加載頁面,那麼所有頁面將立即加載,或者提前預取/預加載,使用不必要的帶寬並減慢頁面加載速度。
這對於具有許多頁面的大型 SPA 尤其不利。互聯網連接速度慢或手機等低端設備的用戶體驗會很差。通過按需加載,用戶永遠不需要下載超過他們需要的內容。
Vue.js 沒有為動態模塊提供任何加載指示器。即使使用預取和預加載 - 也沒有視覺指示器讓用戶知道加載情況。我們還將添加一個進度條來改善用戶體驗。
準備項目
首先,我們需要一種讓進度條與 Vue Router 通信的方法。為此,我們將使用 事件總線模式 .
事件總線基本上是一個單例 Vue 實例。由於所有 Vue 實例都有一個使用 $on 的事件系統 和 $emit ,我們可以使用它在應用程序的任何位置傳遞事件。
讓我們創建一個新文件,eventHub.js 在 components 目錄:
import Vue from 'vue'
export default new Vue()
現在,我們將配置 Webpack 以禁用預取和預加載。我們可以為每個功能單獨執行此操作,也可以全局禁用它。創建一個 vue.config.js 根目錄下的文件,並添加禁用預取和預加載的配置:
module.exports = {
    chainWebpack: (config) => {
        // Disable prefetching and preloading
        config.plugins.delete('prefetch')
        config.plugins.delete('preload')
    },
}
添加路由和頁面
我們將使用 Vue 路由器。為此,我們將使用 npx 安裝它:
$ npx vue add router
現在,讓我們編輯我們的路由器文件,通常位於 router/index.js 下 並更新我們的路線以使用 import() 函數,而不是 import 聲明:
這是默認配置:
import About from '../views/About.vue'
{
    path: '/about',
    name: 'About',
    component: About
},
我們已將其更改為:
{
    path: '/about',
    name: 'About',
    component: () => import('../views/About.vue')
},
如果您更喜歡選擇按需加載哪些頁面而不是全局禁用預取和預加載,請使用特殊的 Webpack 註釋而不是在 vue.config.js 中配置 Webpack :
import(
    /* webpackPrefetch: true */
    /* webpackPreload: true */
    '../views/About.vue'
)
import()的主要區別 和 import 是用 import() 加載的 ES 模塊嗎 在運行時加載,而那些加載了 import 在編譯期間加載。這意味著我們可以使用 import() 延遲加載模塊 並僅在必要時加載。
實現進度條
由於無法準確估計頁面何時加載(或者是否會加載),我們無法真的 做一個進度條。也沒有辦法檢查頁面加載了多少。我們可以做什麼 是創建一個在頁面加載時完成的進度條。
中間的一切並不能真正反映進度,所以在大多數情況下,所描繪的進度只是隨機跳躍。
讓我們安裝 lodash.random 首先,因為我們將在進度條生成過程中使用該包來選擇一些隨機數:
$ npm i lodash.random
然後,讓我們創建一個 Vue 組件 - components/ProgressBar.vue :
<template>
    <div :class="{'loading-container': true, loading: isLoading, visible: isVisible}">
        <div class="loader" :style="{ width: progress + '%' }">
            <div class="light"></div>
        </div>
        <div class="glow"></div>
    </div>
</template>
免費電子書:Git Essentials
查看我們的 Git 學習實踐指南,其中包含最佳實踐、行業認可的標準以及隨附的備忘單。停止谷歌搜索 Git 命令並真正學習 它!
現在,對於該組件,我們將添加一個腳本。在該腳本中,我們將首先導入 random 和 $eventHub ,因為我們將使用這些:
<script>
import random from 'lodash.random'
import $eventHub from '../components/eventHub'
</script>
現在,在導入之後,在同一個腳本中,我們可以定義一些我們將要使用的變量:
// Assume that loading will complete under this amount of time.
const defaultDuration = 8000
// How frequently to update
const defaultInterval = 1000
// 0 - 1. Add some variation to how much the bar will grow at each interval
const variation = 0.5
// 0 - 100. Where the progress bar should start from.
const startingPoint = 0
// Limiting how far the progress bar will get to before loading is complete
const endingPoint = 90
有了這些,讓我們編寫異步加載組件的邏輯:
export default {
    name: 'ProgressBar',

    data: () => ({
        isLoading: true, // Once loading is done, start fading away
        isVisible: false, // Once animate finish, set display: none
        progress: startingPoint,
        timeoutId: undefined,
    }),

    mounted() {
        $eventHub.$on('asyncComponentLoading', this.start)
        $eventHub.$on('asyncComponentLoaded', this.stop)
    },

    methods: {
        start() {
            this.isLoading = true
            this.isVisible = true
            this.progress = startingPoint
            this.loop()
        },

        loop() {
            if (this.timeoutId) {
                clearTimeout(this.timeoutId)
            }
            if (this.progress >= endingPoint) {
                return
            }
            const size = (endingPoint - startingPoint) / (defaultDuration / defaultInterval)
            const p = Math.round(this.progress + random(size * (1 - variation), size * (1 + variation)))
            this.progress = Math.min(p, endingPoint)
            this.timeoutId = setTimeout(
                this.loop,
                random(defaultInterval * (1 - variation), defaultInterval * (1 + variation))
            )
        },

        stop() {
            this.isLoading = false
            this.progress = 100
            clearTimeout(this.timeoutId)
            const self = this
            setTimeout(() => {
                if (!self.isLoading) {
                    self.isVisible = false
                }
            }, 200)
        },
    },
}
在 mounted() 函數你會看到我們正在使用事件總線來監聽異步組件加載。一旦路由器告訴我們已經導航到一個尚未加載的頁面,它就會開始加載動畫。
最後,讓我們為其添加一些樣式:
<style scoped>
.loading-container {
    font-size: 0; /* remove space */
    position: fixed;
    top: 0;
    left: 0;
    height: 5px;
    width: 100%;
    opacity: 0;
    display: none;
    z-index: 100;
    transition: opacity 200;
}

.loading-container.visible {
    display: block;
}
.loading-container.loading {
    opacity: 1;
}

.loader {
    background: #23d6d6;
    display: inline-block;
    height: 100%;
    width: 50%;
    overflow: hidden;
    border-radius: 0 0 5px 0;
    transition: 200 width ease-out;
}

.loader > .light {
    float: right;
    height: 100%;
    width: 20%;
    background-image: linear-gradient(to right, #23d6d6, #29ffff, #23d6d6);
    animation: loading-animation 2s ease-in infinite;
}

.glow {
    display: inline-block;
    height: 100%;
    width: 30px;
    margin-left: -30px;
    border-radius: 0 0 5px 0;
    box-shadow: 0 0 10px #23d6d6;
}

@keyframes loading-animation {
    0% {
        margin-right: 100%;
    }
    50% {
        margin-right: 100%;
    }
    100% {
        margin-right: -10%;
    }
}
</style>
現在,讓我們添加我們的 ProgressBar 到我們的 App.vue 或佈局組件,只要它與路由器視圖位於同一組件中即可。我們希望它在應用的整個生命週期中都可用:
<template>
    <div>
        <progress-bar></progress-bar>
        <router-view></router-view>
        <!--- your other components -->
    </div>
</template>

<script>
import ProgressBar from './components/ProgressBar.vue'
export default {
       components: { ProgressBar },
}
</script>
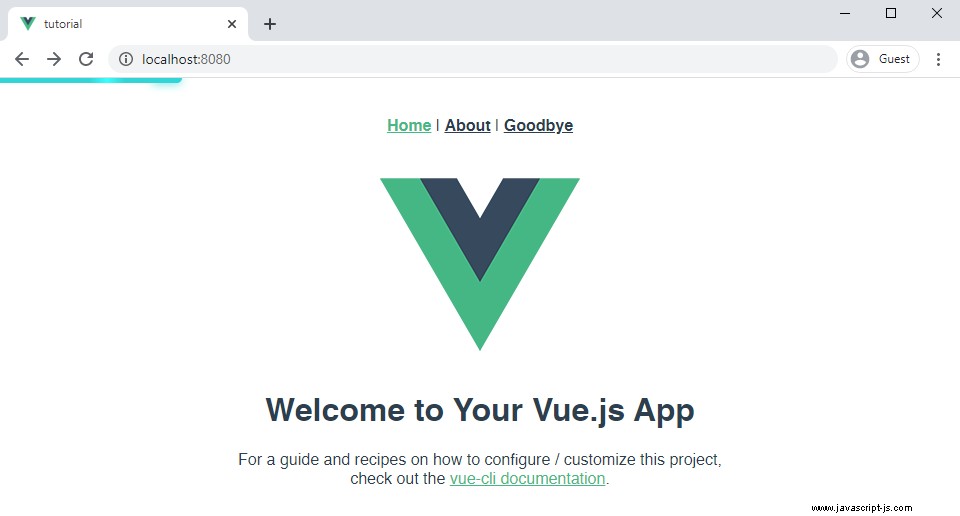
這一切都會產生一個光滑的進度條,如下所示:

觸發延遲加載頁面的進度條
我們的 ProgressBar 正在事件總線上監聽異步組件加載事件。當某些東西以這種方式加載時,我們會想要觸發動畫。讓我們為路由器添加一個路由保護來接收這些事件:
import $eventHub from '../components/eventHub'

router.beforeEach((to, from, next) => {
    if (typeof to.matched[0]?.components.default === 'function') {
        $eventHub.$emit('asyncComponentLoading', to) // Start progress bar
    }
    next()
})

router.beforeResolve((to, from, next) => {
    $eventHub.$emit('asyncComponentLoaded') // Stop progress bar
    next()
})
要檢測頁面是否延遲加載,我們需要檢查組件是否定義為動態導入,即 component: () => import('...') 而不是component: MyComponent .
這是通過 typeof to.matched[0]?.components.default === 'function' 完成的 .使用 import 加載的組件 語句不會被歸類為函數。
結論
在本文中,我們探討了延遲加載某些頁面的需求。我們在 Vue 應用程序中禁用了預取和預加載,並創建了一個進度條組件,用於模擬加載頁面時的實際進度。


