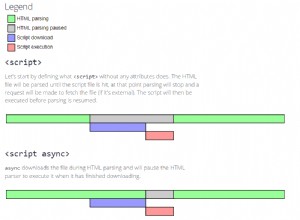
帶有 Twitter Bootstrap 的 Dropbox 文件上傳器
幾週前,Dropbox 推出了一項簡潔的新功能——Dropbox 選擇器。通過將其嵌入您的網站,您可以為用戶提供一個按鈕,通過該按鈕他們可以從在線存儲中附加文件。
今天我們將使用這個功能來創建一個簡單的應用程序,它允許人們從他們的 Dropbox 帳戶中附加一張照片,使用 Jcrop 插件裁剪一個區域,然後下載結果。此外,我們將使用 Twitter Bootstrap 顯示對話框窗口,並在後端使用 PHP 進行實際的照片裁剪。
HTML
首先,這是我們將使用的 HTML 文檔。在頭部,我包含了 bootstrap 的樣式表、Jcrop 插件和我們的自定義 CSS 文件。在頁腳中,我們有 Dropbox JavaScript 庫、jQuery、Bootstrap、Jcrop 和 script.js ,我們將在下一節中寫到。
index.html
<!DOCTYPE html>
<html>
    <head>
        <meta charset="utf-8" />
        <title>Dropbox File Uploader With Twitter Bootstrap | Tutorialzine </title>

        <!-- The stylesheets -->
        <link rel="stylesheet" href="assets/css/bootstrap.min.css"  />
        <link rel="stylesheet" href="assets/Jcrop/jquery.Jcrop.min.css" />
        <link rel="stylesheet" href="assets/css/styles.css"  />
    </head>
    <body>

        <div id="main">

            <input type="dropbox-chooser" name="selected-file" id="db-chooser"
                        data-link-type="direct" class="hide" />
            <div id="content"></div>
            <button class="btn btn-inverse hide" type="button"
                        id="cropButton">Crop Image</button>

            <!-- Bootstrap Modal Dialogs -->

            <div id="cropModal" class="modal hide fade" role="dialog"
                        aria-hidden="true">
                <div class="modal-header">
                    <button type="button" class="close" data-dismiss="modal"
                        aria-hidden="true">×</button>
                    <h4>Your cropped image</h4>
                </div>
                <div class="modal-body center"></div>
                <div class="modal-footer">
                    <button class="btn" data-dismiss="modal" aria-hidden="true">Close</button>
                </div>
            </div>

            <div id="errorModal" class="modal hide fade" role="dialog" aria-hidden="true">
                <div class="modal-header">
                    <h4></h4>
                </div>
                <div class="modal-footer">
                    <button class="btn btn-danger" data-dismiss="modal"
                        aria-hidden="true">OK</button>
                </div>
            </div>

            <div id="progressModal" class="modal hide fade" role="dialog" aria-hidden="true">
                <div class="progress progress-striped active">
                    <div class="bar" style="width: 100%;"></div>
                </div>
            </div>

        </div>

        <!-- JavaScript Includes -->
        <script src="https://www.dropbox.com/static/api/1/dropbox.js"
            id="dropboxjs" data-app-key="z4ylr6z1qlivll4"></script>
        <script src="http://code.jquery.com/jquery-1.8.3.min.js"></script>
        <script src="assets/js/bootstrap.min.js"></script>
        <script src="assets/Jcrop/jquery.Jcrop.min.js"></script>
        <script src="assets/js/script.js"></script>

    </body>
</html>
在文檔的正文中,我們還有 Twitter Bootstrap 將用來顯示模式對話框的標記。我們有三個具有唯一 ID 的模式:#cropModal , #errorModal 和 #progressModal .它們通過簡單的 jQuery 函數調用顯示(稍後會詳細介紹)。
熟悉標記,因為它是 Bootstrap 的標準。模態框可能有可選的頁眉、正文和頁腳,它們的樣式是適當的。您可以在其中放入任何您想要的 HTML。通過指定類,您可以更改對話框的行為。 aria-hidden 屬性用於隱藏屏幕閱讀器的內容。按鈕有 data-dismiss="modal" 屬性,它告訴引導程序它應該在它們上綁定一個事件監聽器,並在它們被點擊時關閉模態窗口。
jQuery
jQuery 的工作是監聽 Dropbox 按鈕上的事件,用選定的圖像初始化 Jcrop,並向 crop.php 發送 AJAX 請求 .以下是代碼的高級概述:
assets/js/script.js
$(document).ready(function() {
var cropButton = $('#cropButton'),
dbChooser = $("#db-chooser"),
errorModal = $('#errorModal'),
errorMessage = errorModal.find('h4'),
progressBar = $('#progressModal'),
cropModal = $('#cropModal'),
content = $('#content');
var coordinates, src,
name, type,
imgWidth, imgHeight,
newWidth, newHeight,
ratio, jcrop;
dbChooser.on("DbxChooserSuccess", function(e) {
// Here we will listen when a file is
// chosen from dropbox, insert it into the page
// and initialize the Jcrop plugin
});
function showCropButton(c) {
// This function will called when we want to show
// the crop button. This is executed when we have
// made a selection with Jcrop.
}
function showError(err){
// This function will display an error dialog
}
cropButton.click(function() {
// This will send an AJAX requst to crop.php
// with the dimensions of the crop area and
// the URL of the image.
});
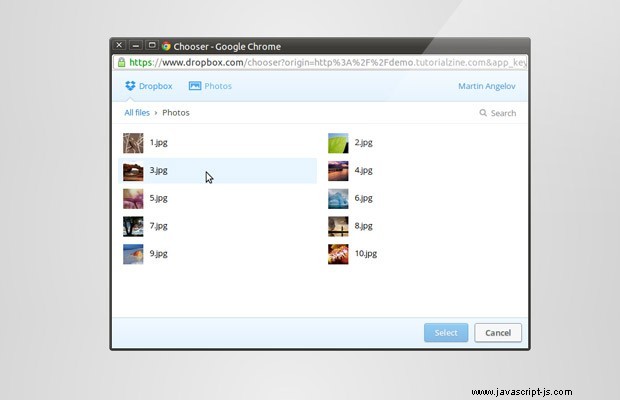
}); 第一步是為您的 Dropbox 選擇器創建一個密鑰。我不得不說,這是我見過的最簡單和經過深思熟慮的開發人員頁面 - 生成應用程序密鑰直接嵌入其中並且易於使用。只需點擊“創建新應用 " 設置部分中的鏈接並填寫您的詳細信息(域字段應包含您將在其上使用按鈕的域;出於開發目的,您可能還希望包括本地主機)。這將為您提供一個密鑰和嵌入代碼您可以在您的頁面上使用 - 在 index.html 中將其替換為我的。
現在我們有了一個功能按鈕,我們必須為成功事件設置一個事件監聽功能。事件對象將包含來自 Dropbox 的圖片 url,以及文件大小、名稱和縮略圖等屬性:
dbChooser.on("DbxChooserSuccess", function(e) {
// Assigning the original event object, so we have access
//to the files property passed by Dropbox:
e = e.originalEvent;
name = e.files[0].name;
src = e.files[0].link;
type = name.split('.');
type = type[1] || '';
if (type.toLowerCase() != 'jpg') {
showError('This file type is not supported! Choose a jpg.');
return false;
}
if (e.files[0].bytes > 1024*1024) {
showError('Please choose an image smaller than 1MB!');
return false;
}
// If we have previously initialized jCrop:
if(jcrop){
jcrop.destroy();
cropButton.hide();
}
progressBar.modal('show');
var img = $('<img>');
img.load(function() {
imgWidth = img.width();
imgHeight = img.height();
if (imgWidth >= 575 || imgHeight >= 575) {
// The image is too large, resize it to fit a 575x575 square!
if (imgWidth > imgHeight) { // Wide
ratio = imgWidth / 575;
newWidth = 575;
newHeight = imgHeight / ratio;
} else { // Tall or square
ratio = imgHeight / 575;
newHeight = 575;
newWidth = imgWidth / ratio;
}
} else {
ratio = 1;
newHeight = imgHeight;
newWidth = imgWidth;
}
// Remove the old styles
img.removeAttr('style');
// Set the new width and height
img.width(newWidth).height(newHeight);
// Initialize jCrop
img.Jcrop({
onChange : showCropButton,
onSelect : showCropButton
}, function(){
// Save the jCrop instance locally
jcrop = this;
});
// Hide the progress bar
progressBar.modal('hide');
});
// Show the image off screen, so we can
// calculate the width and height properly
img.css({
'position' : 'absolute',
'top' : -100000,
'left' : -100000,
'visibility' : 'hidden',
'display' : 'block'
});
// Set the SRC attribute and trigger the load
// function when the image is downloaded
content.html(img.attr('src', src));
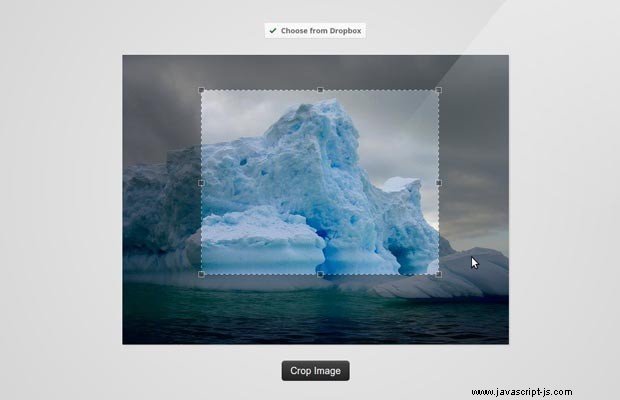
}); 當用戶使用 Jcrop 進行選擇時,showCropButton 使用包含坐標、寬度和高度的對象調用回調(有關更多示例,請參見文檔)。在該函數中,我們顯示或隱藏 #cropButton 元素取決於所選區域的大小。
function showCropButton(c) {
    if (c.w == 0 || c.h == 0) {
        cropButton.hide();
    } else {
        cropButton.show();
        coordinates = c;
    }
}
最後我們只需要編寫顯示錯誤和發送 AJAX 請求的函數。
function showError(err){
    errorMessage.text(err);
    errorModal.modal('show');
}

cropButton.click(function() {

    coordinates.x = Math.round(coordinates.x * ratio);
    coordinates.y = Math.round(coordinates.y * ratio);
    coordinates.w = Math.round(coordinates.w * ratio);
    coordinates.h = Math.round(coordinates.h * ratio);

    progressBar.modal('show');

    $.post('crop.php', {

        'coordinates' : coordinates,
        'src' : src

    }, function(r) {

        // Notice the "one" method - this
        // executes the callback only once

        progressBar.modal('hide').one('hidden', function() {

            cropModal.find('.modal-body').html('<img src="' + r + '" >');

            setTimeout(function() {
                cropModal.modal('show');
            }, 500);

        });

    });
});
偉大的!我們現在有一個工作示例。我們現在要做的就是裁剪圖像。為此,我們將編寫一個簡短的 PHP 腳本。
PHP
此腳本將接收 POST AJAX 請求 ,帶有原始 Dropbox 圖像的 URL 和裁剪區域的坐標。然後它將使用 GD 庫函數來調整它的大小並將其寫入磁盤。退出前會回顯給crop的臨時名稱,由jQuery顯示。
crop.php
$filename_length = 10;
$dir = 'tmp/'; // where to store the cropped images

if ($_SERVER['REQUEST_METHOD'] == 'POST' && isset($_POST['src'])) {

    $src = $_POST['src'];
    $coordinates = $_POST['coordinates'];

    $url = parse_url($src);
    $info = get_headers($src, 1);

    // Only allow photos from dropbox
    if ($url['host'] == 'dl.dropbox.com') {

        if ($info['Content-Type'] == 'image/jpeg' && $info['Content-Length'] < 1024*1024) {

            // Cache the remote file locally
            $cache = $dir . md5($src);

            if(!file_exists($cache)){
                file_put_contents($cache, file_get_contents($src));
            }

            // Original image
            $img = imagecreatefromjpeg($cache);

            // New image with the width and height of the crop
            $dst = imagecreatetruecolor($coordinates['w'], $coordinates['h']);

            // Copy and resize it depending on the crop area
            imagecopyresampled($dst, $img, 0, 0, $coordinates['x'], $coordinates['y'],
                $coordinates['w'], $coordinates['h'], $coordinates['w'], $coordinates['h']);

            // Generate a temporary name and write the file to disk
            $name = substr(str_shuffle("0123456789abcdefghijklmnopqrstuvwxyz".
                        "ABCDEFGHIJKLMNOPQRSTUVWXYZ"), 0, $filename_length);
            imagejpeg($dst, $dir . $name . '.jpg');

            // Print it for jQuery
            echo $dir . $name . '.jpg';

        } else {
            echo 1;
        }
    } else {
        echo 2;
    }

}
至此,我們的 Dropbox 照片上傳和裁剪示例就完成了!
完成!
本教程是許多技術協同工作的示例。我們使用了 Dropbox Chooser、Twitter Bootstrap、Jcrop、jQuery、AJAX 和 PHP 以及 GD 函數來創建這個圖像裁剪演示,我希望它對你有用。