將 jQuery 代碼轉換為插件
當談到有效地組織 jQuery 代碼時,最好的選擇之一是將它的某些部分變成一個插件。這樣做有很多好處——您的代碼變得更容易修改和遵循,並且可以自然地處理重複性任務。這也提高了您的開發速度,因為插件組織促進了代碼重用。
這就是為什麼今天我們要演示將代碼轉換為插件的過程。我們將從我們的 jQuery 和 CSS3 選擇替換教程中獲取代碼,並將其變成一個可以使用的 jQuery 插件。
理念
編寫一個 jQuery 插件一點也不難。您需要擴展 $.fn 具有您自己的功能的對象。然而,更困難的是找到一種方法來正確構建代碼,以便您的插件易於嵌入和使用,而無需依賴。
以下是我們在將教程代碼轉換為jQuery插件時需要解決的幾個問題:
- 我們需要讓用戶能夠控制為下拉菜單生成哪些標記。例如,教程代碼在很大程度上依賴於 data- 的存在 屬性,其中包含 HTML 標記。這太具體了,無法包含在插件中,因此我們需要將其排除在實現之外;
- 由於調用插件的方式,我們需要重寫代碼,使其使用傳遞給插件的“this”對象,而不是硬編碼選擇器。這也使得一次轉換多個選擇元素成為可能;
- 我們需要將插件的 JavaScript 和 CSS 代碼提取到單獨的文件中,以便於嵌入和重新分發。
代碼
正如您在本教程中所記得的那樣,我們的 jQuery 代碼會掃描 select 的選項元素並構建一個無序列表。在此過程中,它還會在包含圖像 URL 和要在列表中使用的描述的選項中查找許多數據屬性。
但是,這對於插件來說太具體了。我們需要讓用戶能夠覆蓋此功能。為了解決這個問題,我們可以允許用戶將函數作為參數傳遞給插件,插件將生成標記。如果不傳遞這樣的參數,我們將使用fall back to a default,它基本上是把選項元素的文本直接變成一個列表項。
讓我們把它寫成代碼:
(function($){

    $.fn.tzSelect = function(options){
        options = $.extend({
            render : function(option){
                return $('<li>',{
                    html : option.text()
                });
            },
            className : ''
        },options);

    // More code will be added here.

    }
})(jQuery);
渲染函數接受一個 option 元素 (包含在 select 中的那種 ),並返回一個 li 元素,該元素被插件直接包含在下拉列表中。這解決了上面列出的問題 #1。
在我們繼續解決問題之前#2 ,讓我們看看我們的插件將如何被調用:
$(document).ready(function(){
    $('select').tzSelect();
});
在上面的示例代碼中,您可以看到我們將插件應用於每個 select 頁面上的元素。我們可以通過遍歷“this " 傳遞給插件的對象:
return this.each(function(){

            // The "this" points to the current select element:

            var select = $(this);

            var selectBoxContainer = $('<div>',{
                width       : select.outerWidth(),
                className   : 'tzSelect',
                html        : '<div class="selectBox"></div>'
            });

            var dropDown = $('<ul>',{className:'dropDown'});
            var selectBox = selectBoxContainer.find('.selectBox');

            // Looping though the options of the original select element

            if(options.className){
                dropDown.addClass(options.className);
            }

            select.find('option').each(function(i){
                var option = $(this);

                if(i==select.attr('selectedIndex')){
                    selectBox.html(option.text());
                }

                // As of jQuery 1.4.3 we can access HTML5
                // data attributes with the data() method.

                if(option.data('skip')){
                    return true;
                }

                // Creating a dropdown item according to the
                // data-icon and data-html-text HTML5 attributes:

                var li = options.render(option);

                li.click(function(){

                    selectBox.html(option.text());
                    dropDown.trigger('hide');

                    // When a click occurs, we are also reflecting
                    // the change on the original select element:
                    select.val(option.val());

                    return false;
                });

                dropDown.append(li);
            });

            selectBoxContainer.append(dropDown.hide());
            select.hide().after(selectBoxContainer);

            // Binding custom show and hide events on the dropDown:

            dropDown.bind('show',function(){

                if(dropDown.is(':animated')){
                    return false;
                }

                selectBox.addClass('expanded');
                dropDown.slideDown();

            }).bind('hide',function(){

                if(dropDown.is(':animated')){
                    return false;
                }

                selectBox.removeClass('expanded');
                dropDown.slideUp();

            }).bind('toggle',function(){
                if(selectBox.hasClass('expanded')){
                    dropDown.trigger('hide');
                }
                else dropDown.trigger('show');
            });

            selectBox.click(function(){
                dropDown.trigger('toggle');
                return false;
            });

            // If we click anywhere on the page, while the
            // dropdown is shown, it is going to be hidden:

            $(document).click(function(){
                dropDown.trigger('hide');
            });

        });
上面的片段與我們今天轉換的教程代碼幾乎相同。一個顯著的變化是我們分配了 $(this) 到選擇變量(第 5 行),它曾經是 $('select.makeMeFancy') (硬編碼的選擇器),大大限制了代碼的範圍。
另一個變化是,我們不是直接生成下拉列表,而是調用作為參數傳遞的渲染函數(第 51 行)。
當我們結合上面的時候,我們就得到了插件的完整源代碼:
tzSelect/jquery.tzSelect.js
(function($){

    $.fn.tzSelect = function(options){
        options = $.extend({
            render : function(option){
                return $('<li>',{
                    html : option.text()
                });
            },
            className : ''
        },options);

        return this.each(function(){

            // The "this" points to the current select element:

            var select = $(this);

            var selectBoxContainer = $('<div>',{
                width       : select.outerWidth(),
                className   : 'tzSelect',
                html        : '<div class="selectBox"></div>'
            });

            var dropDown = $('<ul>',{className:'dropDown'});
            var selectBox = selectBoxContainer.find('.selectBox');

            // Looping though the options of the original select element

            if(options.className){
                dropDown.addClass(options.className);
            }

            select.find('option').each(function(i){
                var option = $(this);

                if(i==select.attr('selectedIndex')){
                    selectBox.html(option.text());
                }

                // As of jQuery 1.4.3 we can access HTML5
                // data attributes with the data() method.

                if(option.data('skip')){
                    return true;
                }

                // Creating a dropdown item according to the
                // data-icon and data-html-text HTML5 attributes:

                var li = options.render(option);

                li.click(function(){

                    selectBox.html(option.text());
                    dropDown.trigger('hide');

                    // When a click occurs, we are also reflecting
                    // the change on the original select element:
                    select.val(option.val());

                    return false;
                });

                dropDown.append(li);
            });

            selectBoxContainer.append(dropDown.hide());
            select.hide().after(selectBoxContainer);

            // Binding custom show and hide events on the dropDown:

            dropDown.bind('show',function(){

                if(dropDown.is(':animated')){
                    return false;
                }

                selectBox.addClass('expanded');
                dropDown.slideDown();

            }).bind('hide',function(){

                if(dropDown.is(':animated')){
                    return false;
                }

                selectBox.removeClass('expanded');
                dropDown.slideUp();

            }).bind('toggle',function(){
                if(selectBox.hasClass('expanded')){
                    dropDown.trigger('hide');
                }
                else dropDown.trigger('show');
            });

            selectBox.click(function(){
                dropDown.trigger('toggle');
                return false;
            });

            // If we click anywhere on the page, while the
            // dropdown is shown, it is going to be hidden:

            $(document).click(function(){
                dropDown.trigger('hide');
            });

        });
    }

})(jQuery);
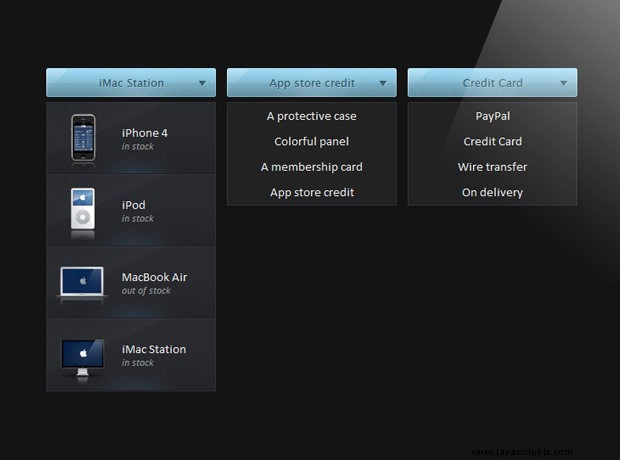
將此插件放在單獨的文件中可以解決問題#3 .然而,正如我之前提到的,我們故意省略了使用 data- 的代碼 屬性以使插件更便攜。作為補償,我們需要在調用插件時傳遞一個自定義的渲染函數,如下圖所示(這也是demo中使用的代碼)。
script.js
$(document).ready(function(){

    $('select.makeMeFancy').tzSelect({
        render : function(option){
            return $('<li>',{
                html:   '<img src="'+option.data('icon')+'" /><span>'+
                        option.data('html-text')+'</span>'
            });
        },
        className : 'hasDetails'
    });

    // Calling the default version of the dropdown
    $('select.regularSelect').tzSelect();

});
有了這個我們的jQuery插件就完成了!
總結
遵循這些簡單的步驟,您可以輕鬆地將雜亂無章的 jQuery 代碼轉換為結構化且可供重用的插件。當然,這確實需要一些工作,但從長遠來看,這種努力會得到很多倍的回報。