使用 React 製作你的第一個 Web 應用程序
React 最近獲得了很多人氣,並吸引了一個龐大而活躍的社區。這會產生大量可重用的組件,從而節省您編碼的時間。該庫本身鼓勵編寫模塊化和可組合的鬆散耦合代碼。
在本教程中,我將向您展示如何創建一個小型應用程序以及如何將其拆分為相互通信的離散組件。作為基礎,我們將使用上個月的 npm 驅動的網站示例,但我們將使用 React 方式。比較結果很有趣——React 版本的代碼比 jQuery 版本多幾行,但我們都同意它組織得更好。
你需要了解的關於 React 的知識
- 它是一個流行的用於構建用戶界面的客戶端庫/框架,由 Facebook 開發和使用。
- 使用它,您可以圍繞離散組件組織應用程序,每個組件都處理自己的渲染和狀態。組件可以相互嵌套。
- React 速度很快,因為它最大限度地減少了對 DOM 的寫入次數(任何客戶端應用程序中最慢的部分)。
- 推薦的編寫 React 代碼的方法是使用 JSX - JavaScript 的擴展,它將組件呈現為 HTML 元素。 JSX 需要編譯成 JS 才能在瀏覽器中工作。
- 在撰寫本文時它還沒有達到 1.0 版,因此未來可能會有變化。
- 我們有一篇很好的文章,其中包含學習反應的示例,您可以查看。這裡還有官方的入門指南。
我們將建造什麼
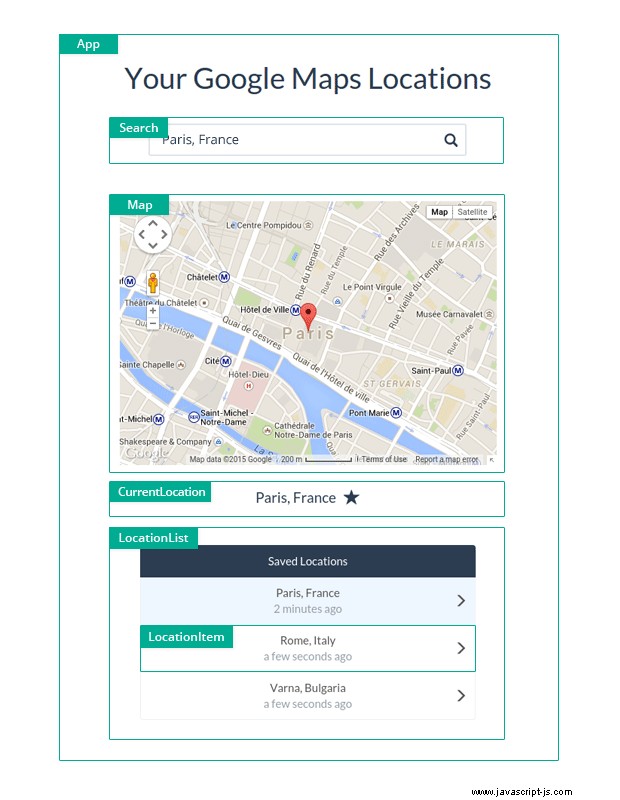
我們將創建一個簡單的 Web 應用程序,邀請人們搜索位置並將其存儲在瀏覽器的 localStorage 中。這些位置將在 GMaps 插件的幫助下顯示在谷歌地圖上。我們將使用帶有 Flatly 主題的 Bootstrap 作為界面。在此過程中,我們會將應用程序分解為邏輯組件,並讓它們相互通信。
運行演示
如果您不想閱讀整個教程,可以繼續從上面的下載按鈕下載源代碼。要運行它,您需要安裝 Node.js 和 npm。假設你有,這是你需要做的:
- 從上面的按鈕下載帶有源代碼的 zip。
- 將其解壓縮到您計算機上某處的文件夾中。
- 打開一個新終端(命令提示符),然後導航到該文件夾。
- 執行
npm install.這將下載並安裝所有需要的依賴項。 - 執行
npm run build.這會將反應組件編譯成一個名為compiled.js的常規JavaScript文件。 - 在瀏覽器中打開 index.html。您應該會看到該應用。
我為您準備了另外一個 npm 命令,以使您的開發更容易:
npm run watch
這會將 JSX 代碼編譯為 JavaScript,並將繼續監視它的更改。如果您更改文件,代碼將自動為您重新編譯。您可以在 package.json 中看到這些命令 文件。
源代碼簡單易懂,註釋很多,喜歡閱讀源代碼的朋友可以跳過本文的其餘部分。
設置
正如我所提到的,編寫 React 代碼的推薦方法是使用名為 JSX 的 JavaScript 擴展,它需要轉換為 JavaScript。有一些工具可以做到這一點,但我推薦的是 reactify - 一個 browserify 轉換。因此,除了將 JSX 編譯為 JavaScript 之外,您還可以訪問 require() node.js 調用,並具有從 npm 安裝和使用庫的能力。
要設置 reactify、browserify 等,請運行以下命令:
npm install browserify reactify watchify uglify-js react
要創建一個可以在線發布的生產就緒和縮小的 JavaScript 文件,請在終端中運行以下命令:
NODE_ENV=production browserify -t [ reactify --es6 ] main.js | uglifyjs > compiled.min.js
Reactify 通過 --es6 支持一組有限的新 ES6 功能 flag,我在源代碼中使用過(稍後你會看到)。
開發時,使用如下命令:
watchify -v -d -t [ reactify --es6 ] main.js -o compiled.js
Watchify 將監視您的文件的更改並在需要時重新編譯您的源代碼。它還啟用了源映射,因此您可以使用 Chrome 調試器來單步調試您的代碼。
偉大的!您現在可以編寫 React 模塊、require() npm 庫,甚至可以使用一些 ES6 功能。你已經準備好寫一些代碼了!
代碼
以下是我們將要編寫的組件:
- 應用 是主要成分。它包含用戶可以執行的操作的方法,例如搜索、將位置添加到收藏夾等等。其他組件嵌套在其中。
- 當前位置 在地圖中顯示當前訪問的地址。點擊星形圖標可以在收藏夾中添加或刪除地址。
- 位置列表 呈現所有喜歡的位置。它為每個創建一個 LocationItem。
- 位置項 是一個單獨的位置。單擊它時,會在地圖中搜索並突出顯示其對應的地址。
- 地圖 與 GMaps 庫集成,並從 Google Maps 呈現地圖。
- 搜索 是一個環繞搜索表單的組件。提交後,將觸發對位置的搜索。
App.js
首先是應用程序。除了 React 需要的生命週期方法之外,它還有一些額外的方法來反映用戶可以執行的主要操作,例如從收藏夾和搜索中添加和刪除地址。請注意,我使用較短的 ES6 語法來定義對像中的函數。
var React = require('react');

var Search = require('./Search');
var Map = require('./Map');
var CurrentLocation = require('./CurrentLocation');
var LocationList = require('./LocationList');

var App = React.createClass({

    getInitialState(){

        // Extract the favorite locations from local storage

        var favorites = [];

        if(localStorage.favorites){
            favorites = JSON.parse(localStorage.favorites);
        }

        // Nobody would get mad if we center it on Paris by default

        return {
            favorites: favorites,
            currentAddress: 'Paris, France',
            mapCoordinates: {
                lat: 48.856614,
                lng: 2.3522219
            }
        };
    },

    toggleFavorite(address){

        if(this.isAddressInFavorites(address)){
            this.removeFromFavorites(address);
        }
        else{
            this.addToFavorites(address);
        }

    },

    addToFavorites(address){

        var favorites = this.state.favorites;

        favorites.push({
            address: address,
            timestamp: Date.now()
        });

        this.setState({
            favorites: favorites
        });

        localStorage.favorites = JSON.stringify(favorites);
    },

    removeFromFavorites(address){

        var favorites = this.state.favorites;
        var index = -1;

        for(var i = 0; i < favorites.length; i++){

            if(favorites[i].address == address){
                index = i;
                break;
            }

        }

        // If it was found, remove it from the favorites array

        if(index !== -1){

            favorites.splice(index, 1);

            this.setState({
                favorites: favorites
            });

            localStorage.favorites = JSON.stringify(favorites);
        }

    },

    isAddressInFavorites(address){

        var favorites = this.state.favorites;

        for(var i = 0; i < favorites.length; i++){

            if(favorites[i].address == address){
                return true;
            }

        }

        return false;
    },

    searchForAddress(address){

        var self = this;

        // We will use GMaps' geocode functionality,
        // which is built on top of the Google Maps API

        GMaps.geocode({
            address: address,
            callback: function(results, status) {

                if (status !== 'OK') return;

                var latlng = results[0].geometry.location;

                self.setState({
                    currentAddress: results[0].formatted_address,
                    mapCoordinates: {
                        lat: latlng.lat(),
                        lng: latlng.lng()
                    }
                });

            }
        });

    },

    render(){

        return (

            <div>
                <h1>Your Google Maps Locations</h1>

                <Search onSearch={this.searchForAddress} />

                <Map lat={this.state.mapCoordinates.lat} lng={this.state.mapCoordinates.lng} />

                <CurrentLocation address={this.state.currentAddress}
                    favorite={this.isAddressInFavorites(this.state.currentAddress)}
                    onFavoriteToggle={this.toggleFavorite} />

                <LocationList locations={this.state.favorites} activeLocationAddress={this.state.currentAddress}
                    onClick={this.searchForAddress} />

            </div>

        );
    }

});

module.exports = App;
在 render 方法中,我們初始化其他組件。每個組件只接收完成其工作所需的數據,作為屬性。在某些地方,我們還傳遞了子組件將調用的方法,這是組件進行通信同時保持彼此隔離的好方法。
CurrentLocation.js
接下來是CurrentLocation .該組件在 H4 標籤中顯示當前顯示位置的地址,以及一個可點擊的星形圖標。點擊圖標時,App的toggleFavorite 方法被調用。
var React = require('react');

var CurrentLocation = React.createClass({

    toggleFavorite(){
        this.props.onFavoriteToggle(this.props.address);
    },

    render(){

        var starClassName = "glyphicon glyphicon-star-empty";

        if(this.props.favorite){
            starClassName = "glyphicon glyphicon-star";
        }

        return (
            <div className="col-xs-12 col-md-6 col-md-offset-3 current-location">
                <h4 id="save-location">{this.props.address}</h4>
                <span className={starClassName} onClick={this.toggleFavorite} aria-hidden="true"></span>
            </div>
        );
    }

});

module.exports = CurrentLocation;
LocationList.js
位置列表 獲取傳遞給它的最喜歡位置的數組,創建一個 LocationItem 每個對象,並將其呈現在 Bootstrap 列表組中。
var React = require('react');
var LocationItem = require('./LocationItem');

var LocationList = React.createClass({

    render(){

        var self = this;

        var locations = this.props.locations.map(function(l){

            var active = self.props.activeLocationAddress == l.address;

            // Notice that we are passing the onClick callback of this
            // LocationList to each LocationItem.

            return <LocationItem address={l.address} timestamp={l.timestamp}
                    active={active} onClick={self.props.onClick} />
        });

        if(!locations.length){
            return null;
        }

        return (
            <div className="list-group col-xs-12 col-md-6 col-md-offset-3">
                <span className="list-group-item active">Saved Locations</span>
                {locations}
            </div>
        )

    }

});

module.exports = LocationList;
LocationItem.js
位置項 代表個人最喜歡的位置。它使用時刻庫來計算自該位置被添加為收藏後的相對時間。
var React = require('react');
var moment = require('moment');

var LocationItem = React.createClass({

    handleClick(){
        this.props.onClick(this.props.address);
    },

    render(){

        var cn = "list-group-item";

        if(this.props.active){
            cn += " active-location";
        }

        return (
            <a className={cn} onClick={this.handleClick}>
                {this.props.address}
                <span className="createdAt">{ moment(this.props.timestamp).fromNow() }</span>
                <span className="glyphicon glyphicon-menu-right"></span>
            </a>
        )

    }

});

module.exports = LocationItem;
Map.js
地圖 是一個特殊的組件。它包裝了 Gmaps 插件,它本身不是 React 組件。通過掛鉤到地圖的 componentDidUpdate 方法,我們可以在#map裡面初始化一個真實的地圖 div 每當顯示的位置改變時。
var React = require('react');

var Map = React.createClass({

    componentDidMount(){

        // Only componentDidMount is called when the component is first added to
        // the page. This is why we are calling the following method manually.
        // This makes sure that our map initialization code is run the first time.

        this.componentDidUpdate();
    },

    componentDidUpdate(){

        if(this.lastLat == this.props.lat && this.lastLng == this.props.lng){

            // The map has already been initialized at this address.
            // Return from this method so that we don't reinitialize it
            // (and cause it to flicker).

            return;
        }

        this.lastLat = this.props.lat;
        this.lastLng = this.props.lng

        var map = new GMaps({
            el: '#map',
            lat: this.props.lat,
            lng: this.props.lng
        });

        // Adding a marker to the location we are showing

        map.addMarker({
            lat: this.props.lat,
            lng: this.props.lng
        });
    },

    render(){

        return (
            <div className="map-holder">
                <p>Loading...</p>
                <div id="map"></div>
            </div>
        );
    }

});

module.exports = Map;
Search.js
搜索 組件由一個帶有輸入組的 Bootstrap 表單組成。提交表單時,應用程序的 searchForAddress 方法被調用。
var React = require('react');

var Search = React.createClass({

    getInitialState() {
        return { value: '' };
    },

    handleChange(event) {
        this.setState({value: event.target.value});
    },

    handleSubmit(event){

        event.preventDefault();

        // When the form is submitted, call the onSearch callback that is passed to the component

        this.props.onSearch(this.state.value);

        // Unfocus the text input field
        this.getDOMNode().querySelector('input').blur();
    },

    render() {

        return (
            <form id="geocoding_form" className="form-horizontal" onSubmit={this.handleSubmit}>
                <div className="form-group">
                    <div className="col-xs-12 col-md-6 col-md-offset-3">
                        <div className="input-group">
                            <input type="text" className="form-control" id="address" placeholder="Find a location..."
                            value={this.state.value} onChange={this.handleChange} />
                            <span className="input-group-btn">
                                <span className="glyphicon glyphicon-search" aria-hidden="true"></span>
                            </span>
                        </div>
                    </div>
                </div>
            </form>
        );

    }
});

module.exports = Search;
main.js
剩下的就是添加 App 組件到頁面。我使用 #main 將它添加到容器 div id(你可以在 index.html 中看到這個元素 在可下載的 zip 文件中)。
var React = require('react');
var App = require('./components/App');

React.render(
  <App />,
  document.getElementById('main')
);
除了這些文件之外,我還包含了 GMaps 庫和它所依賴的 Google Maps JavaScript API,作為 index.html 中的